How To Use JEB – Analyze an obfuscated win32 crypto clipper

We’re kicking off a malware analysis series explaining how to use JEB Decompiler to perform reverse engineering tasks ranging from out-of-the-box actions to complex use cases requiring scripts or custom plugins.

In this first entry, we look at a Windows malware compiled for x86 32-bit targets. The malware is an Ethereum cryptocurrency stealer. It monitors and intercepts clipboard activity to find and replace wallet addresses by an address of its own — presumably, one controlled by the malware authors to collect stolen ether.

Quick look at the malware

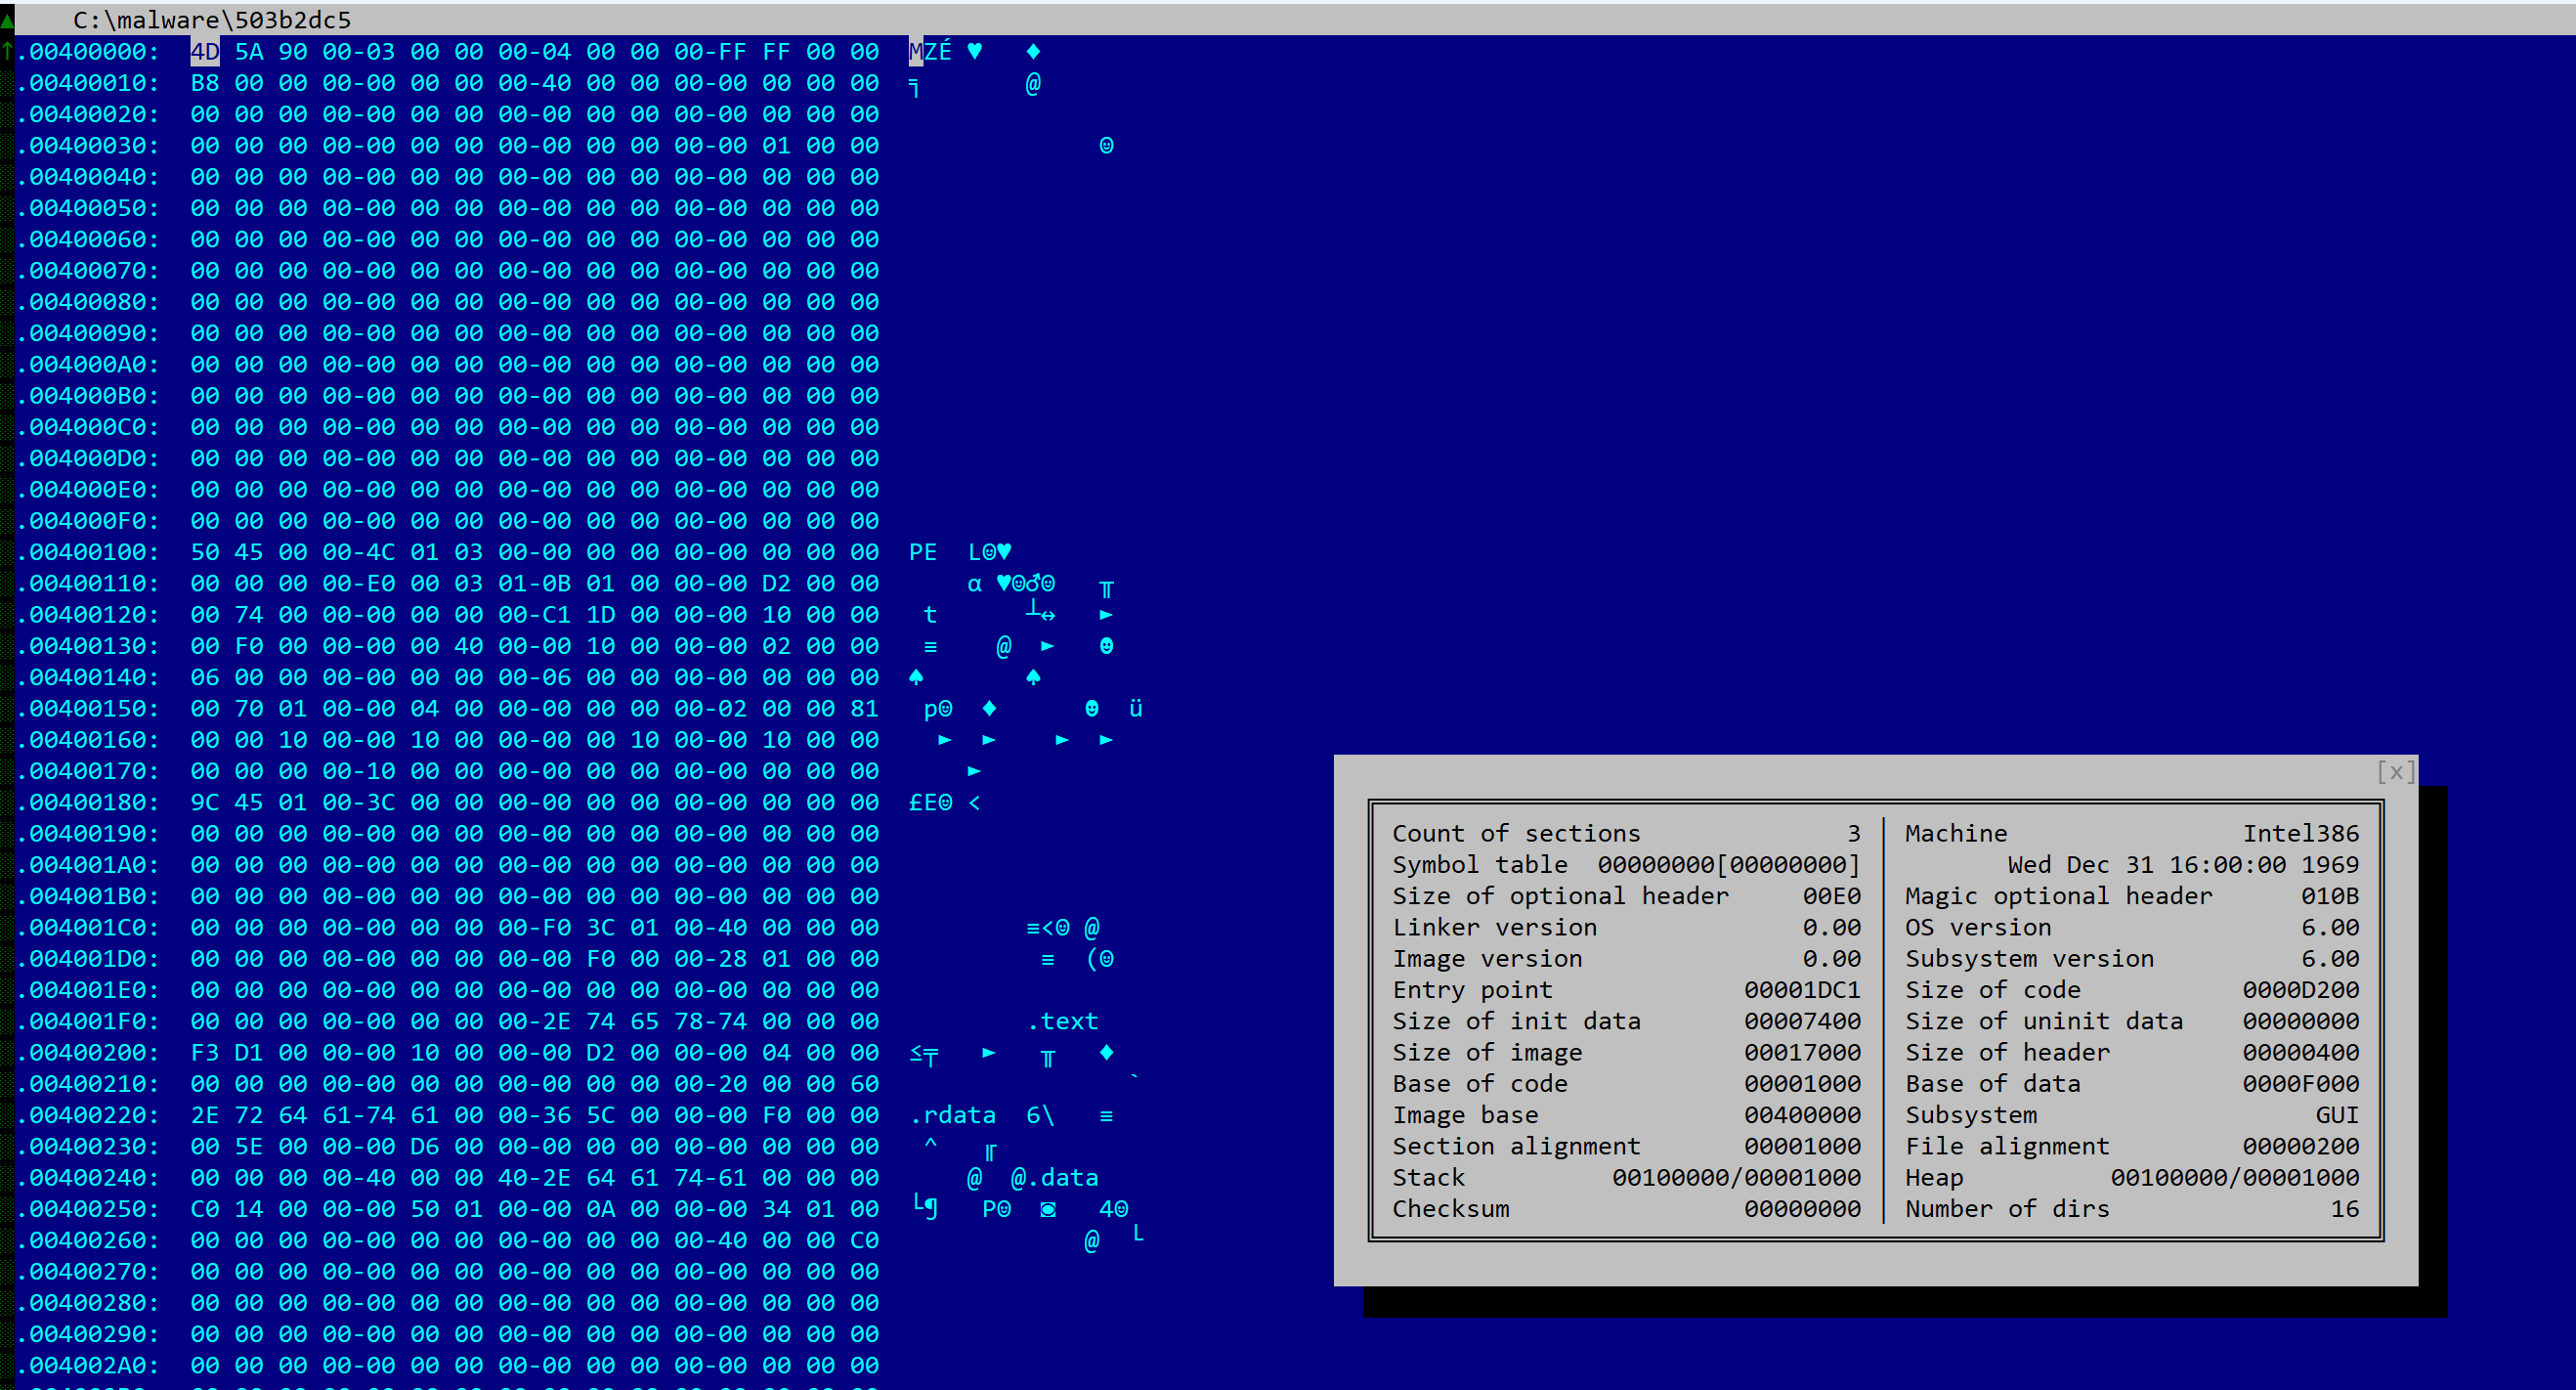
The file has a size of 81Kb, is compiled for x86 platforms. Although it does not appear to be packed, most metadata elements of the PE header were scraped. There is no rich data or timestamp.

SHA256: 503b2dc50262be583633db7b52dca9bcadc698413270047c209818436196c987

Quick look at the file in Hiew

If you are familiar with JEB, its terminology, and the organization of its UI elements, you may skip the next section and go directly to “Examining the code”.

Opening the file in JEB

Let’s fire up JEB. Any recent build (5.7+) with the x86 analysis modules and decompiler will do, i.e. JEB Community Edition or JEB Pro.
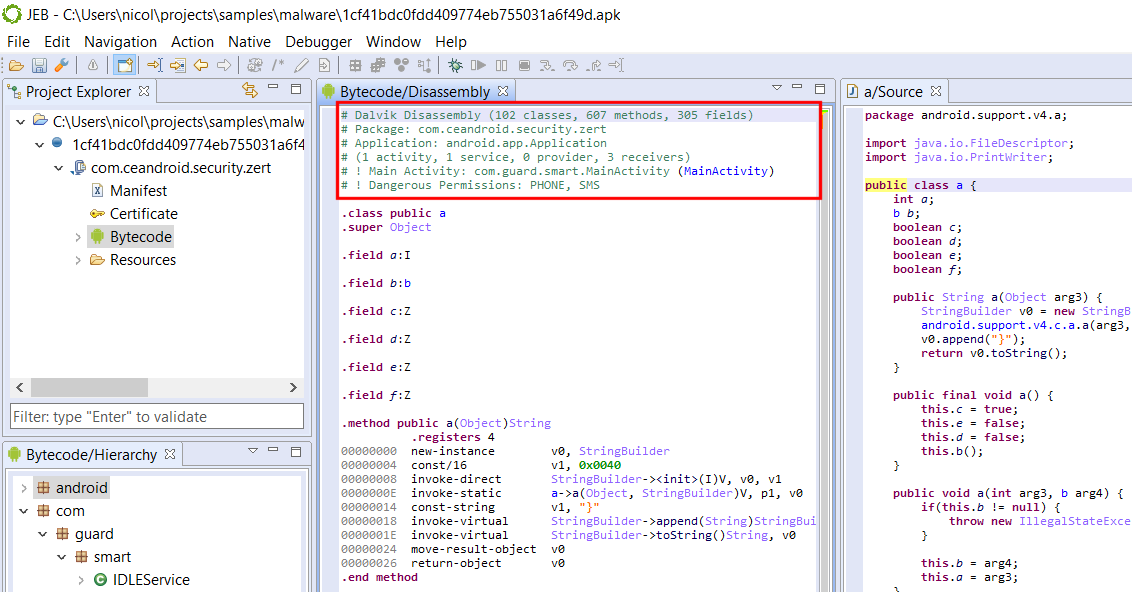
We open the file and keep the default settings
A view of the GUI after the initial analysis (from top-left, clockwise: project explorer, main workspace, and code hierarchy)

Project and units

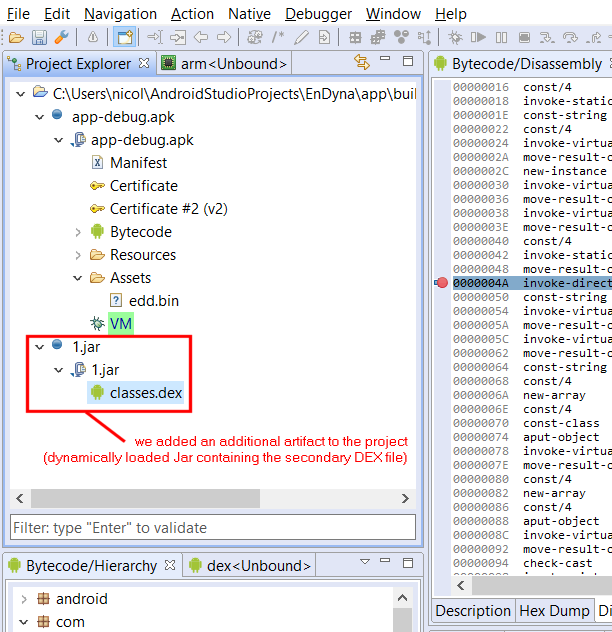
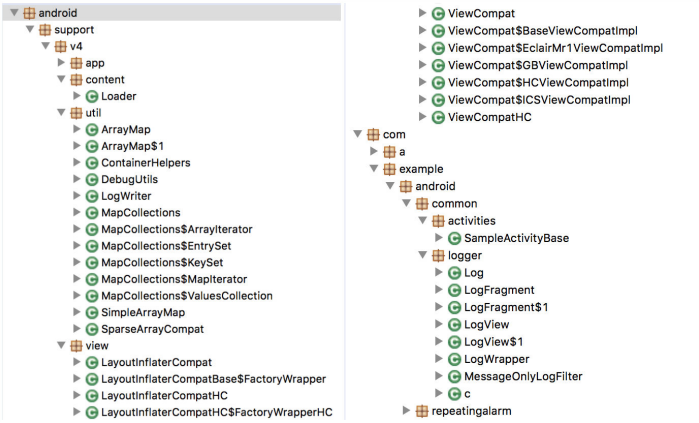
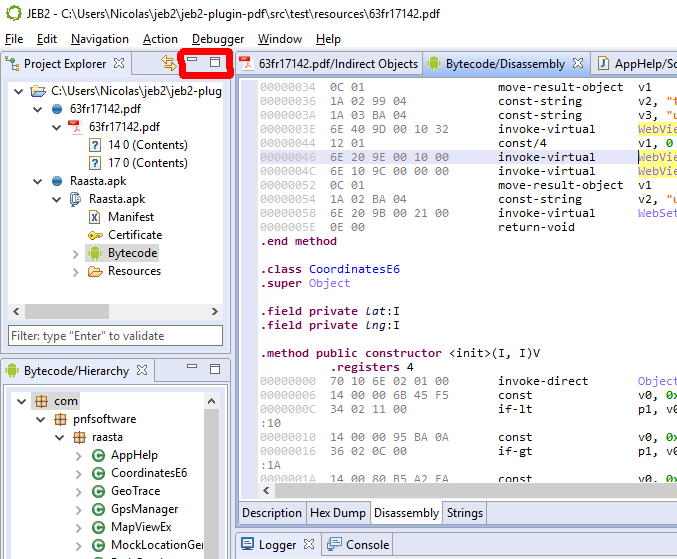
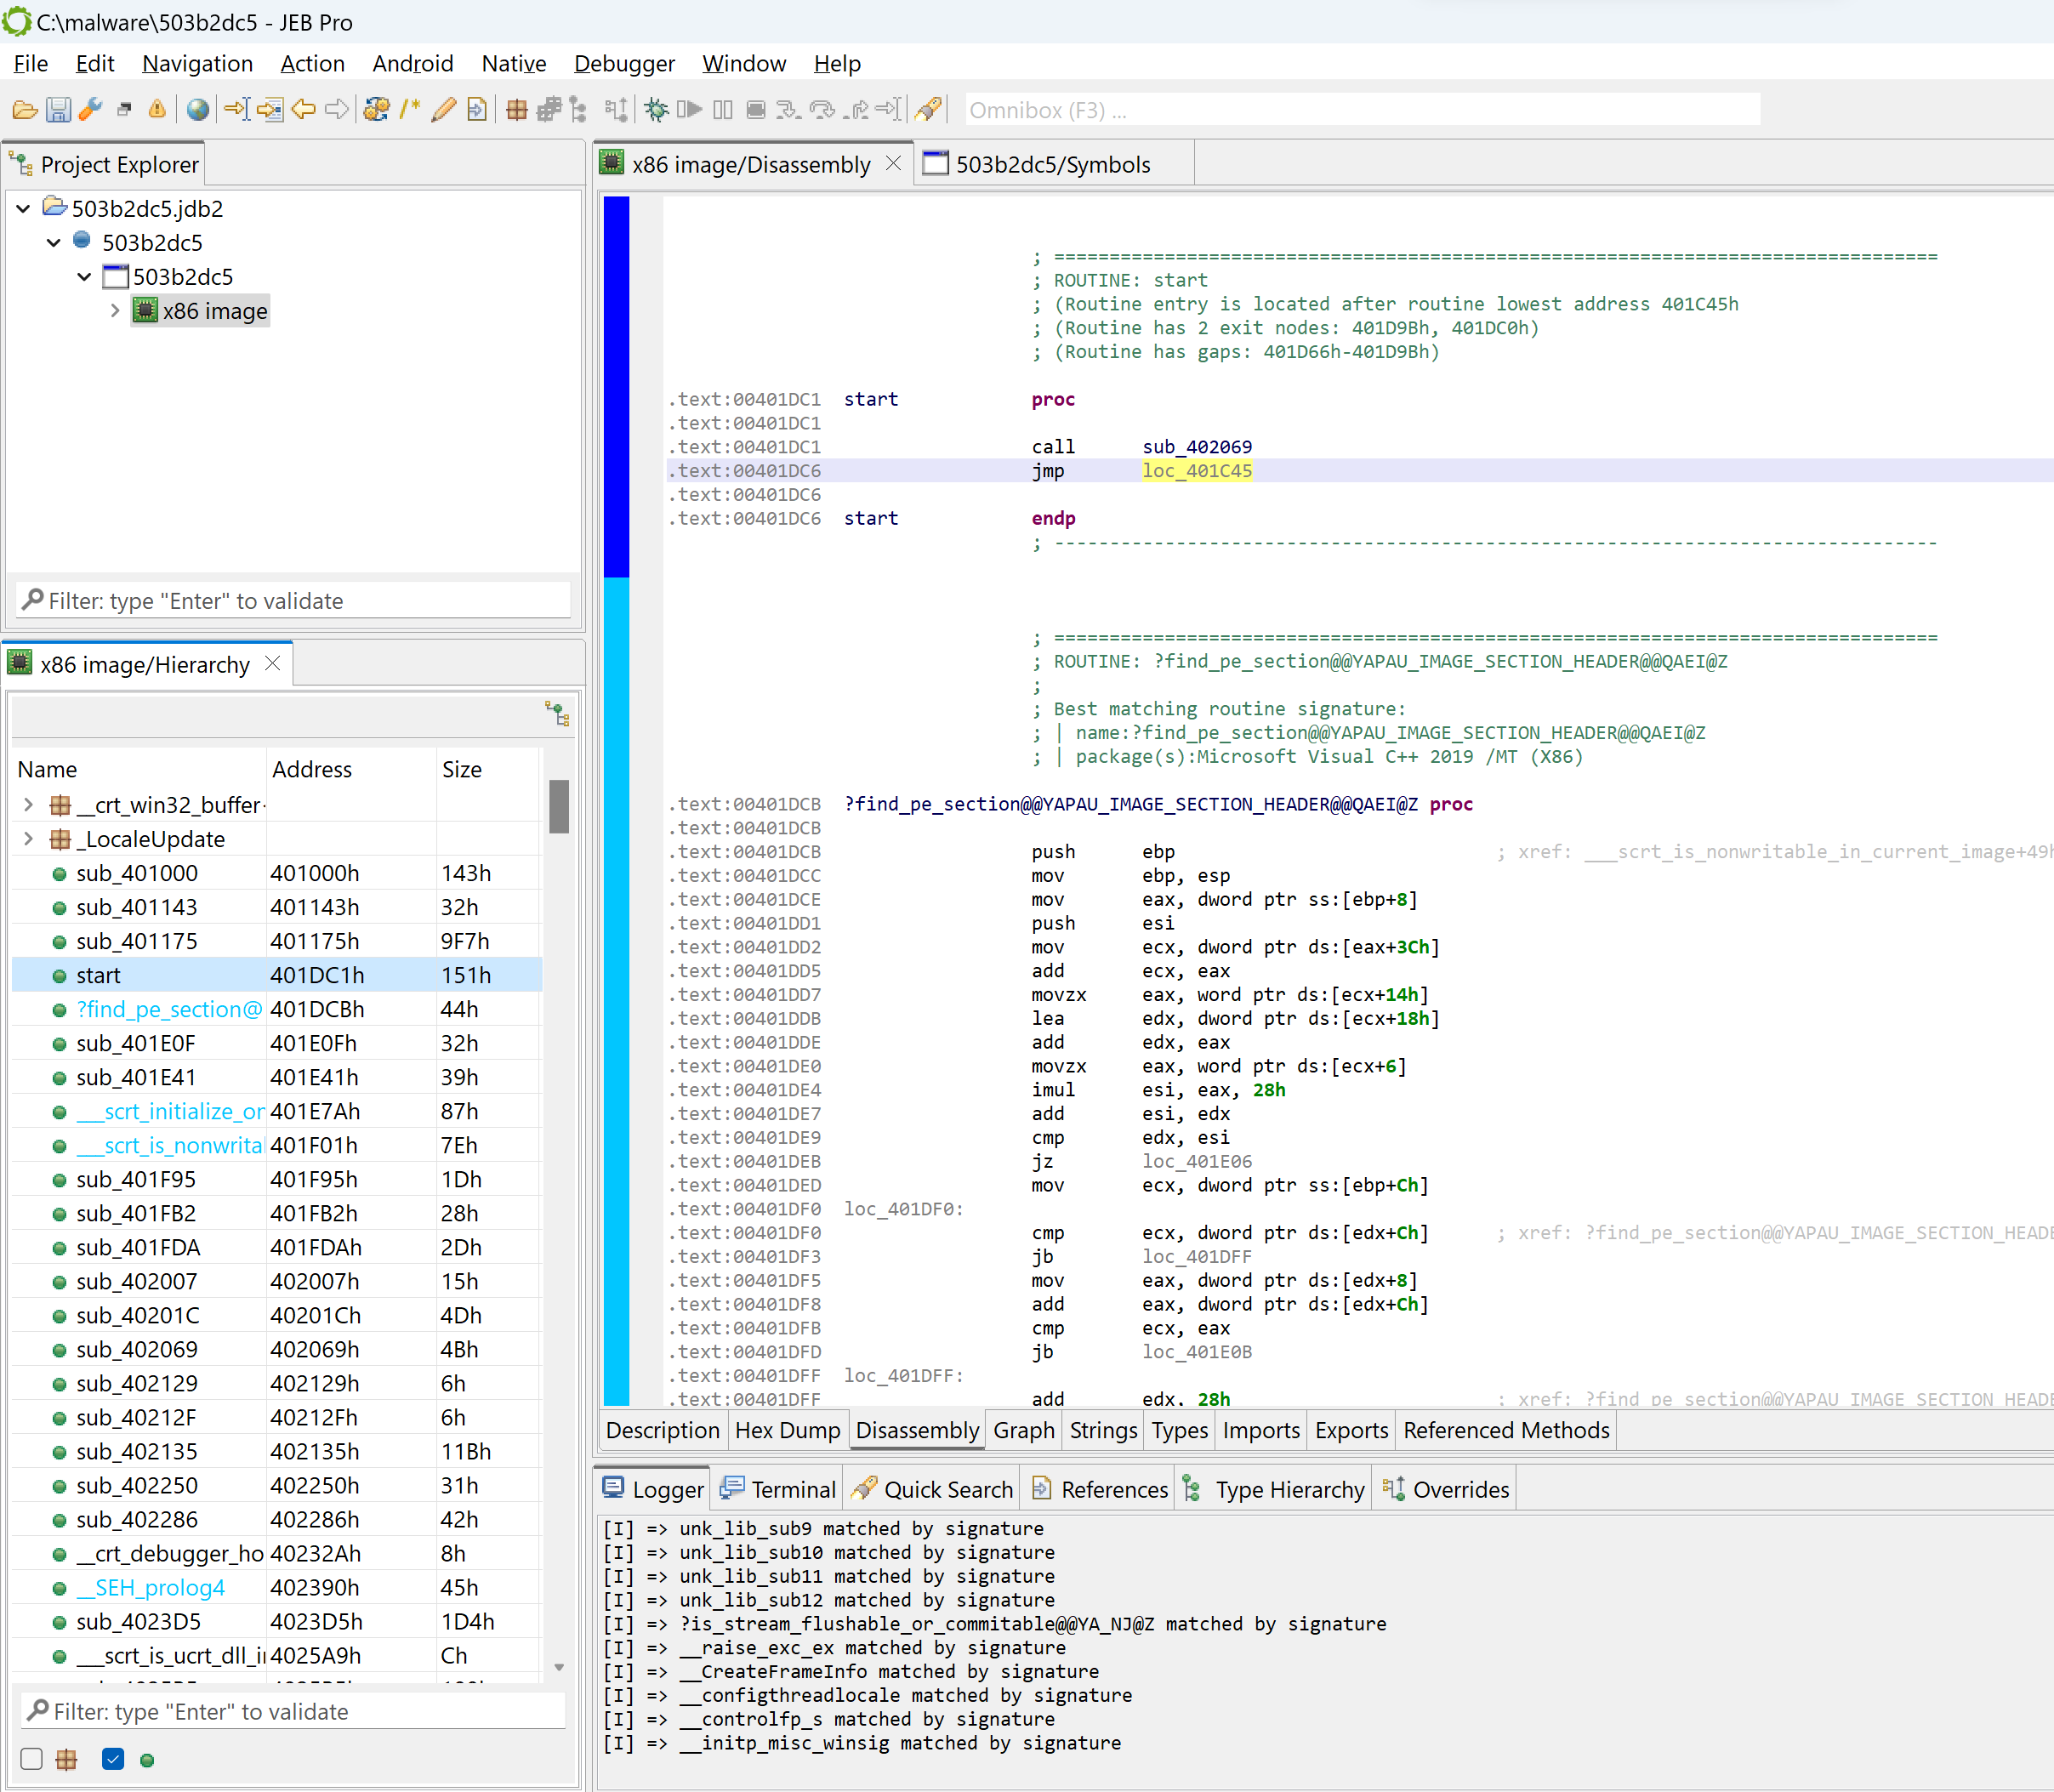
The top-left view shows the project, along with a single artifact (the input file) and the analysis units created by JEB:

  • The artifact file has a blue-round icon
  • The top-level unit is a winpe unit
  • It has one child unit at the moment, named “x86 image”, of type x86.

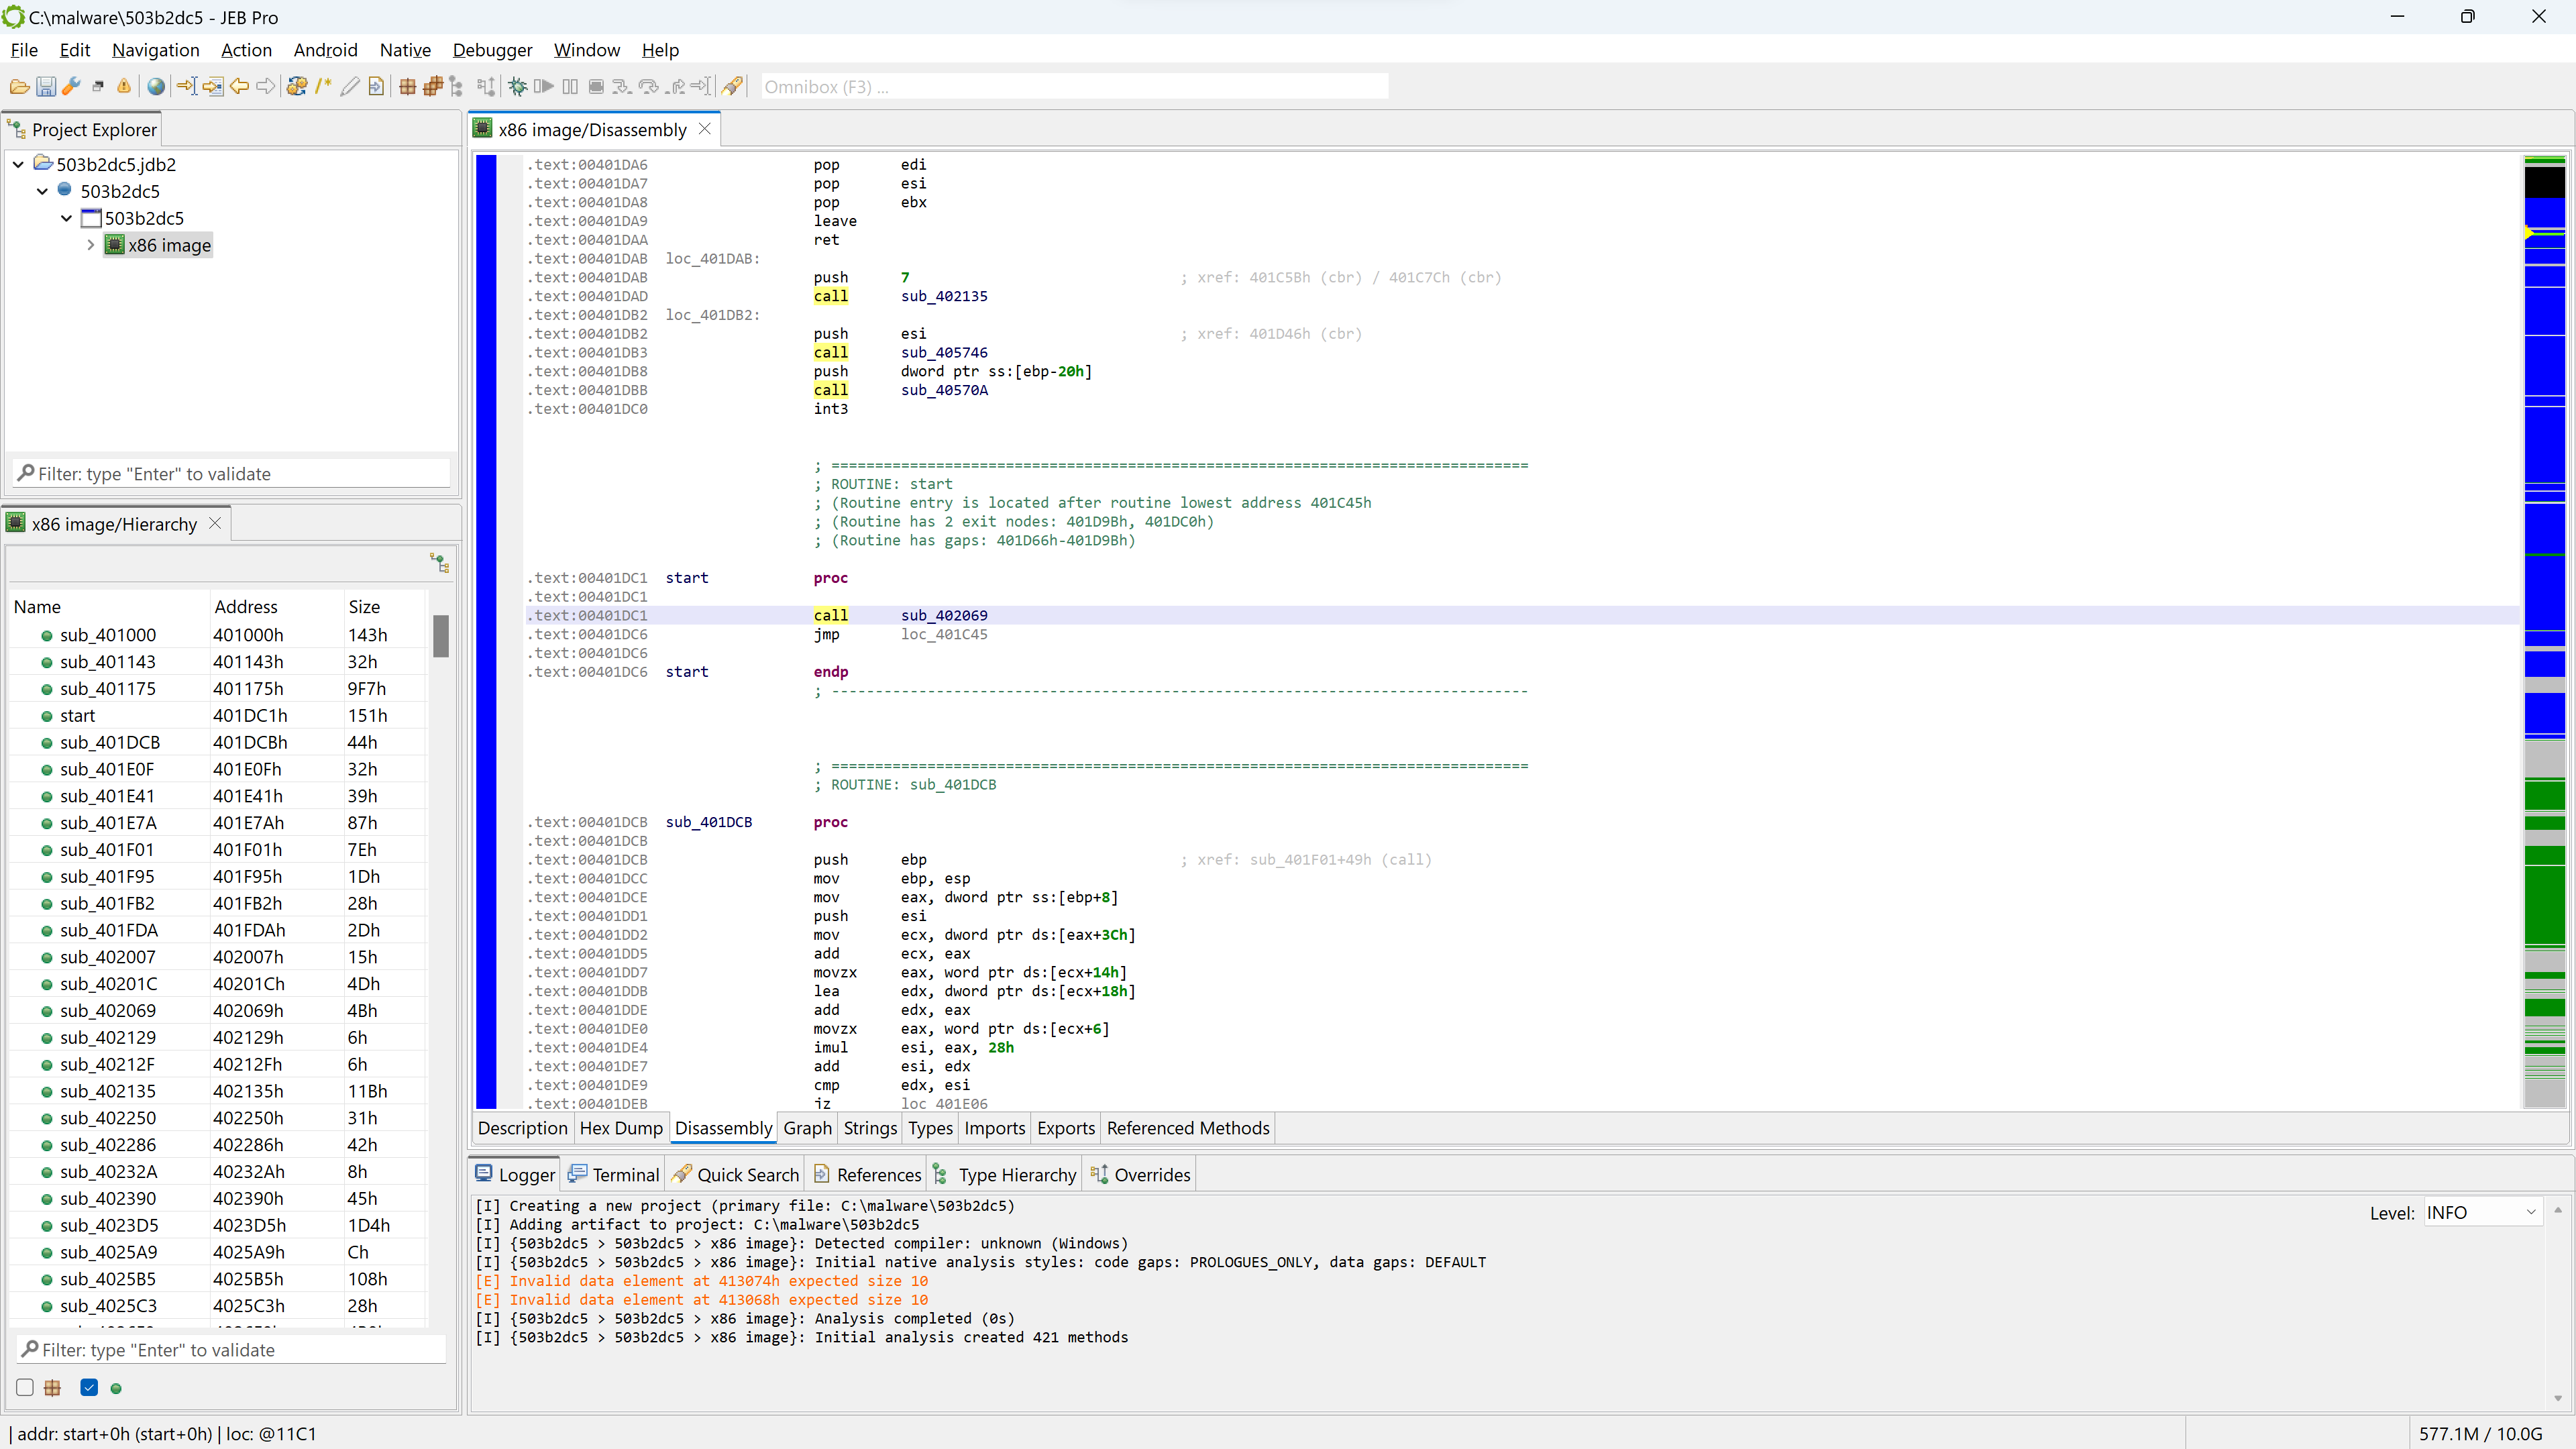
The bottom-left view shows a list of code routines resulting from the analysis of the file.
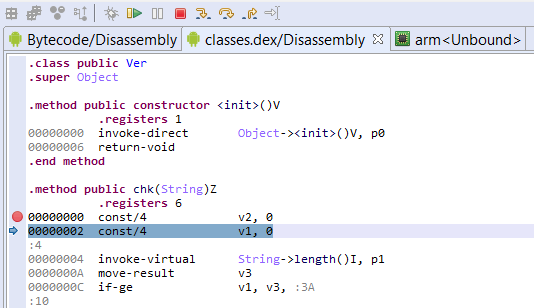
Disassembly

By default, the main panel shows the disassembly window.

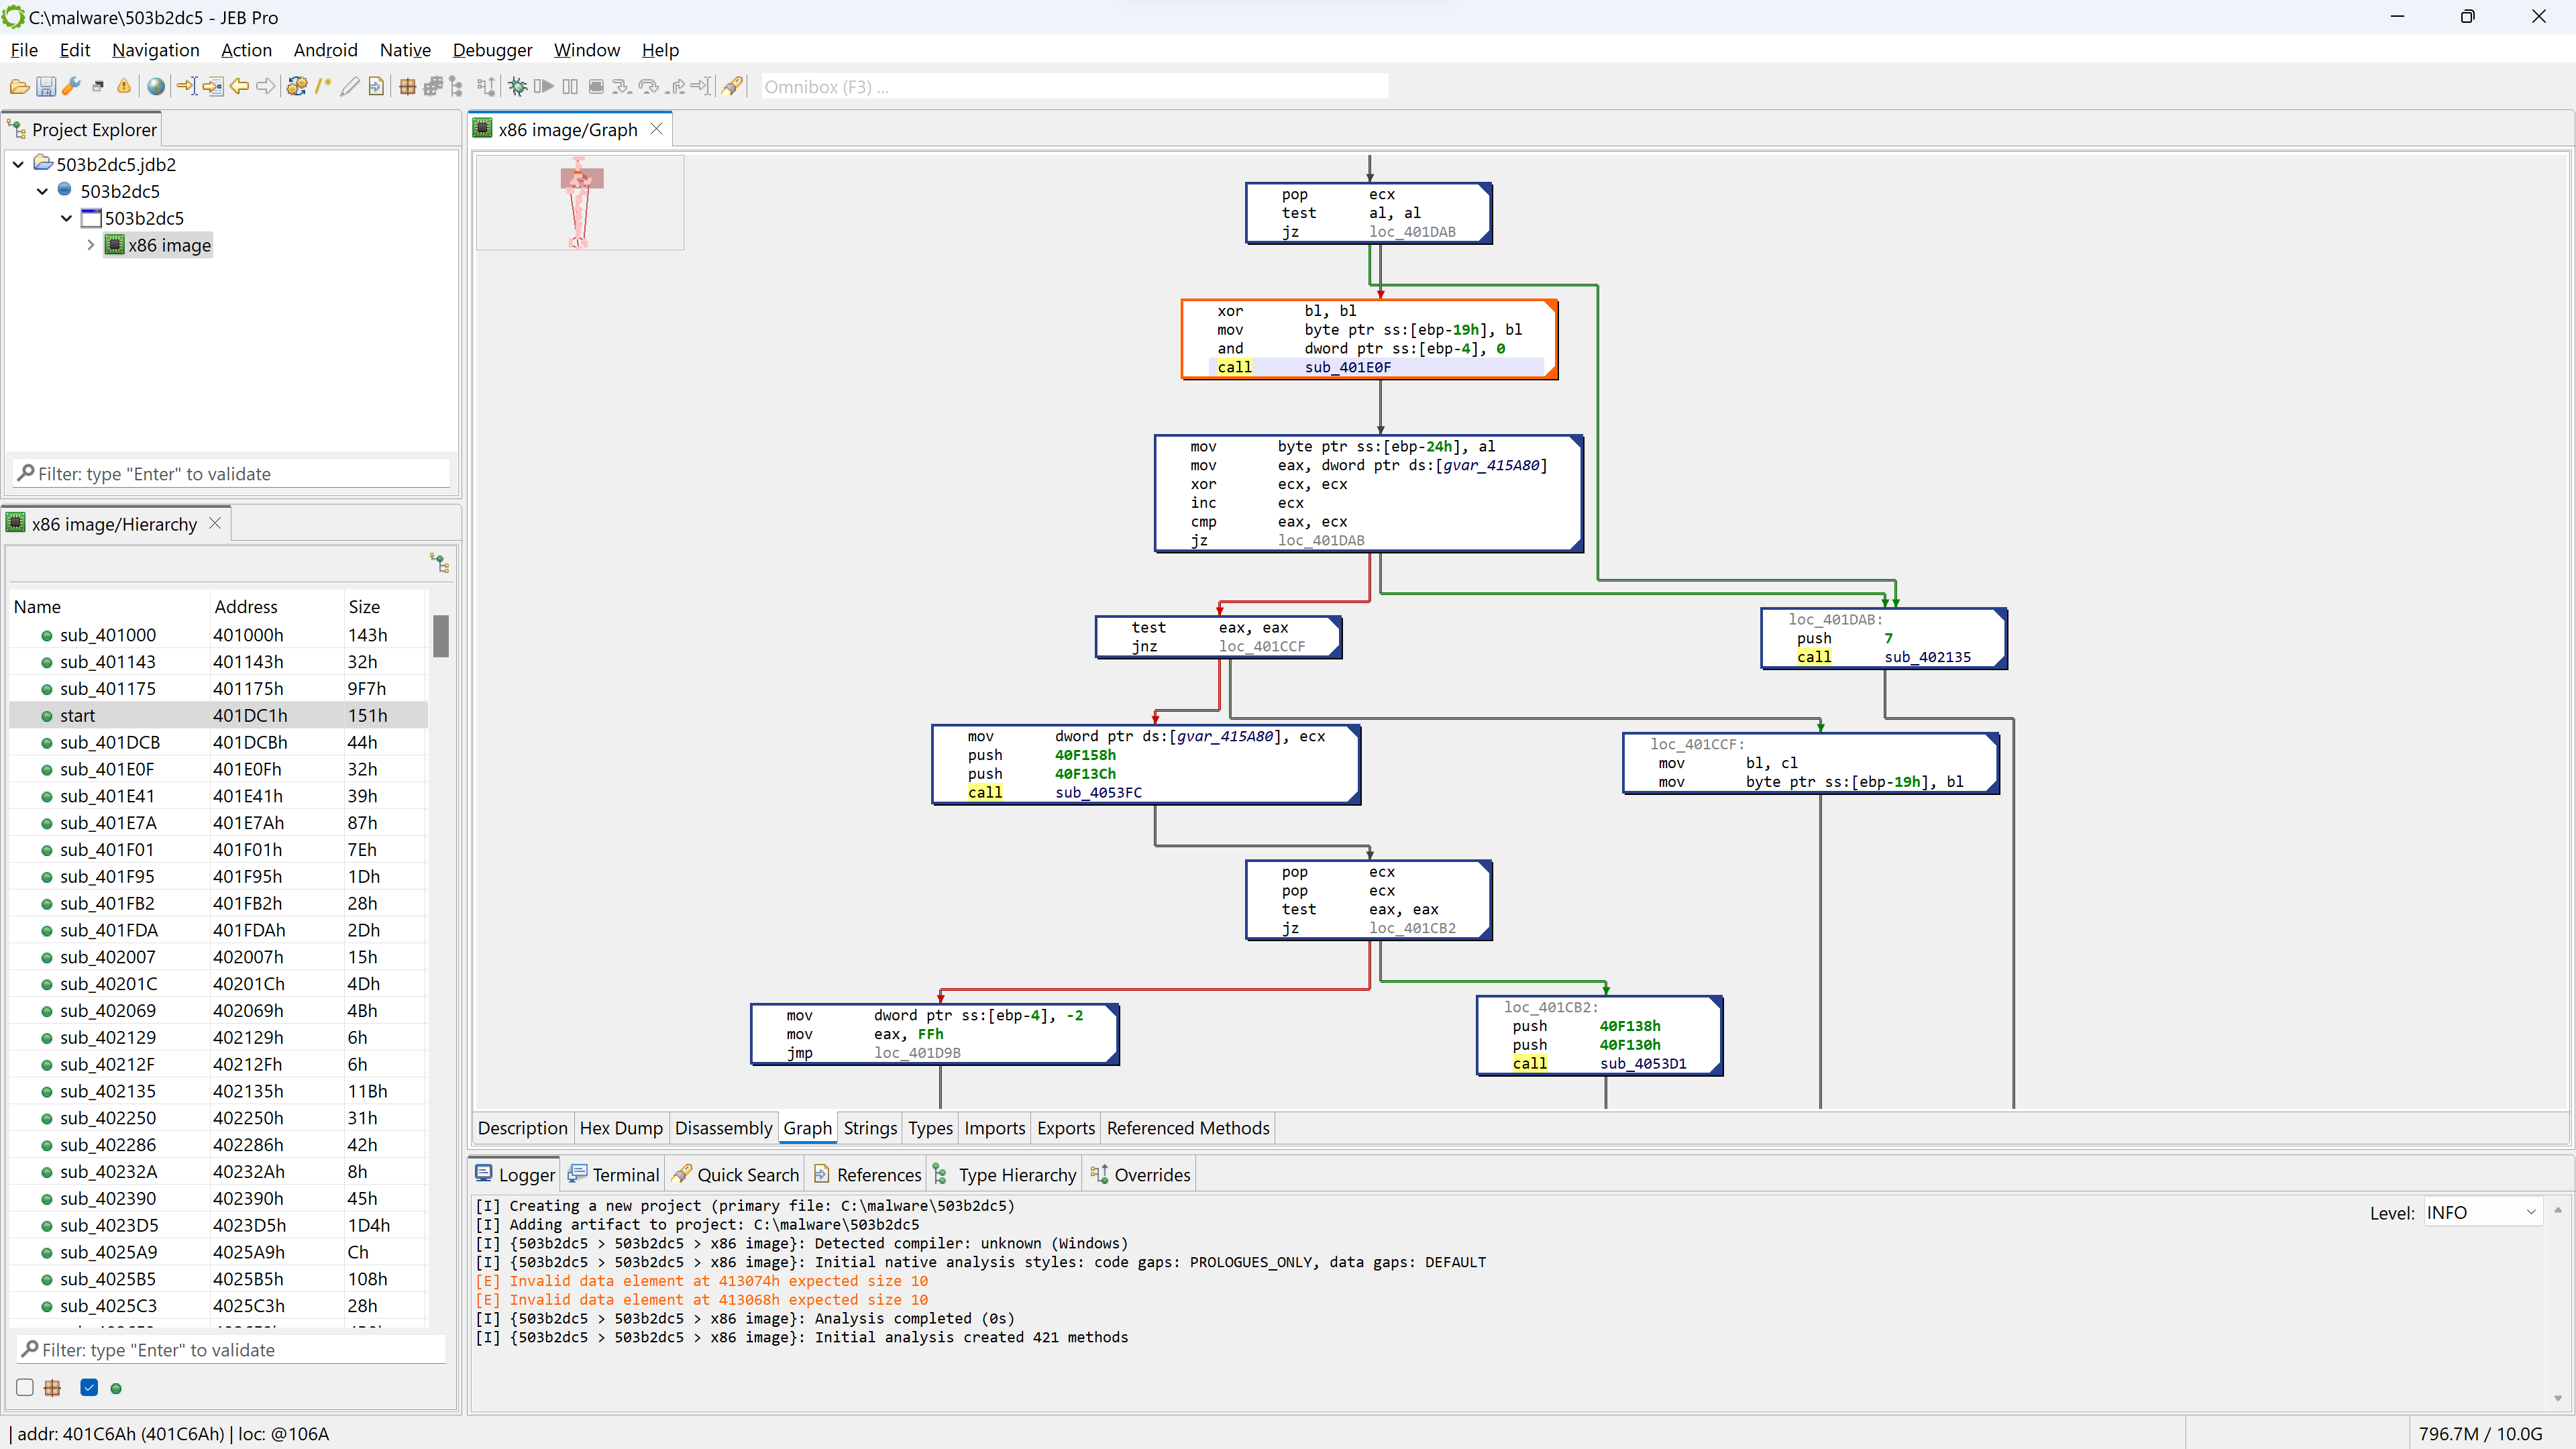
You may press the SPACE bar to switch to a graph view of the code (menu: Action, Graph…). In the graph view, only a single method is rendered at a time.

CFG (control flow graph) view of a disassembled routine

PE unit

If you wish to have a look at the PE file in more details, open the winpe unit. Double-click the corresponding node in the project hierarchy.

View of a winpe unit’s “Overview” fragment

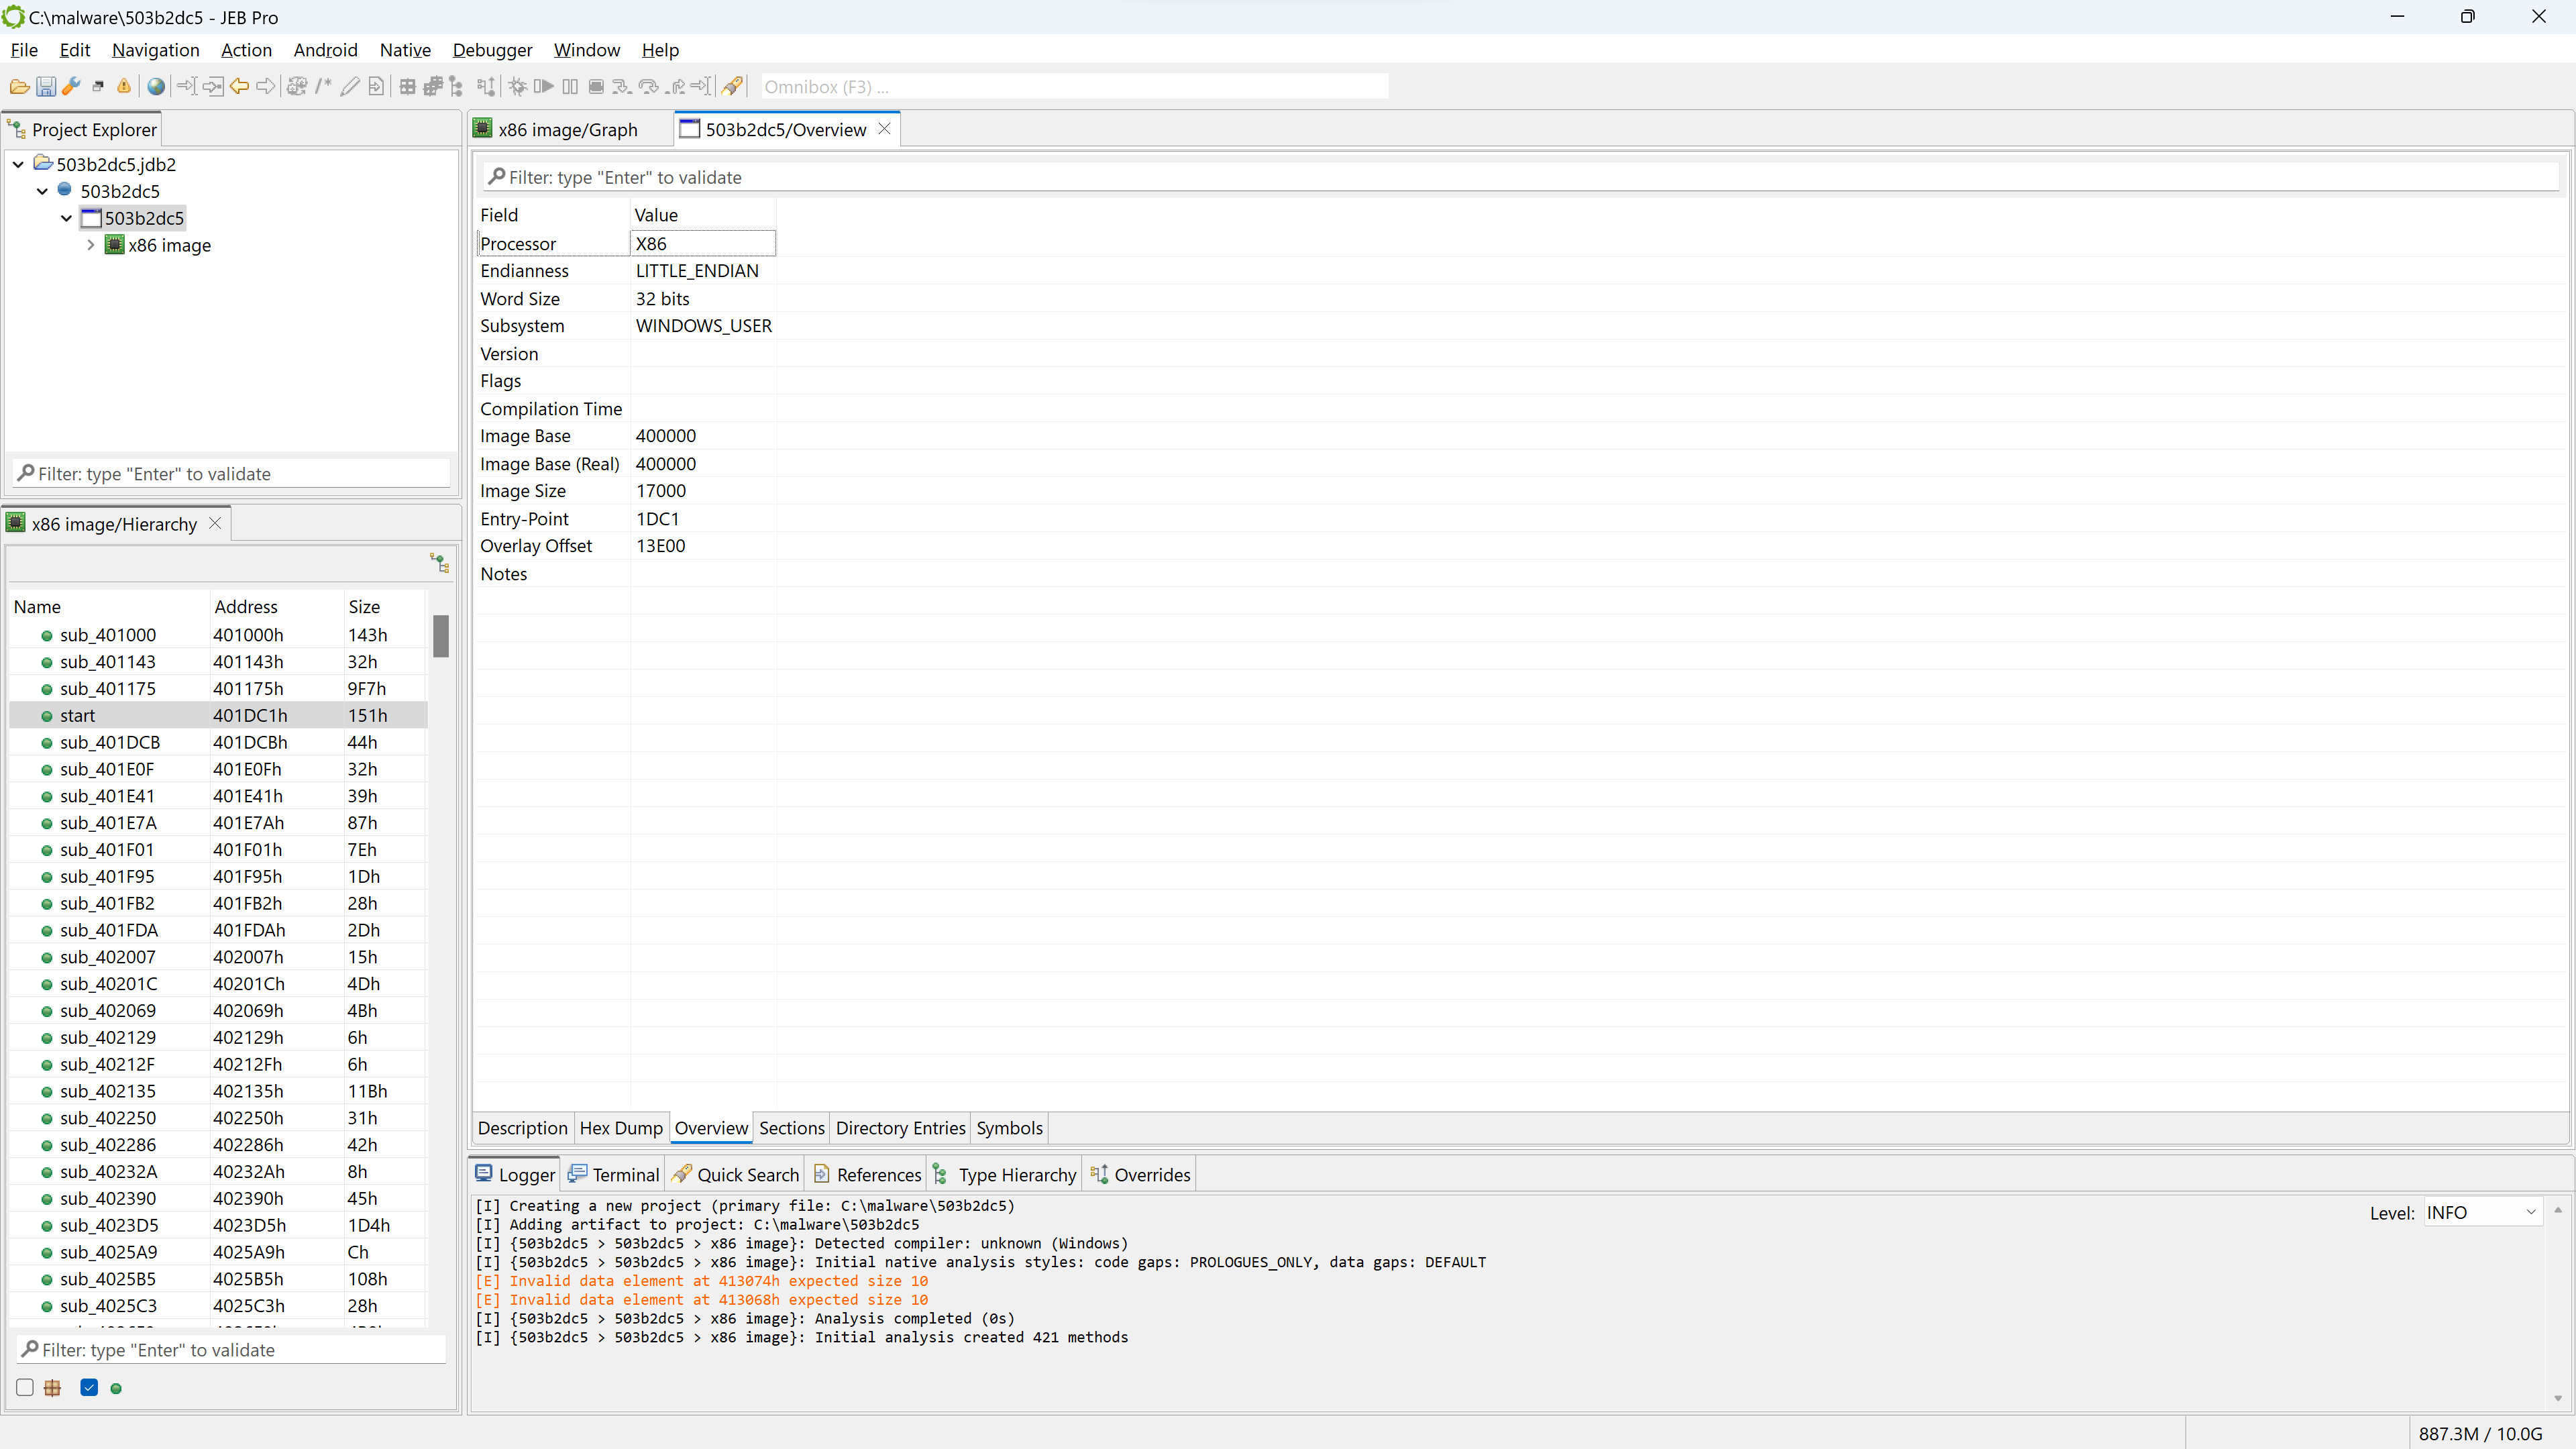
The winpe unit view provides several information, organized in fragments that can be seen below the unit view: Description, Hex Dump, Overview (the default fragment), Sections, Directory Entries, Symbols, etc.

Note that if the PE had not been stripped, we would probably see a compilation timestamp as well as additional sub-units detailing the Rich Header data. For Windows executables, that data is important to perform fine-grained compiler identification.

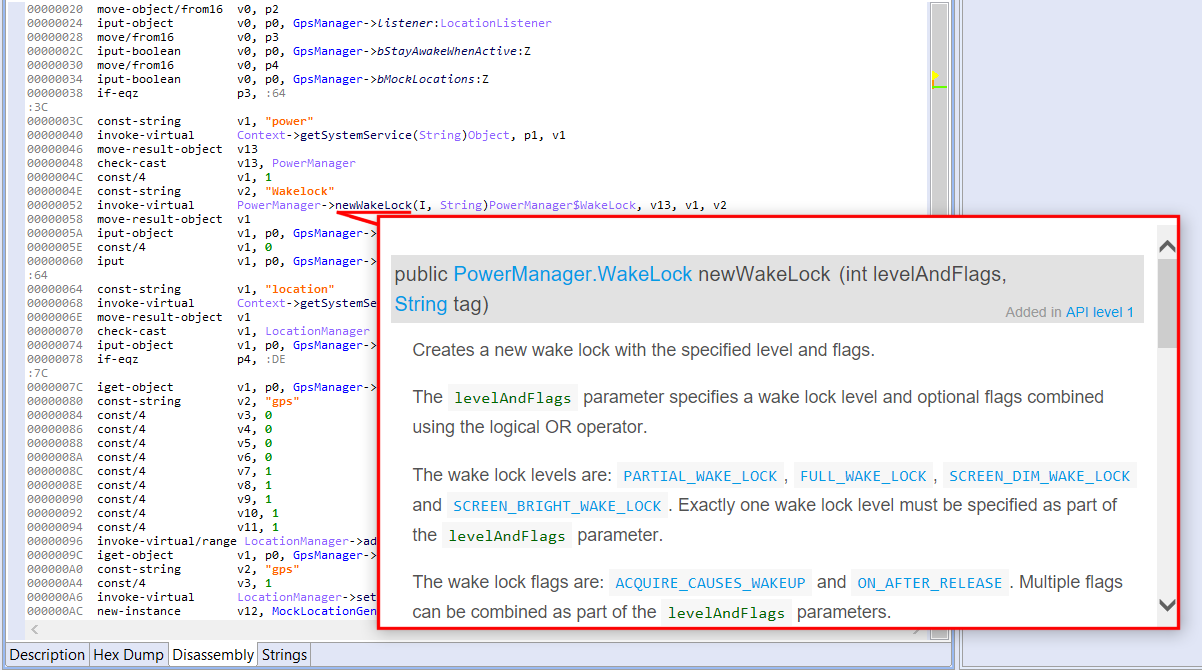
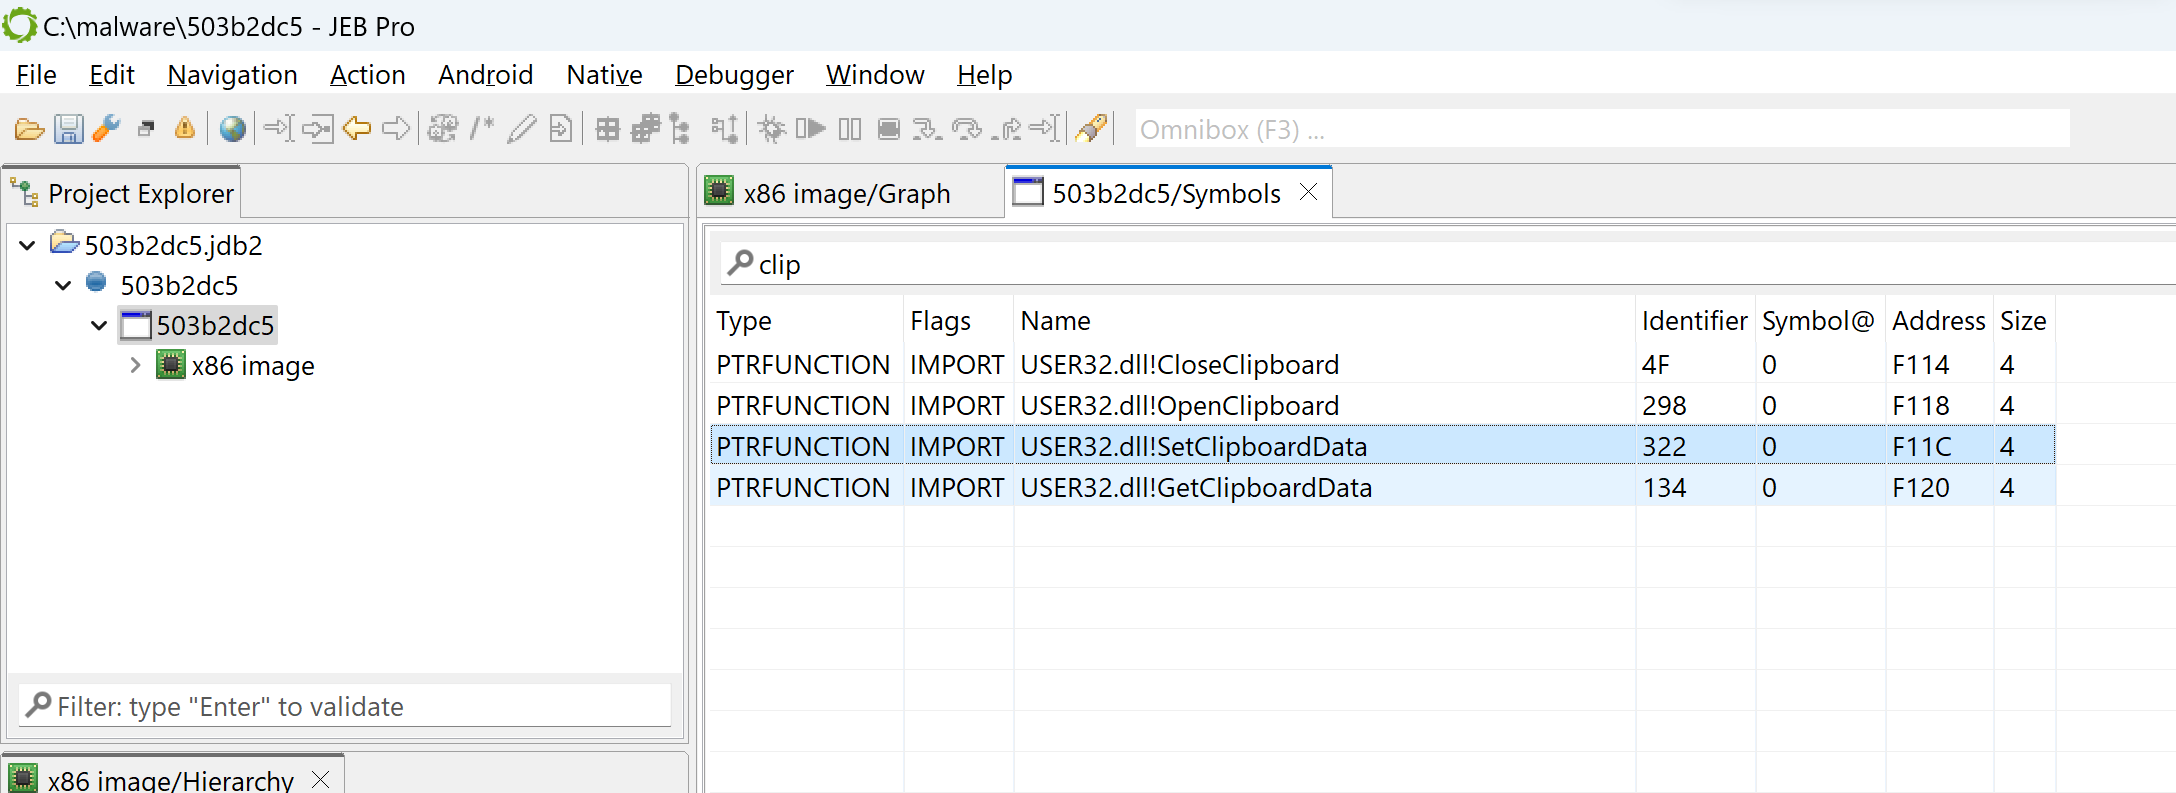
The Symbols tab lists all symbols advertised by the PE, including imported and exported routines. For example, if you filter on “clip”, you can see multiple win32 routines relating to clipboard access, such as OpenClipboard or SetClipboardData:

The Symbols fragment of the winpe unit view, with a filter applied (“clip”)

Examining the code

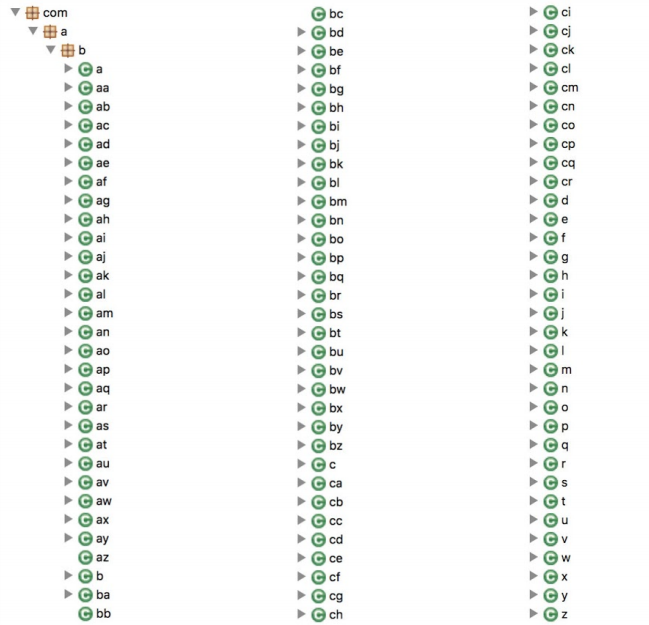
Let’s go back to the disassembly offered by the x86 unit. First, notice that the code hierarchy view does not seem to contain well-known methods (static code), typically standard library routines linked at compile-time.

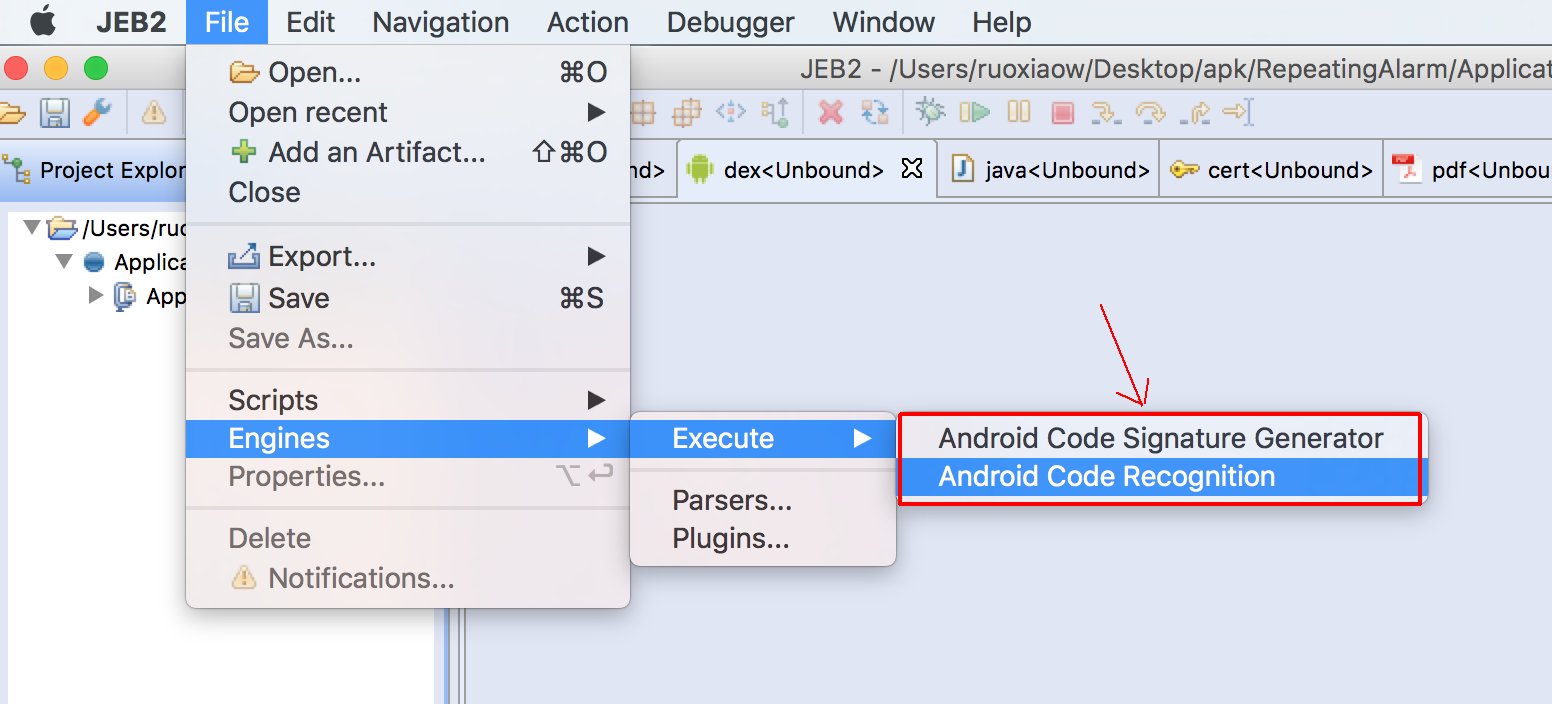
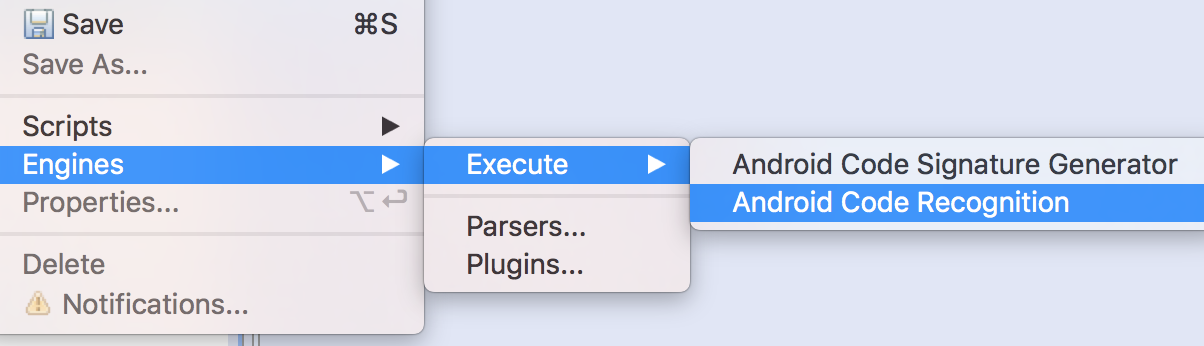
Let’s see why by looking at which siglibs (signature libraries) were applied during the initial analysis (menu: Native, Signature Libraries…). It looks like none were loaded:

The Signatures Libraries dialog

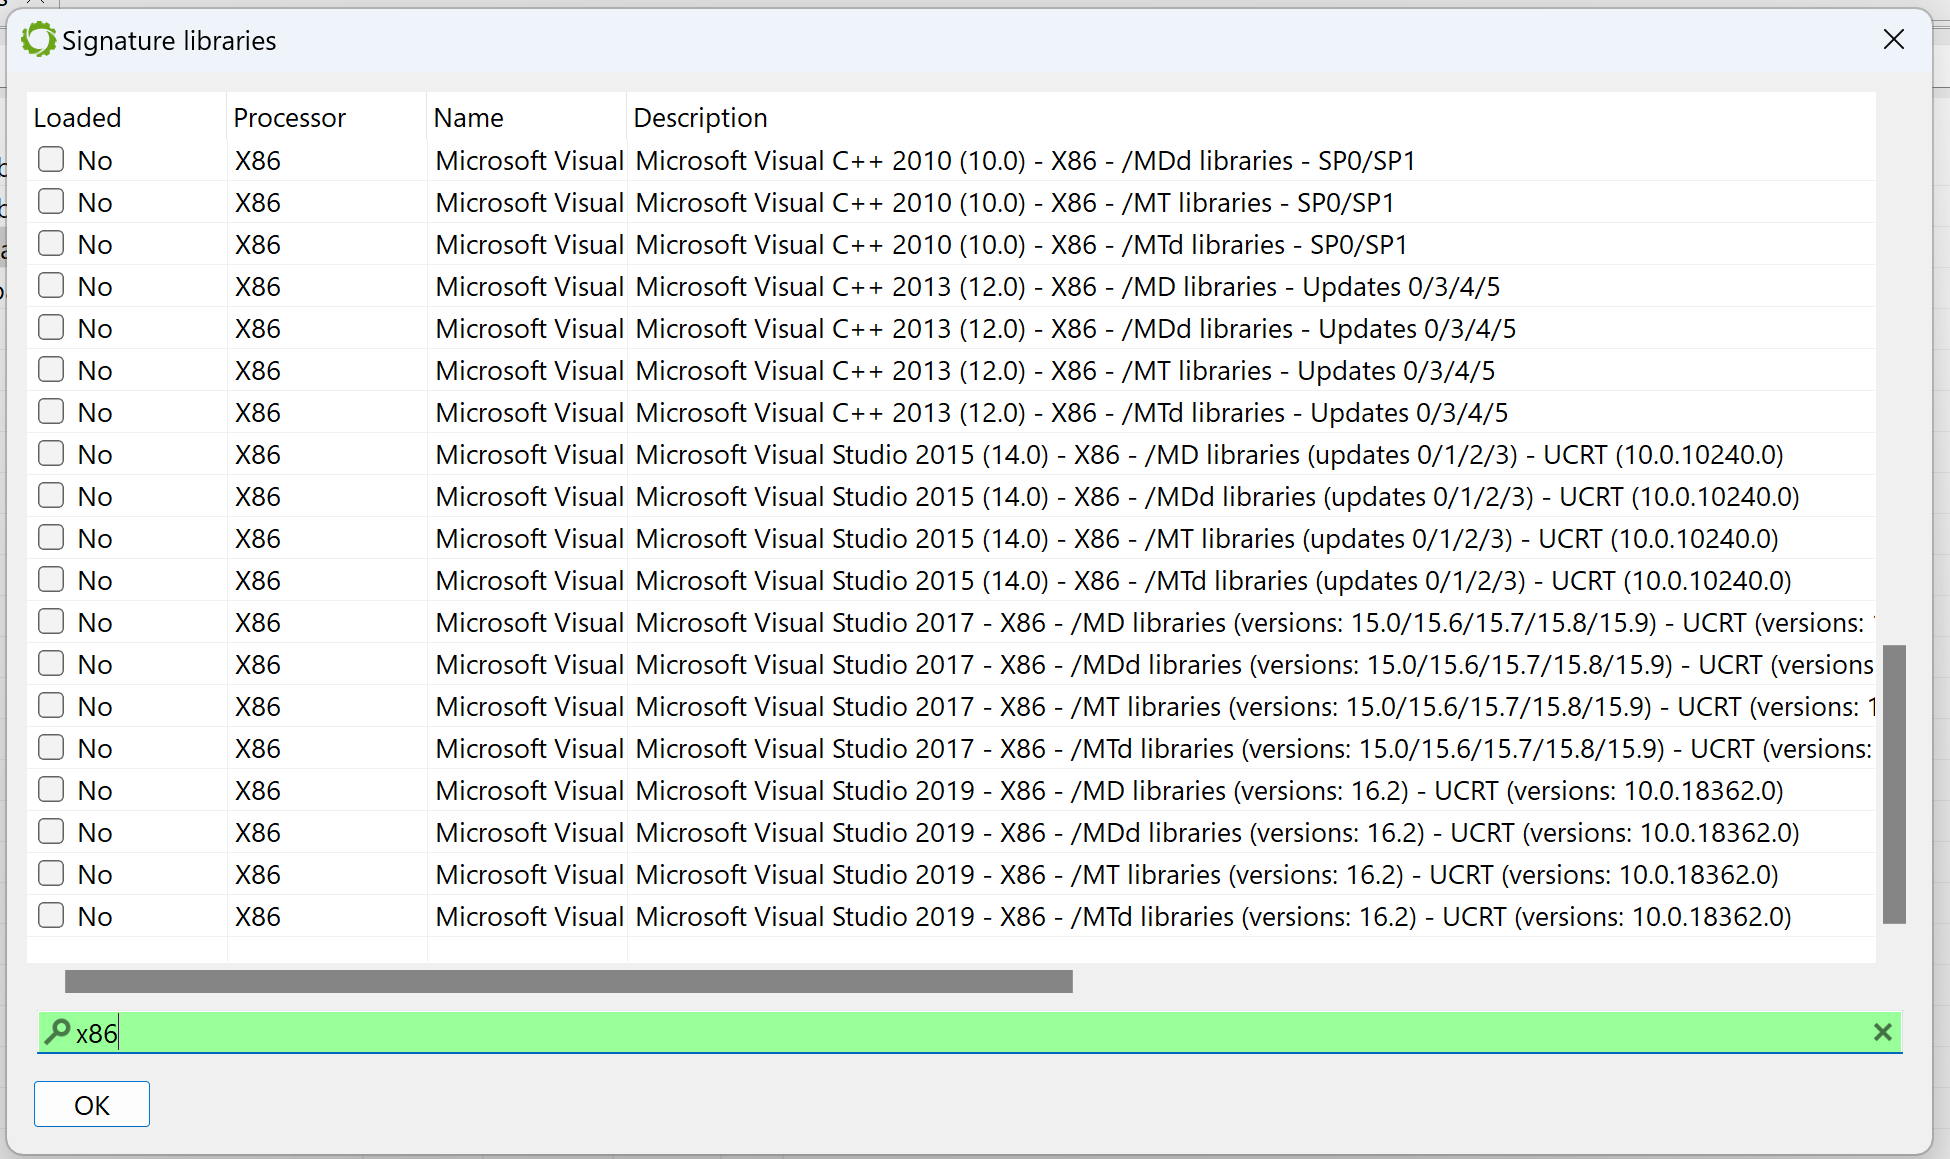
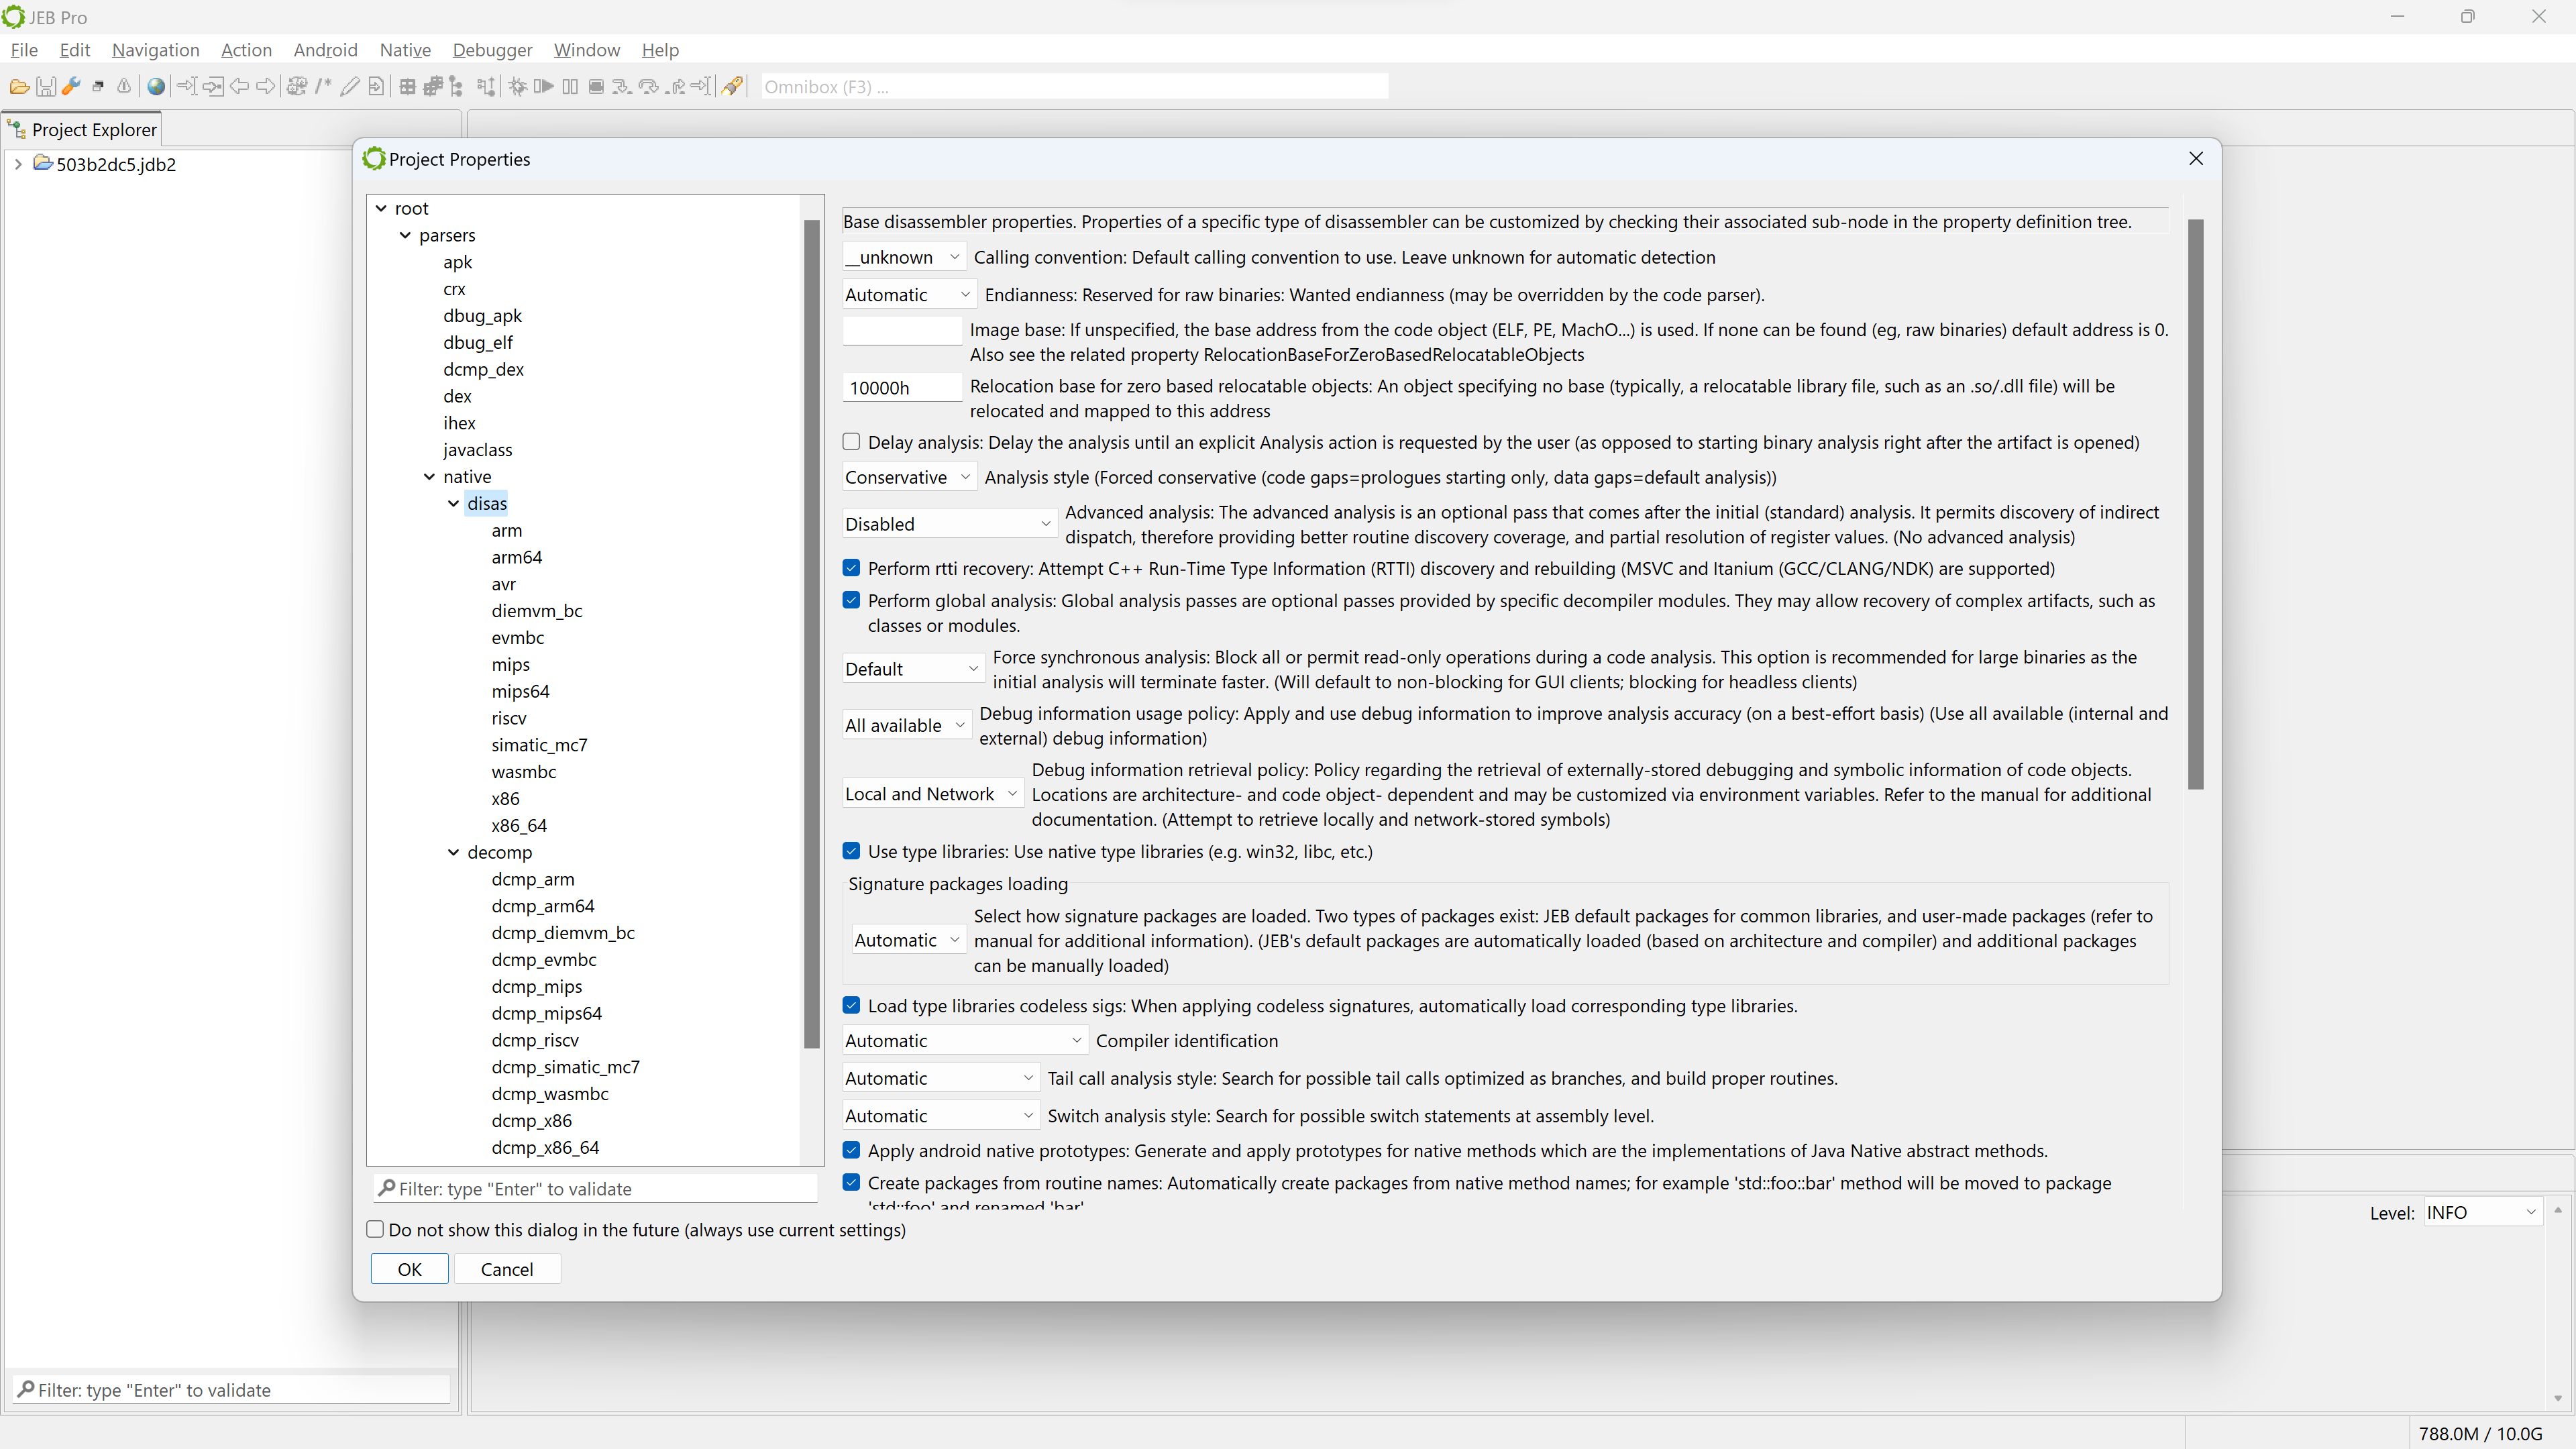
Library code identification

Normally, when JEB performs the initial auto-analysis of the code, compiler identification is used to determine whether well-known signature libraries of static code (siglibs) should be loaded and applied to the binary. In this case, compiler identification failed because all header data had been discarded. JEB decided to not load and apply signatures.

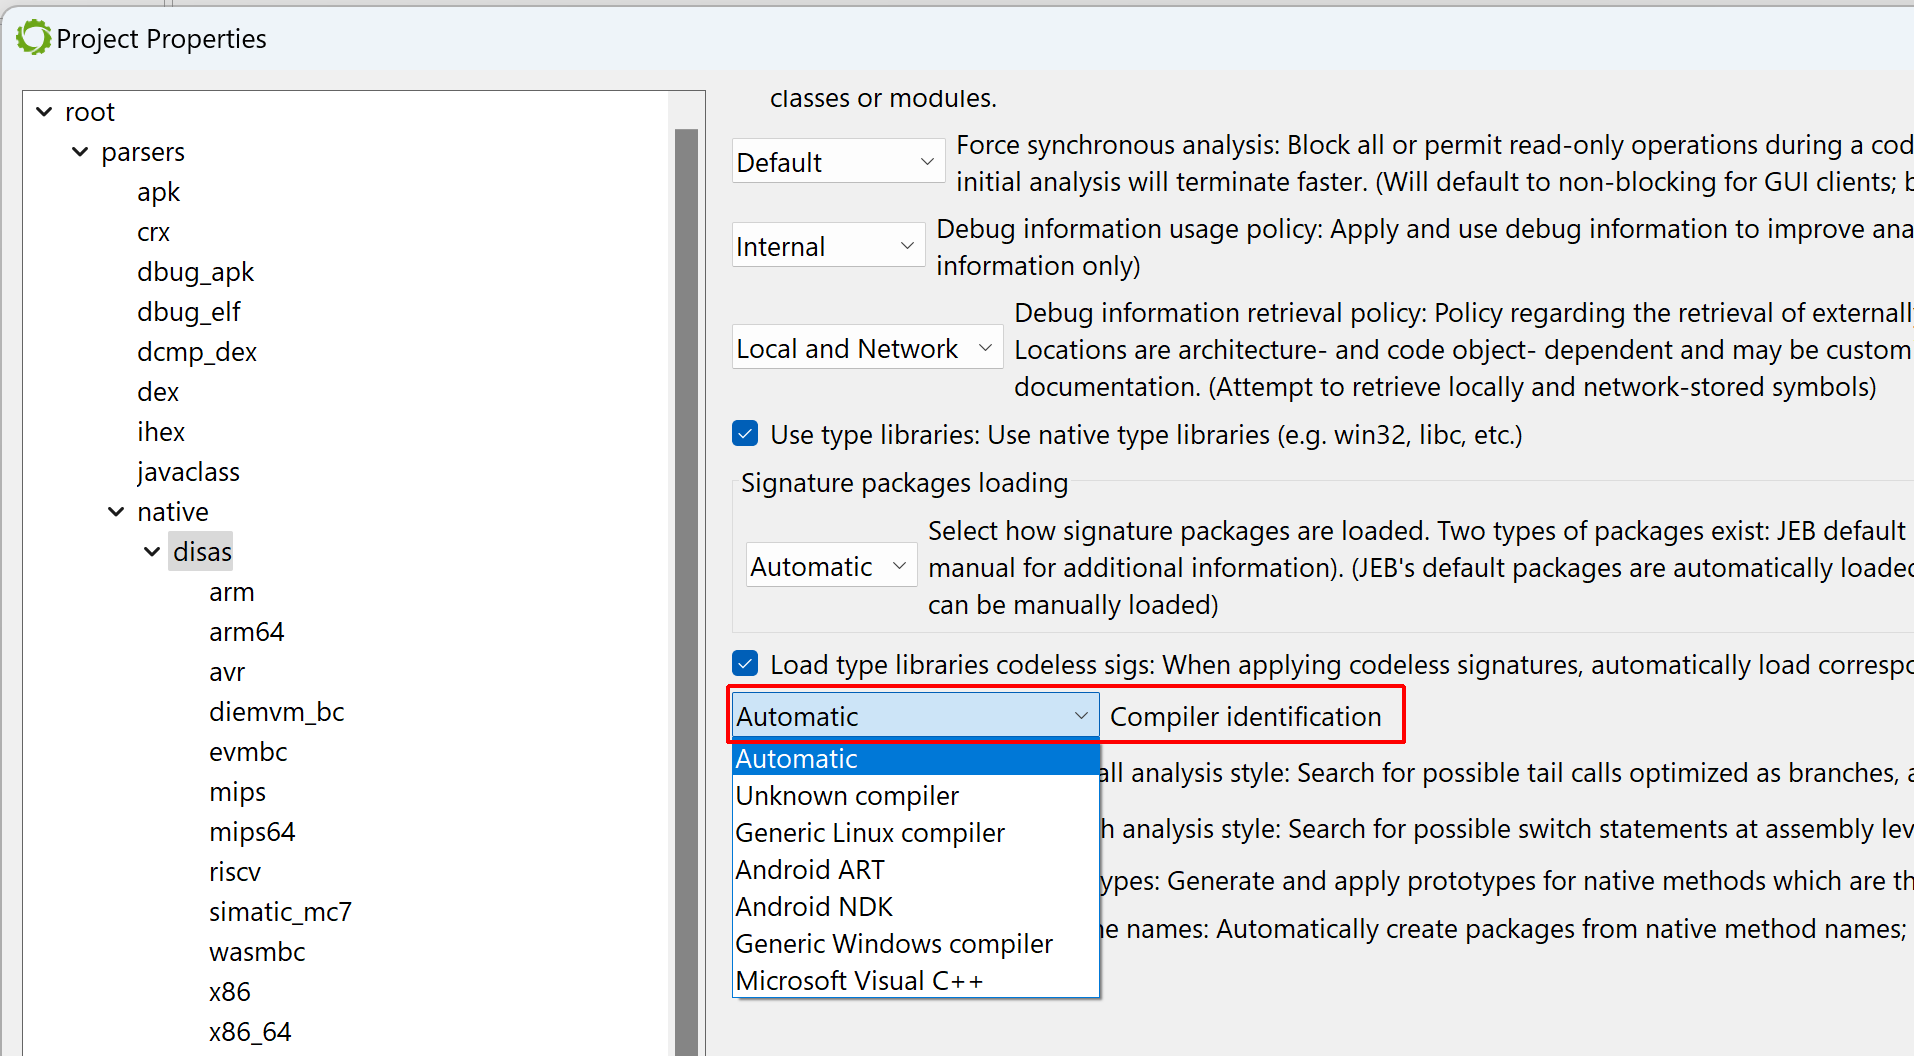
To apply them manually, tick the “MSVC x86” boxes. (An alternative is to let JEB know that the file was compiled with MSVC before the analysis starts: when opening the artifact, when the Options panel is displayed, the user may decide to force the compiler to a set-value.)

Forcing a compiler setting before the initial analysis

After doing either of the above ((a) file re-analysis with a compiler identification pre-set; or (b) manual siglibs application), several methods are identified as MSVC code:

Light-blue areas mean the code was matched against well-known signatures

Entry-point and WinMain

Navigate to the executable entry-point (menu: Native, Go to entry-point…).

In the general case, the entry-point of a Windows PE compiled with MSVC is not the high-level entry-point that will contain meaningful code. Although it is relatively easy to find WinMain with a bit of experience, there is a JEB script to help you as well, FindMain.py (available in the samples-script folder, also available on GitHub). Open up the script selector with F2 (menu: File, Scripts, Script selector…).

Run a JEB Python script inside the GUI client

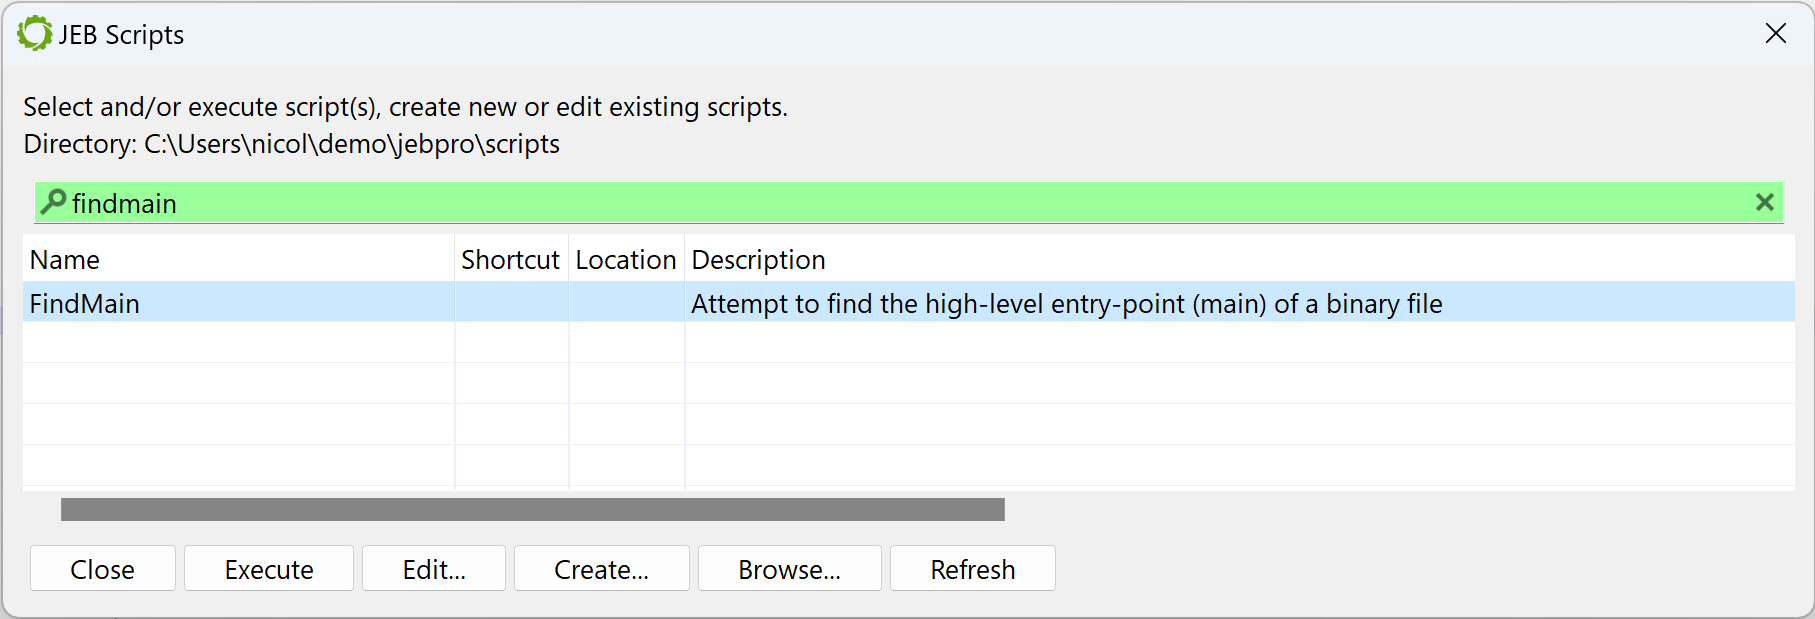
Select the desired script and execute it. The result is displayed in the console:

...
Found high-level entry-point at 0x401175 (branched from 0x401D38)
Renaming entry-point to 'winmain'
...

The code at 0x401175 was auto-renamed to winmain (menu: Action, Rename…).

Initial decompilation

Let’s decompile that method by pressing the TAB key (menu: Action, Decompile…).

Initial decompilation of WinMain

Two items of interest to note at this point:

  • There is lots of code that appears to be junk or garbage
  • There is a note about some “deobfuscation score”

Junk code

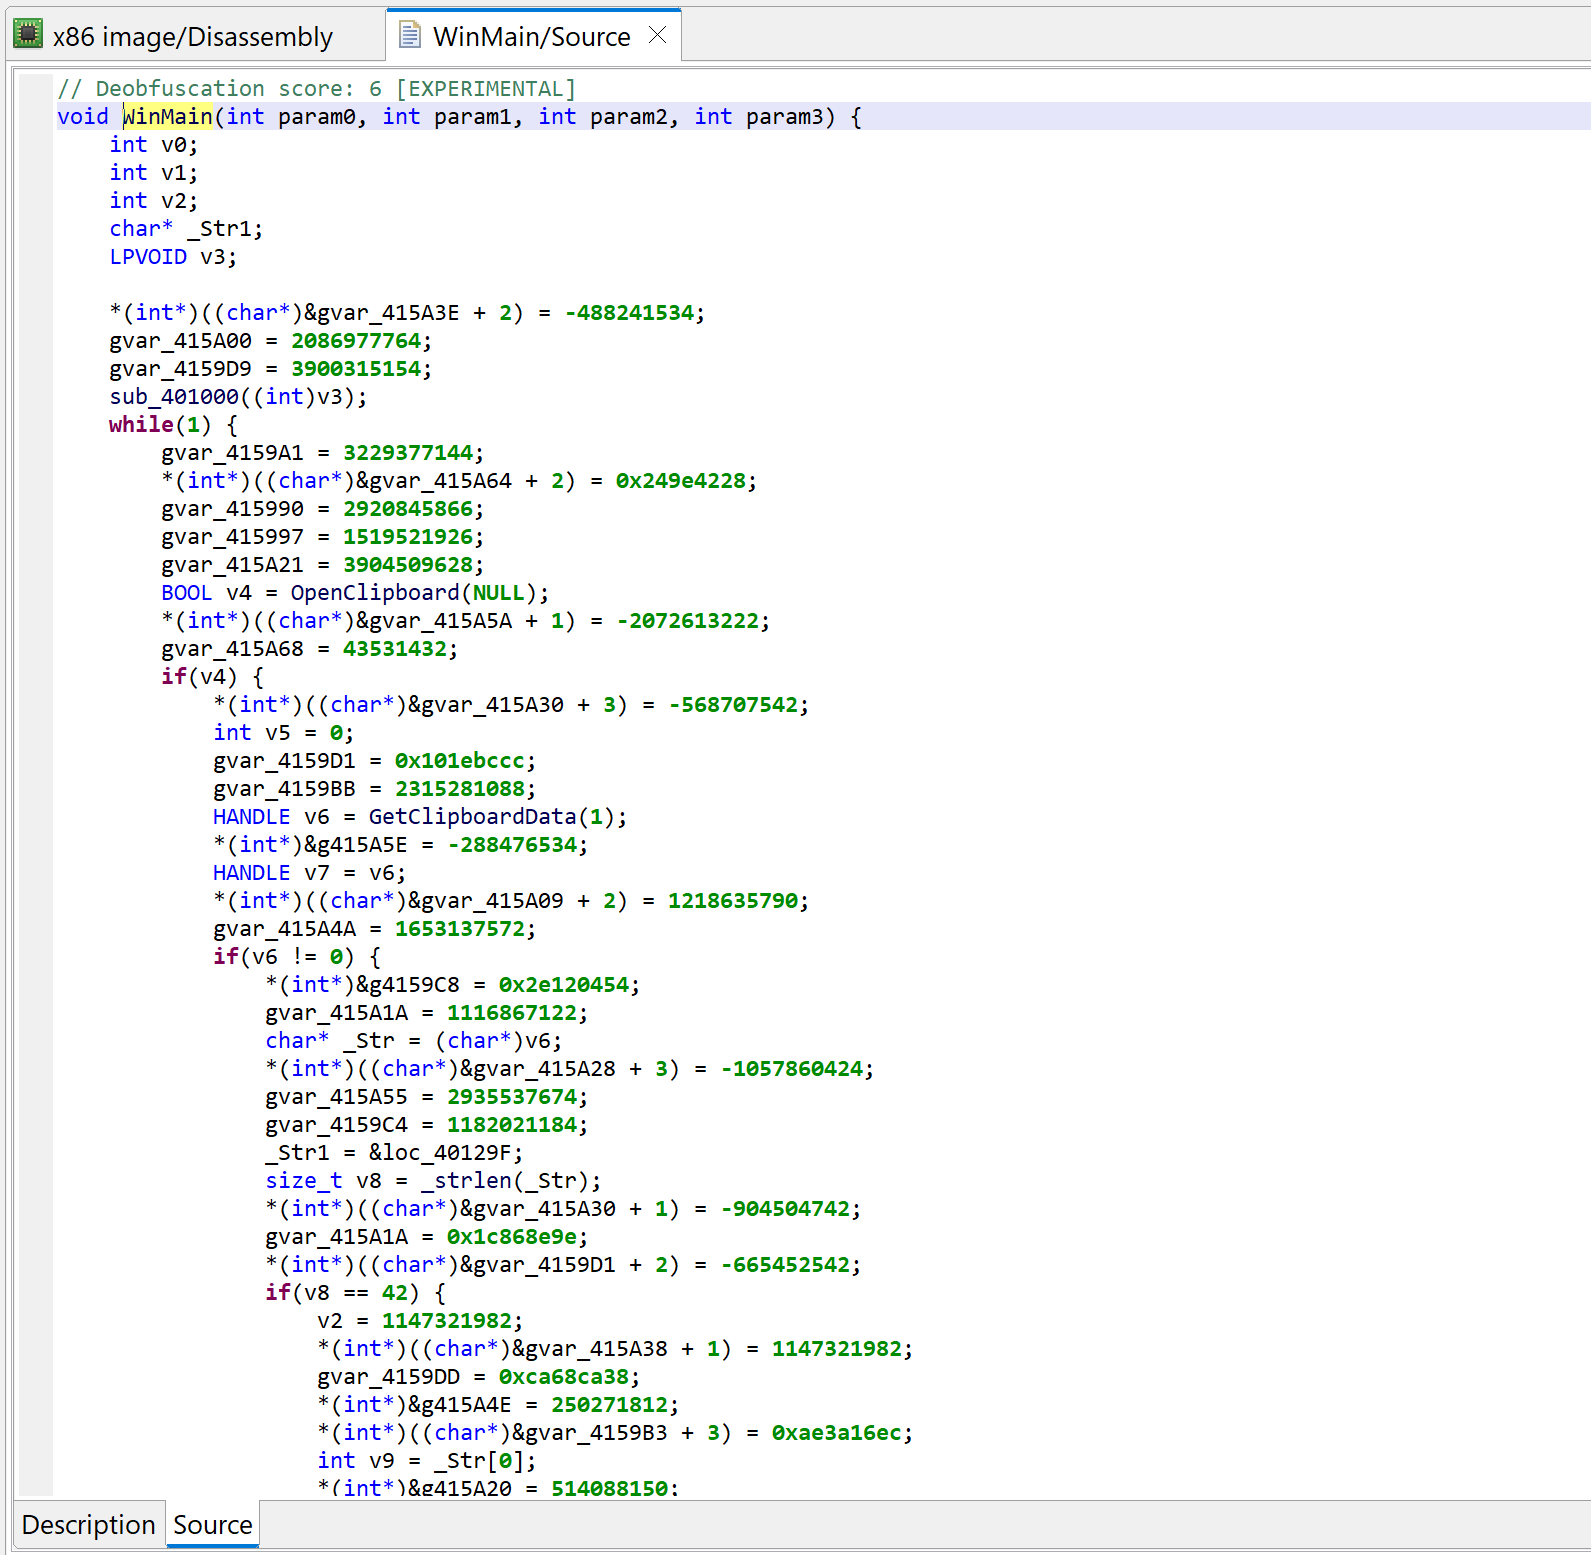
The decompiled WinMain method is about 300 lines of C code. A lot of it are assignments writing to program globals. At first glance, it looks like it could be some sort of obfuscation. Let’s look at the corresponding assembly code:

Press TAB to go back from a decompilation to the closest matching machine code disassembly line

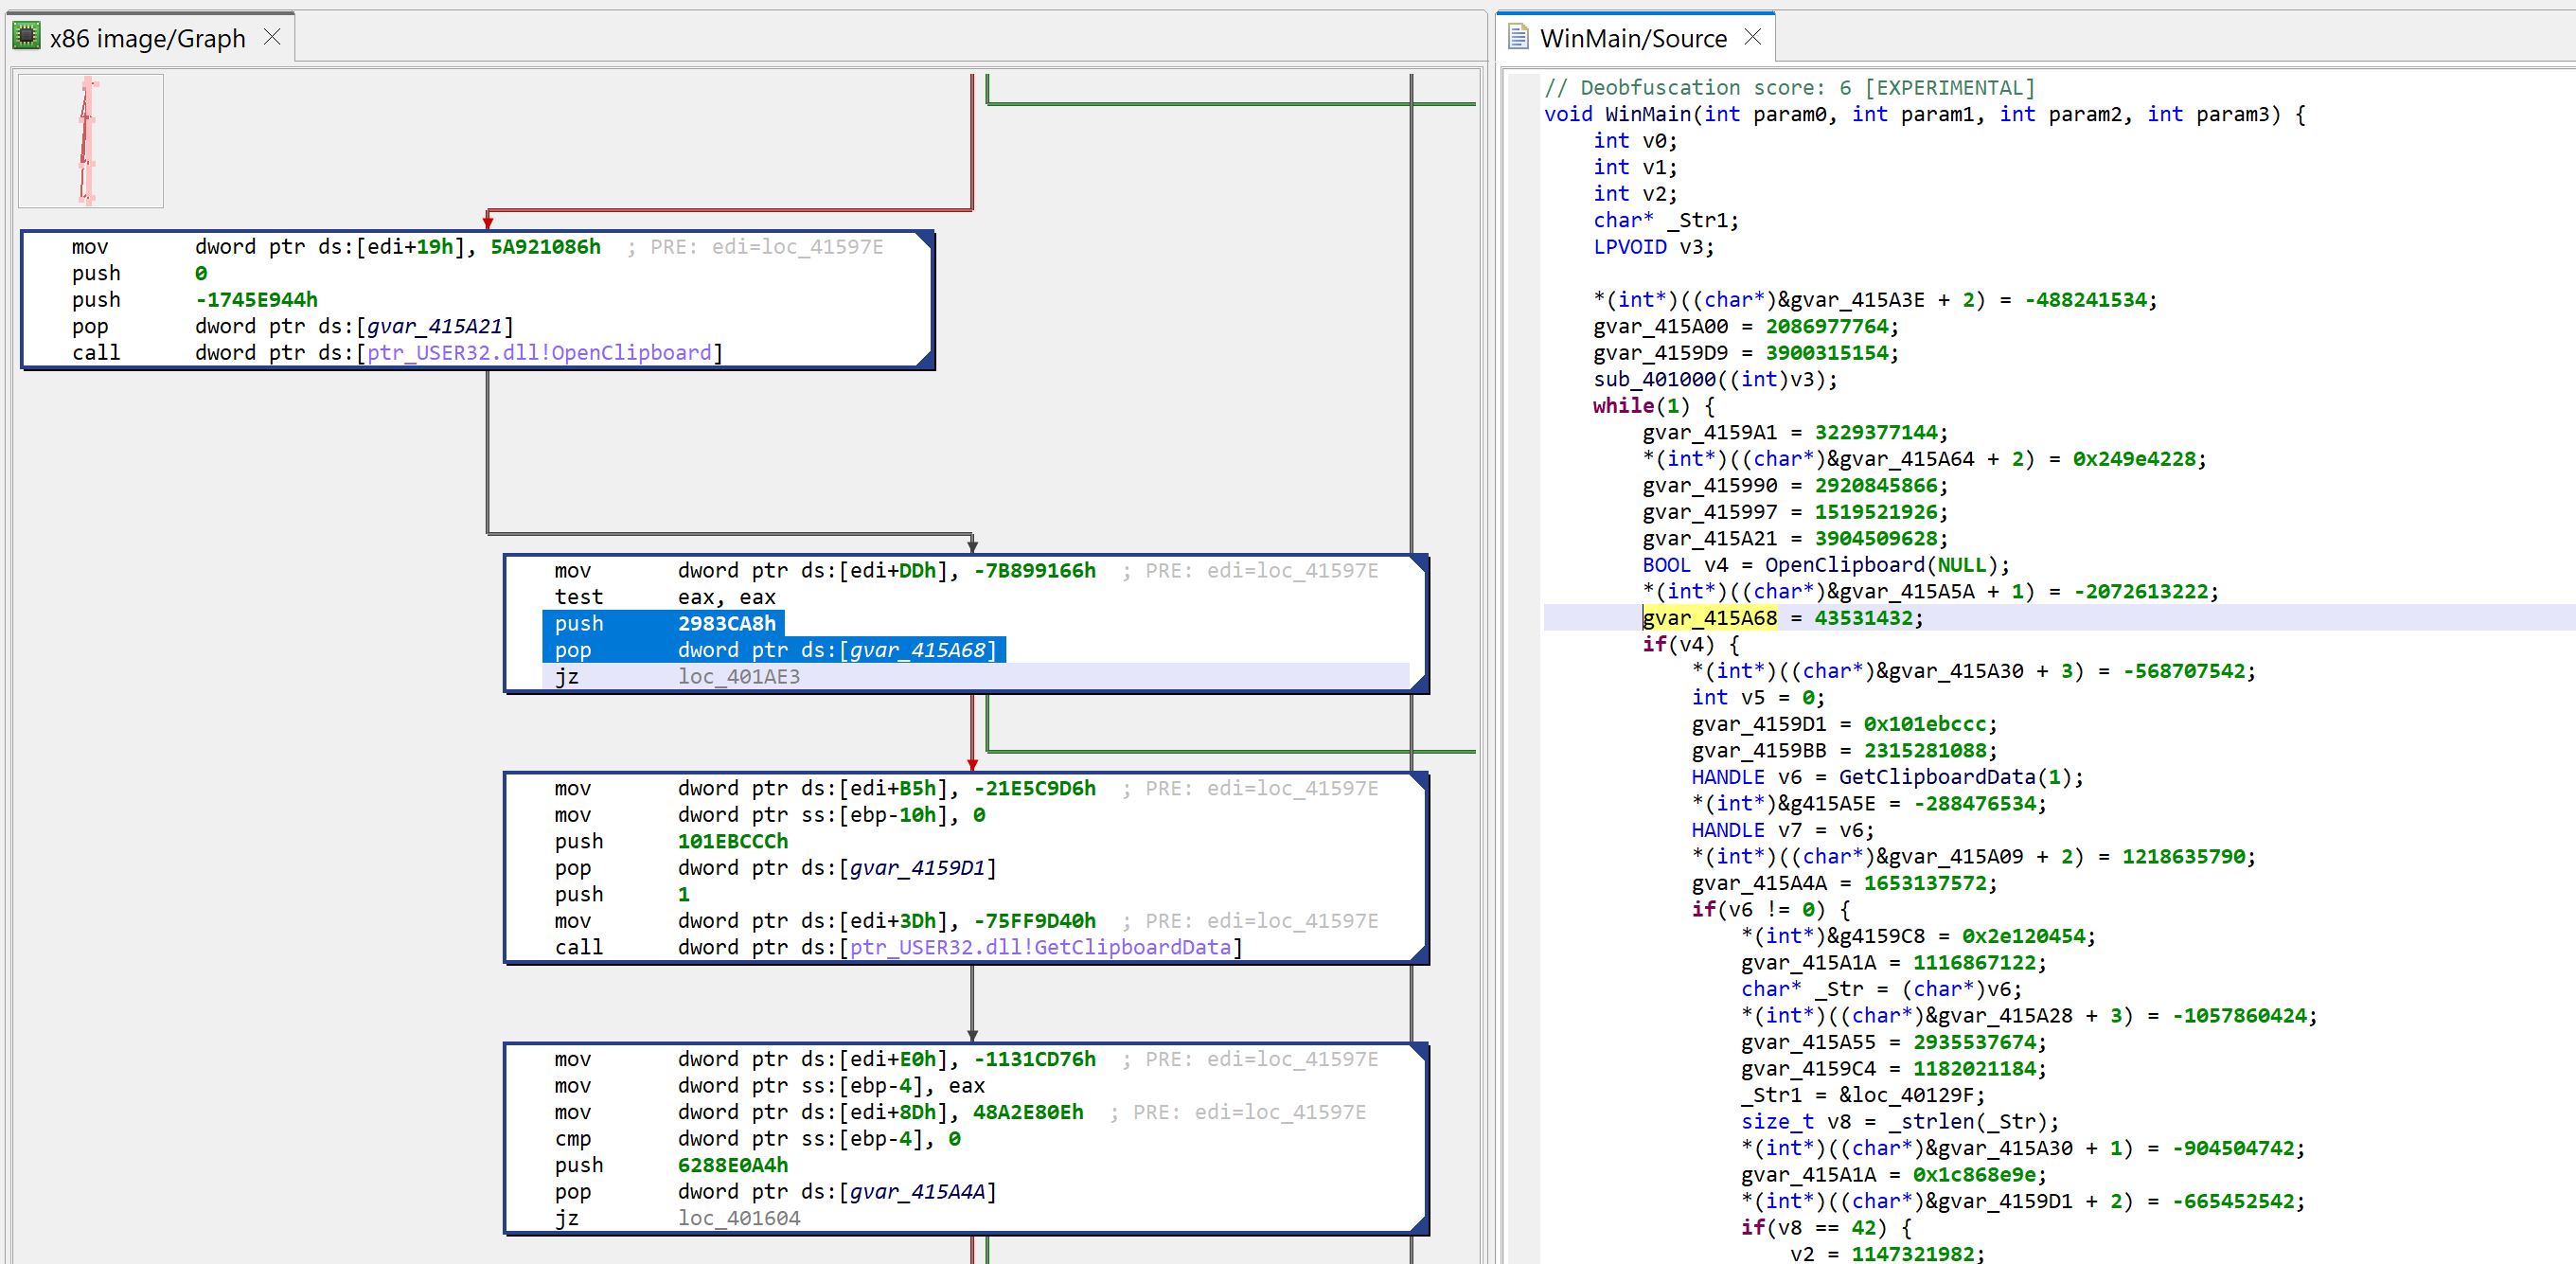
The snippets have the following structure:
push GARBAGE / pop dword [gXXX]

Or that, assuming edi is callee-saved:
mov edi, gXXX / ... / mov dword [edi+offset], GARBABE

Later on, we will see how to remove this clutter to make the analysis more pleasant.
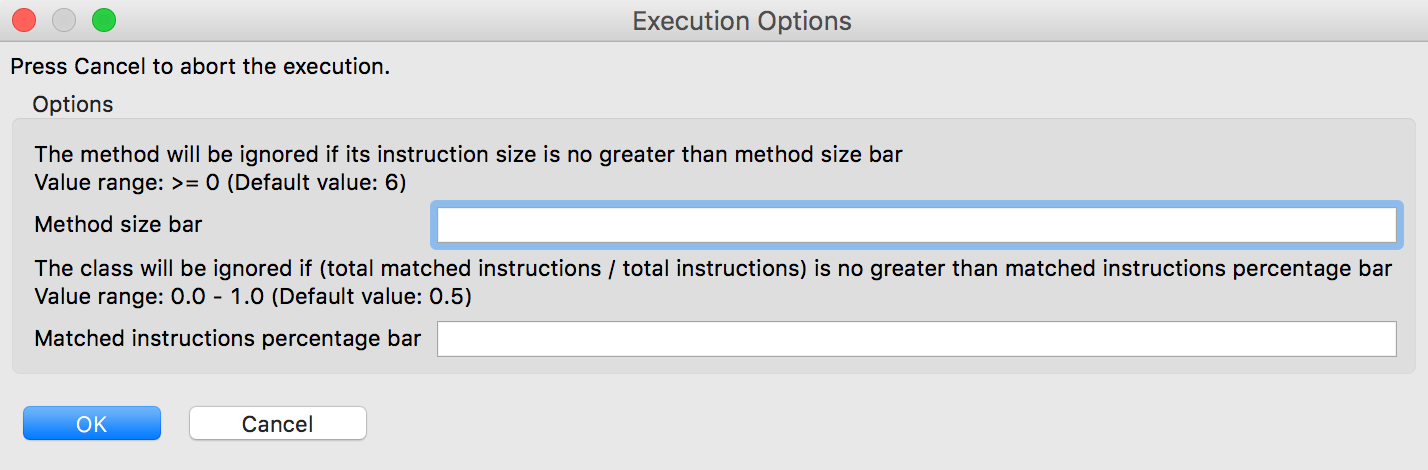
Deobfuscation score

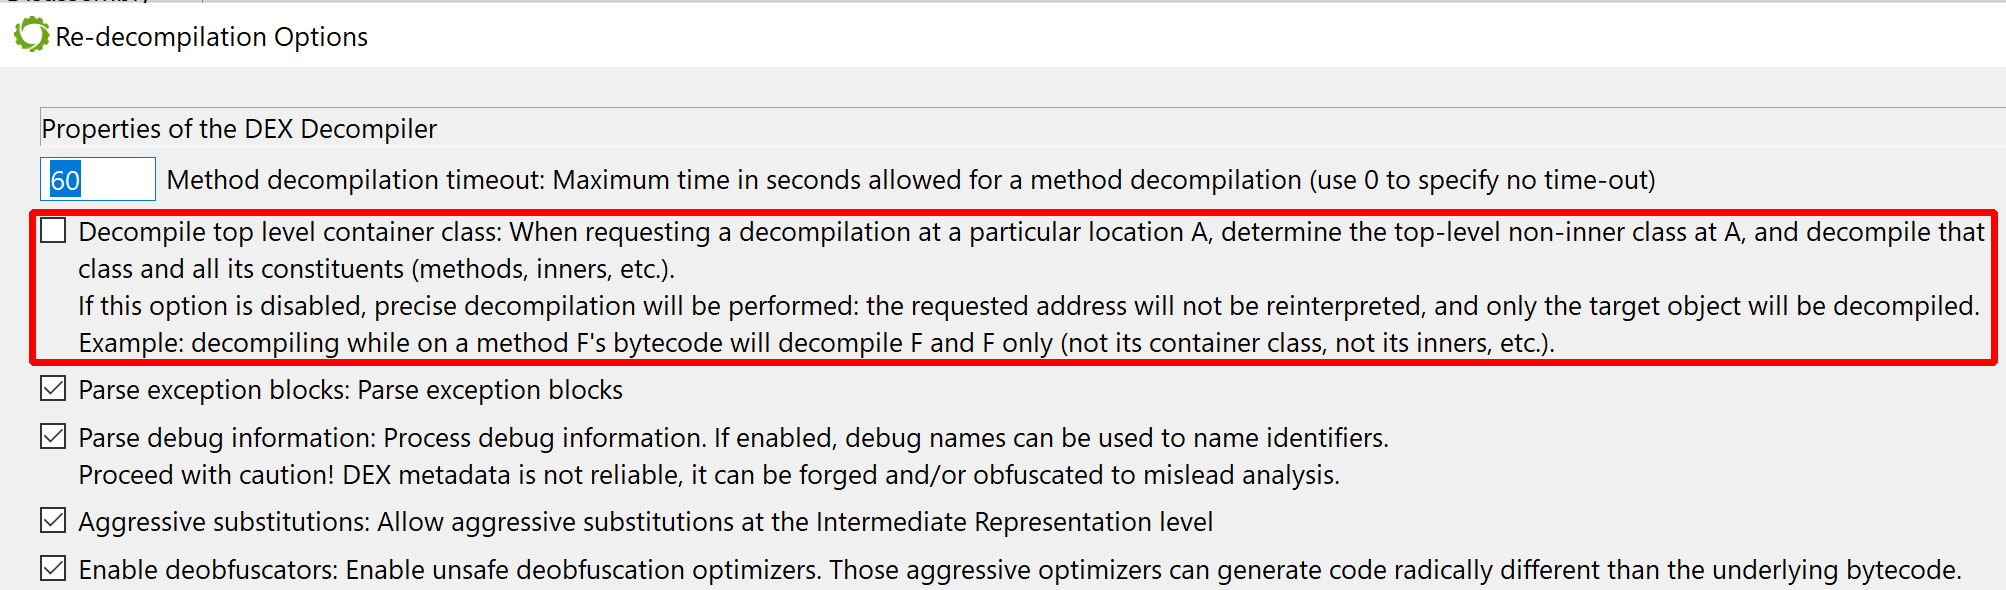
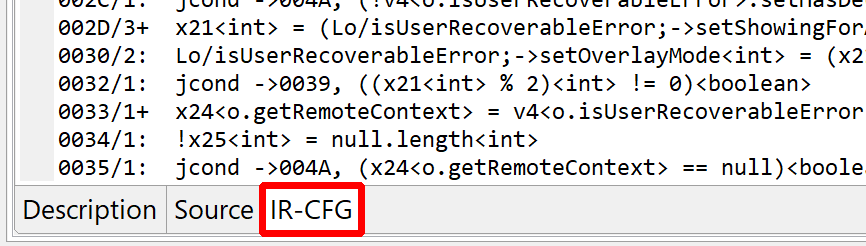
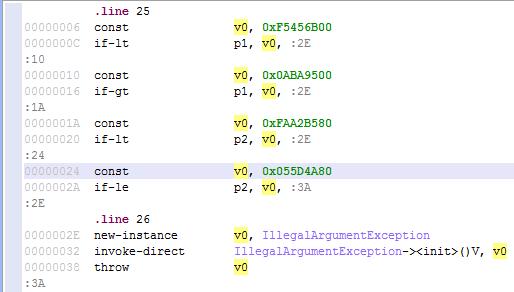
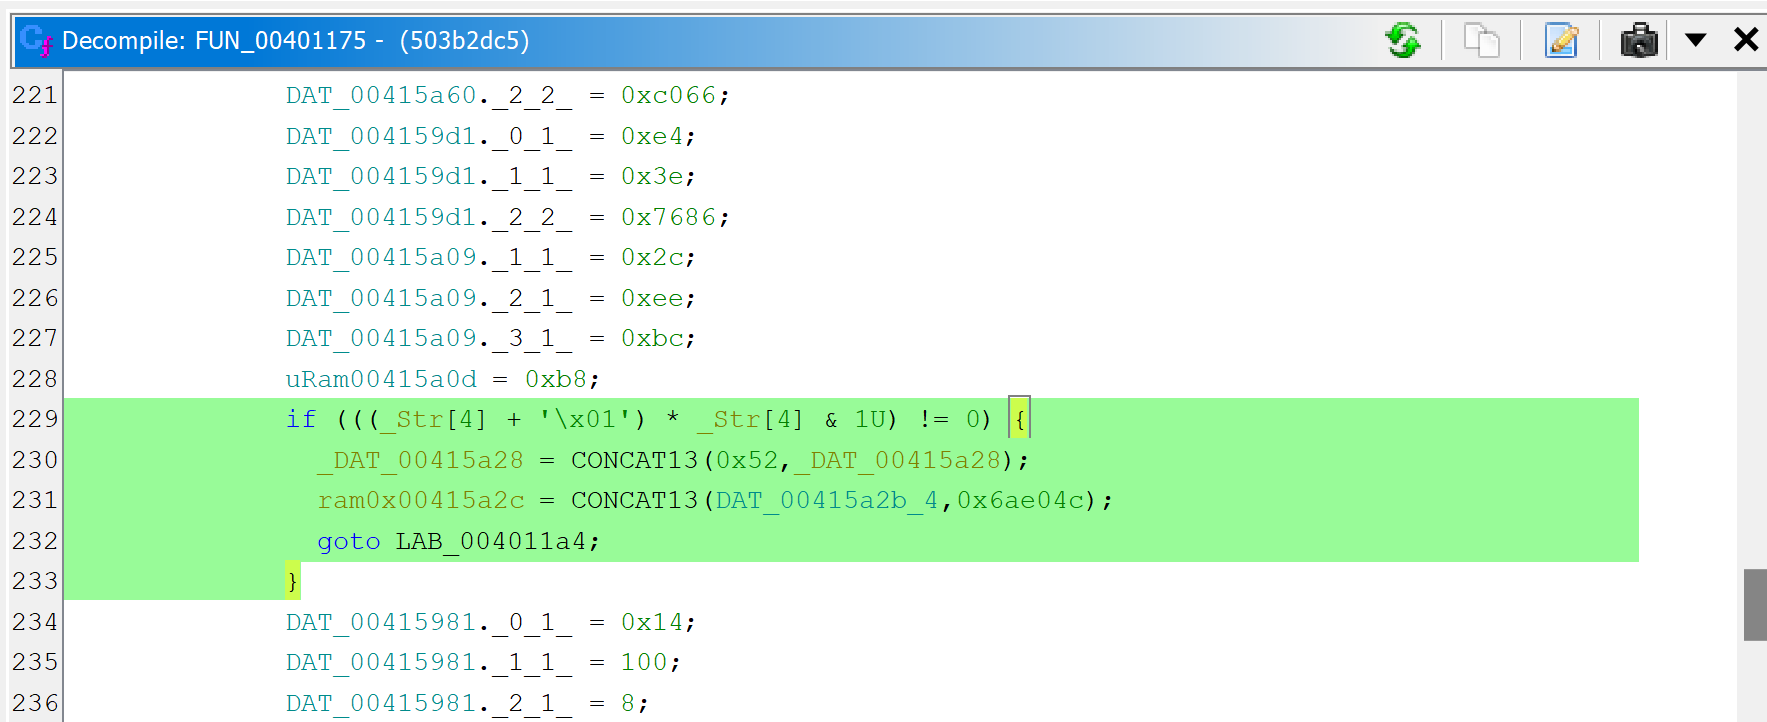
A note “deobfuscation score: 6” was inserted as a method comment. That score indicates that some “advanced” clean-up was performed. In this case, a careful examination (as well as a comparison against a decompilation with UNSAFE optimizers turned off, which you can do by redecompiling the method with CTRL+TAB (menu: Action, Decompile with Options…)) will point to this area of code:

The opaque predicate calculation is highlighted in green using CTRL+M (menu: Action, Toggle Highlight…)

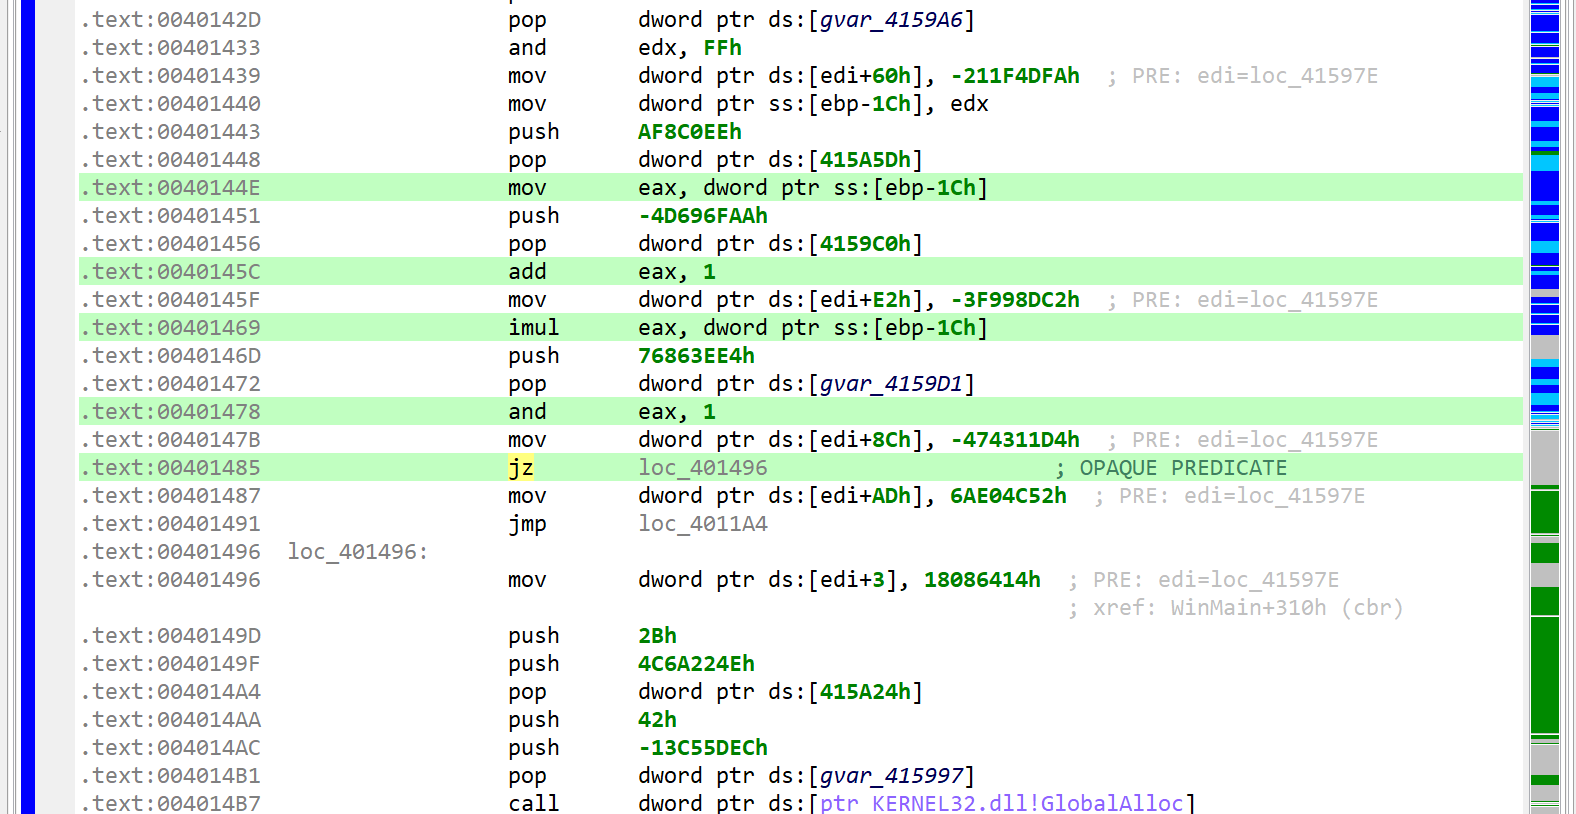
This predicate looks like the following: if(X*(X+1) % 2 == 0) goto LABEL.

With X being an integer, X*(X+1) is always even. Therefore, the predicate will always evaluate to true. JEB cleaned this up automatically. (While this particular predicate is trivial, truly opaque predicates will also be attempted to be broken up by JEB, using the Z3 SMT solver.)

Comparison with GHIDRA

For a point of comparison, you may have a look at the same method decompiled by GHIDRA 10.4 here (default settings were used, just like we did with JEB). The predicate is not cleaned-up adequately, extra control-flow edges are left over, leading to AST structuring confusion.

Cleaning up the code

Let’s start with decluttering this code. First of all, why couldn’t the decompiler clean it up on its own? If the globals written to are never read with meaningful intent, then they could be discarded.

The issue is that this is very hard to ensure in the general case. However, in specific cases, sometimes involving manual review, some global written-to memory range may be deemed useless, as it is the case here. How do we provide this information to the decompiler? Well, as of version 5.7, we cannot! 1 What we can do though is write a decompiler plugin to clean-up the offending IR, and in the process, generate clean(er) code.
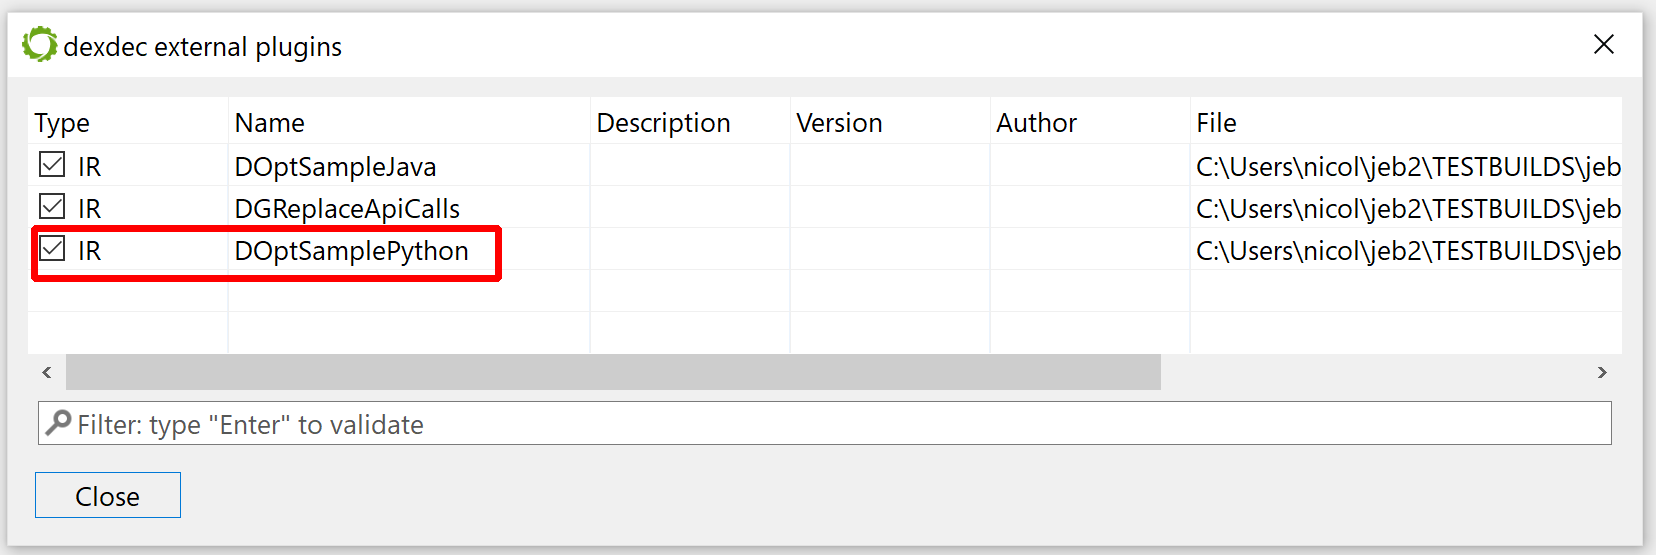
IR cleaner plugin

The decompiler accept several types of plugins, including IR Optimizers (they work on the Intermediate Representation of a routine, as it moves up the decompilation pipeline), and AST optimizers (to clean-up or reformat the generated abstract syntax tree of the pseudo-code). In most cases, IR optimizers are well-suited to perform code clean-up or deobfuscation tasks (refer to this blog post for a detailed comparison).

We will write the plugin in Java (we could also write it in Python). It will do the following:

  • Examine each IR statement of a CFG
  • Check if the statement is writing an immediate to some global array: *(array + offset) = value
  • If so, check the array name. If it starts with the prefix “garbage”, consider the statement useless and replace it by a Nop statement

Writing IR plugins is out-of-scope in this post; we will go over that in details in a future entry. In the meantime, you can download the plugin code here. Dump the Java file in your JEB’s coreplugins/scripts/ folder. There is no need to close and re-open JEB; it will be picked up at the next decompilation.

public class GarbageCleaner extends AbstractEOptimizer {

	@Override
	public int perform() {
		int cnt = 0;

		for (BasicBlock<IEStatement> b : cfg) {
			for (int i = 0; i < b.size(); i++) {
				IEStatement stm = b.get(i);
				if (stm instanceof IEAssign && stm.asAssign().getDstOperand() instanceof IEMem
						&& stm.asAssign().getSrcOperand() instanceof IEImm) {
					IEMem dst = stm.asAssign().getDstOperand().asMem();
					IEGeneric e = dst.getReference();
					// [xxx + offset] = immediate
					if (e.isOperation(OperationType.ADD)) {
						IEOperation op = e.asOperation();
						if (op.getOperand1().isVar() && op.getOperand2().isImm()) {
							IEVar v = op.getOperand1().asVar();
							IEImm off = op.getOperand2().asImm();
							if (v.isGlobalReference()) {
								long addr = v.getAddress();
								INativeContinuousItem item = ectx.getNativeContext().getNativeItemAt(addr);
								// logger.info("FOUND ITEM %s", item.getName());
								if (item != null && item.getName().startsWith("garbage")) {
									long itemsize = item.getMemorySize();
									if (off.canReadAsLong() && off.getValueAsLong() + dst.getBitsize() / 8 < itemsize) {
										logger.info("FOUND GARBAGE CODE");
										b.set(i, ectx.createNop(stm));
										cnt++;
									}
								}
							}
						}
					}
				}
			}
		}

		if (cnt > 0) {
			cfg.invalidateDataFlowAnalysis();
		}
		return cnt;
	}
}

Note that by design, the plugin is not specific to this malware. We will be able to re-use it in future analyses: all global arrays prefixed with “garbage” will be treated by the decompiler as junk recipients, and cleaned-up accordingly!

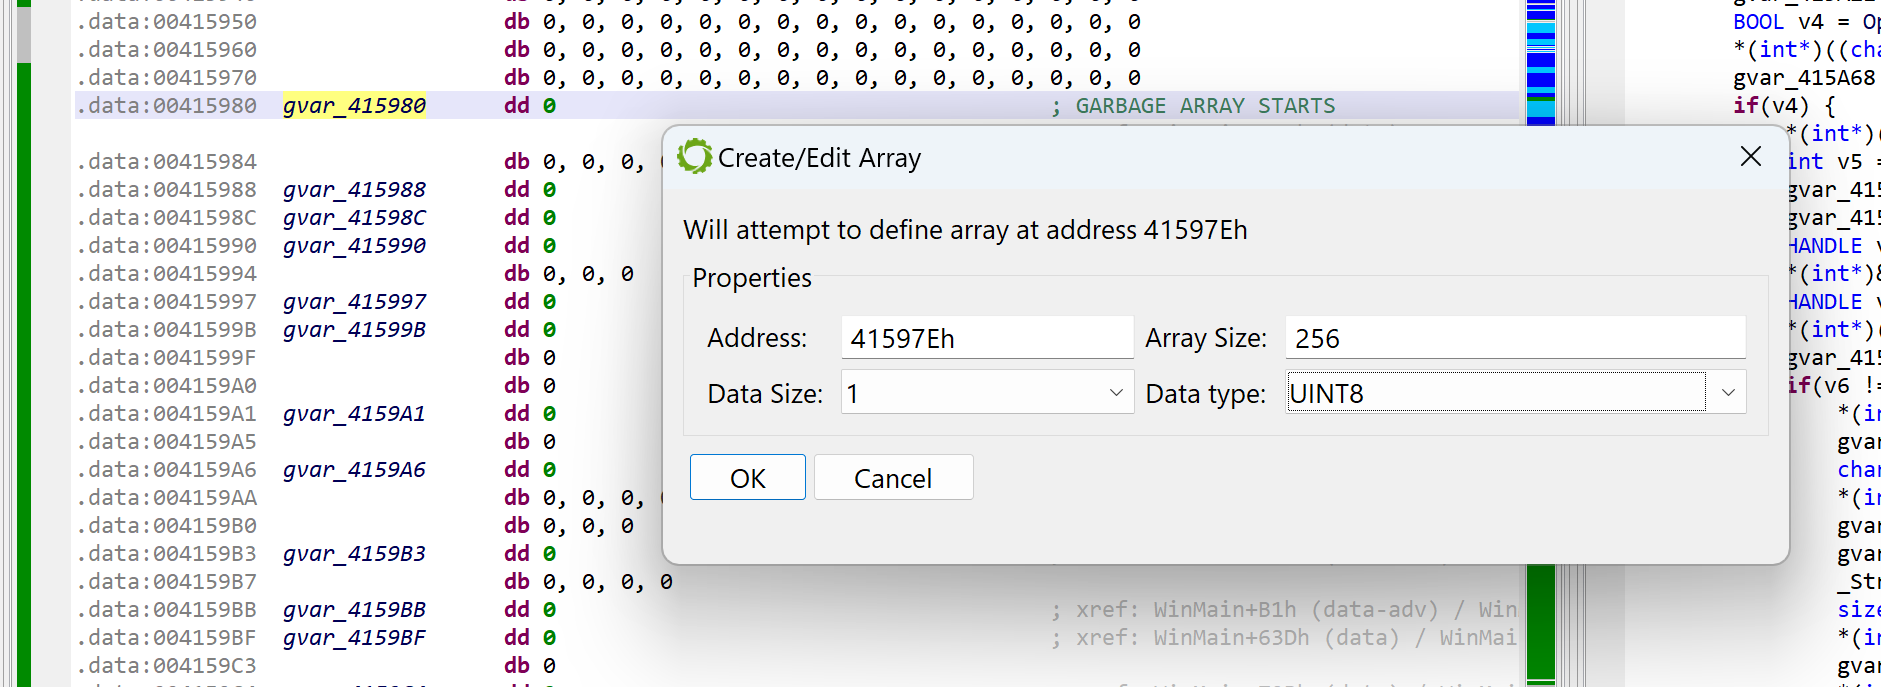
Defining the garbage array

At this point, we need to determine where that array is. Some examination of the code leads to the following boundaries (roughly): start at 0x41597E, spans over 0x100 bytes. Navigate to the disassembly; create an array using the STAR key (menu: Native, Create/Edit Array…); specify its characteristics.

Creating a global array of 0x100 bytes. This is the garbage array.

As soon as the array is created, the disassembly will change to what can be seen below. At the same time, the decompilations using that array will be invalidated; that is the case for WinMain. You may see that another extra-comment was added by the decompiler: “Stale decompilation – Refresh this view to re-decompile this code”. Such decompilations are read-only until a new one is generated.

The array is now created. The decompilation of WinMain becomes stale.

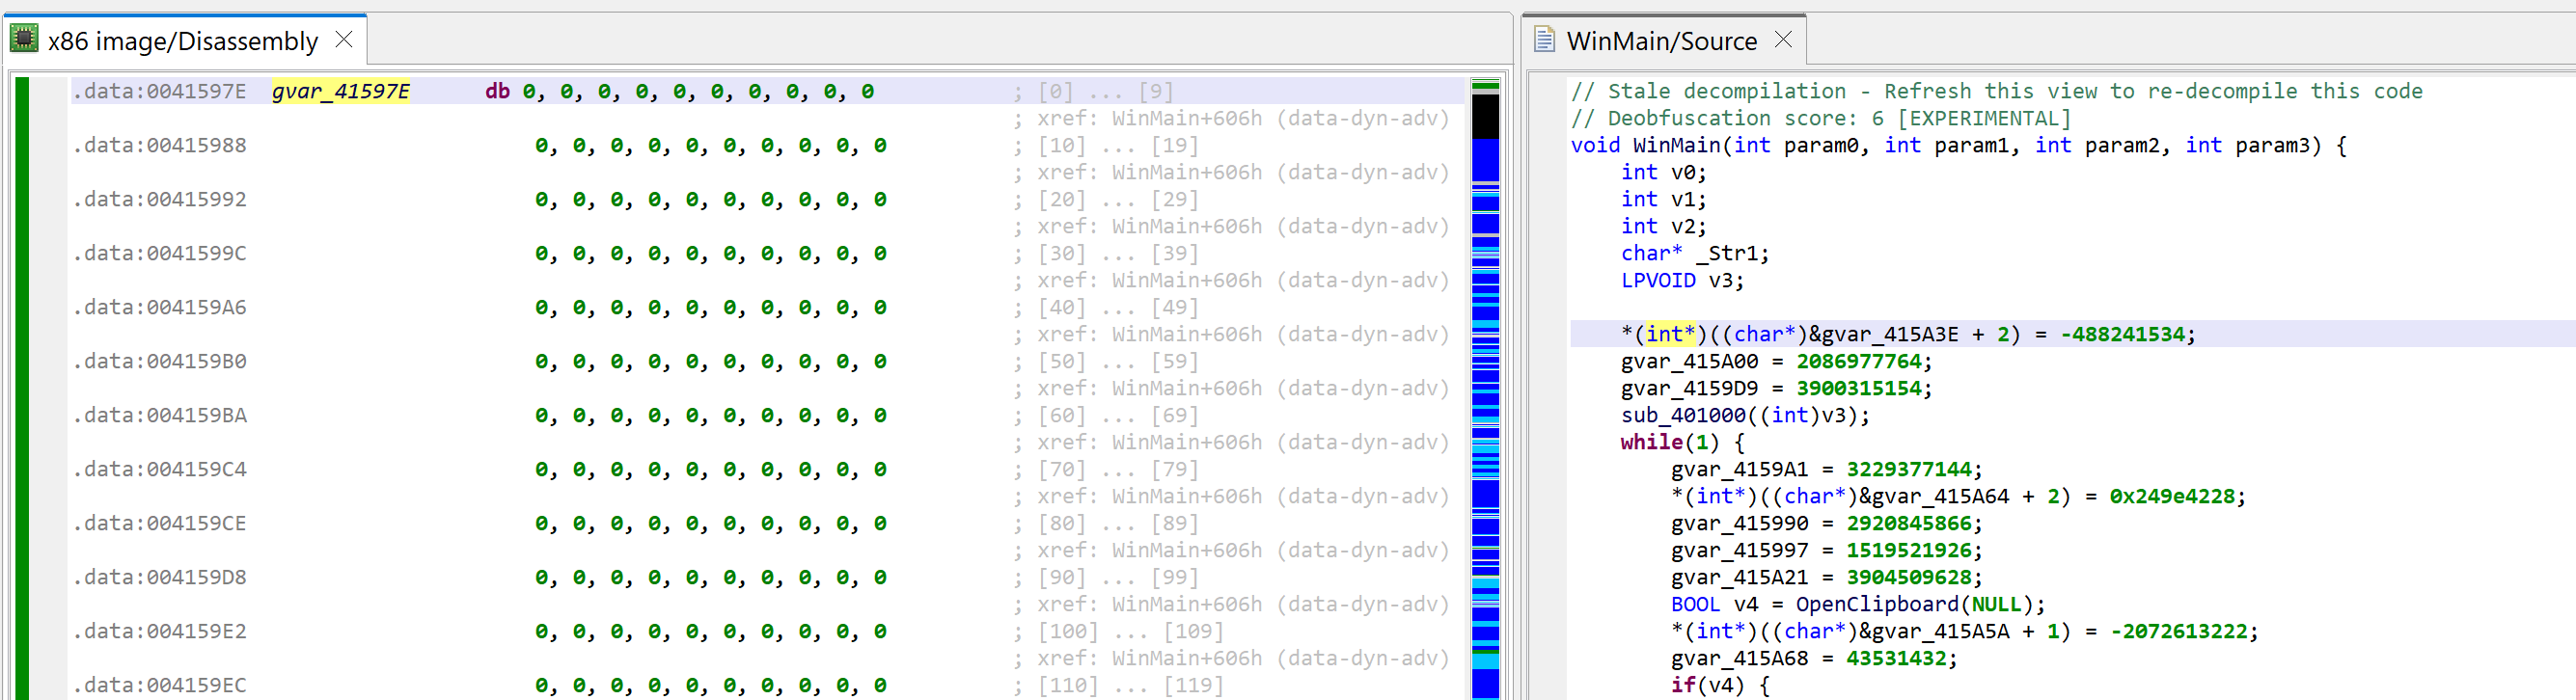
Before redecompiling, remember we need to rename our array with a label starting with “garbage”. Set the caret on the array, hit the key N (menu: Actions, Rename…) and set your new name, e.g., garbageArray1.

Now you may go back to the decompilation view of WinMain and hit F5 (menu: Windows, Refresh…) to regenerate a decompilation.

Decompiled WinMain after the garbage array-assigns were cleaned-up by the plugin

The code above is much nicer to look at – and much easier to work on!

Quick analysis

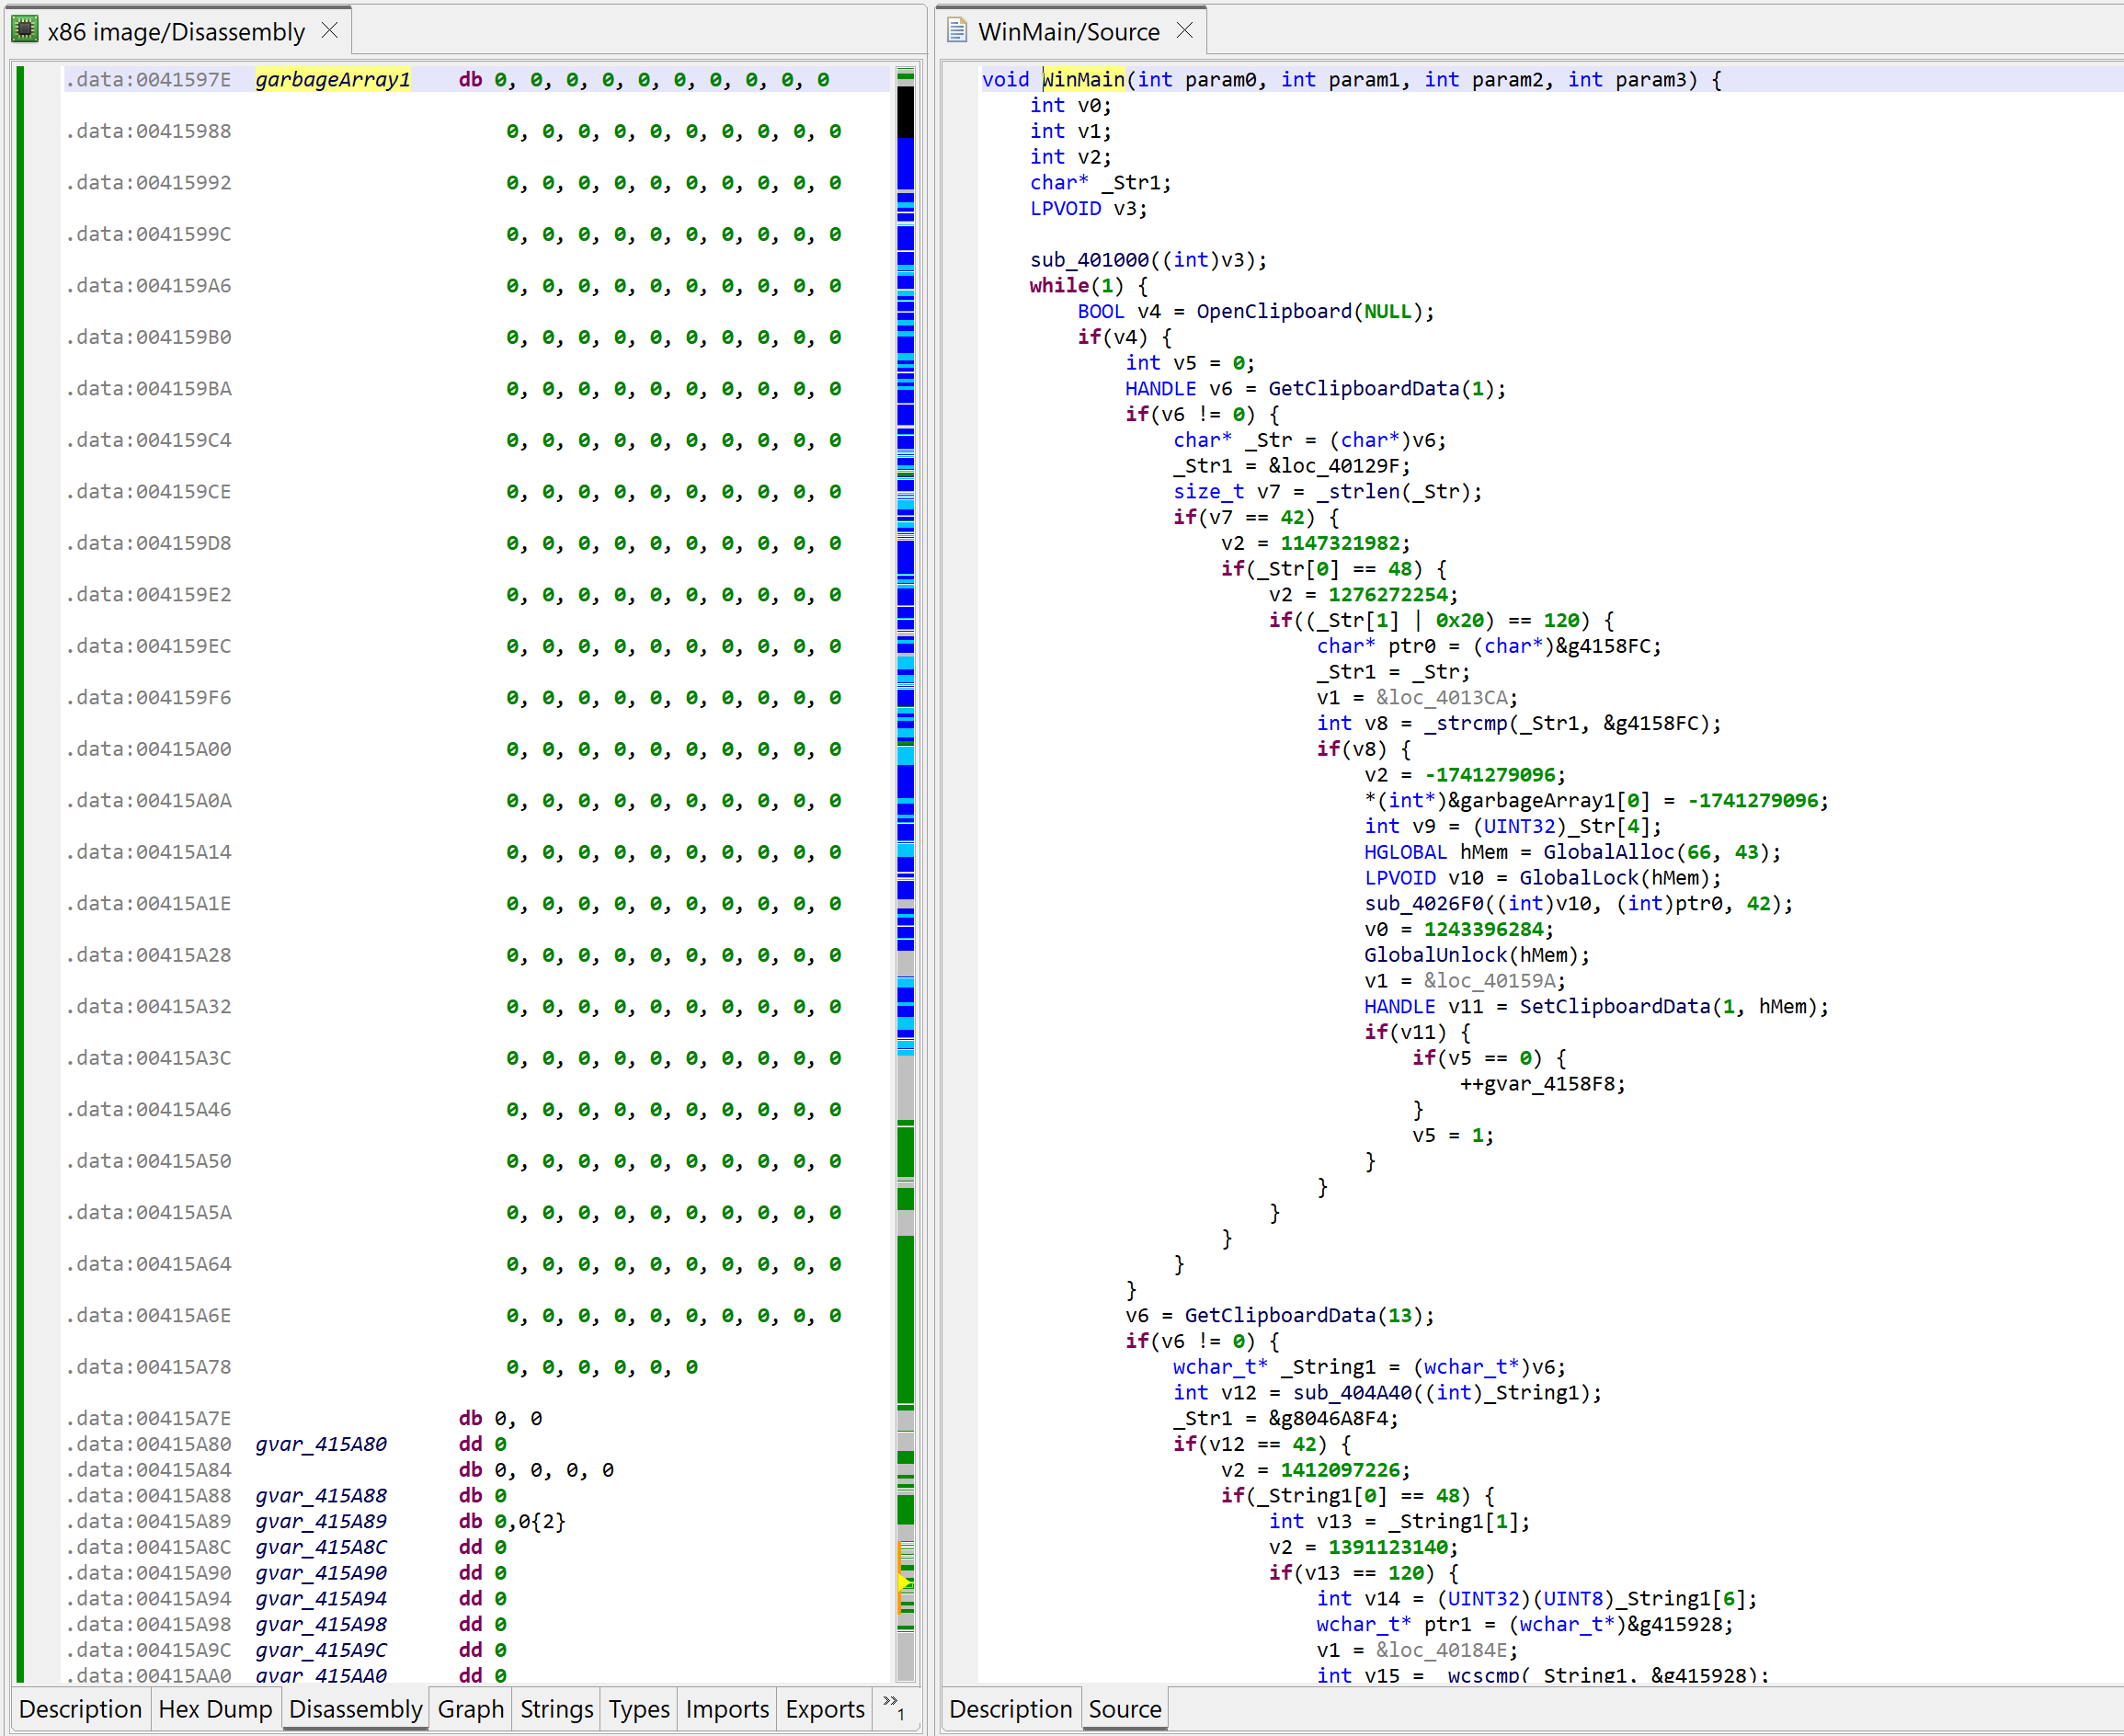
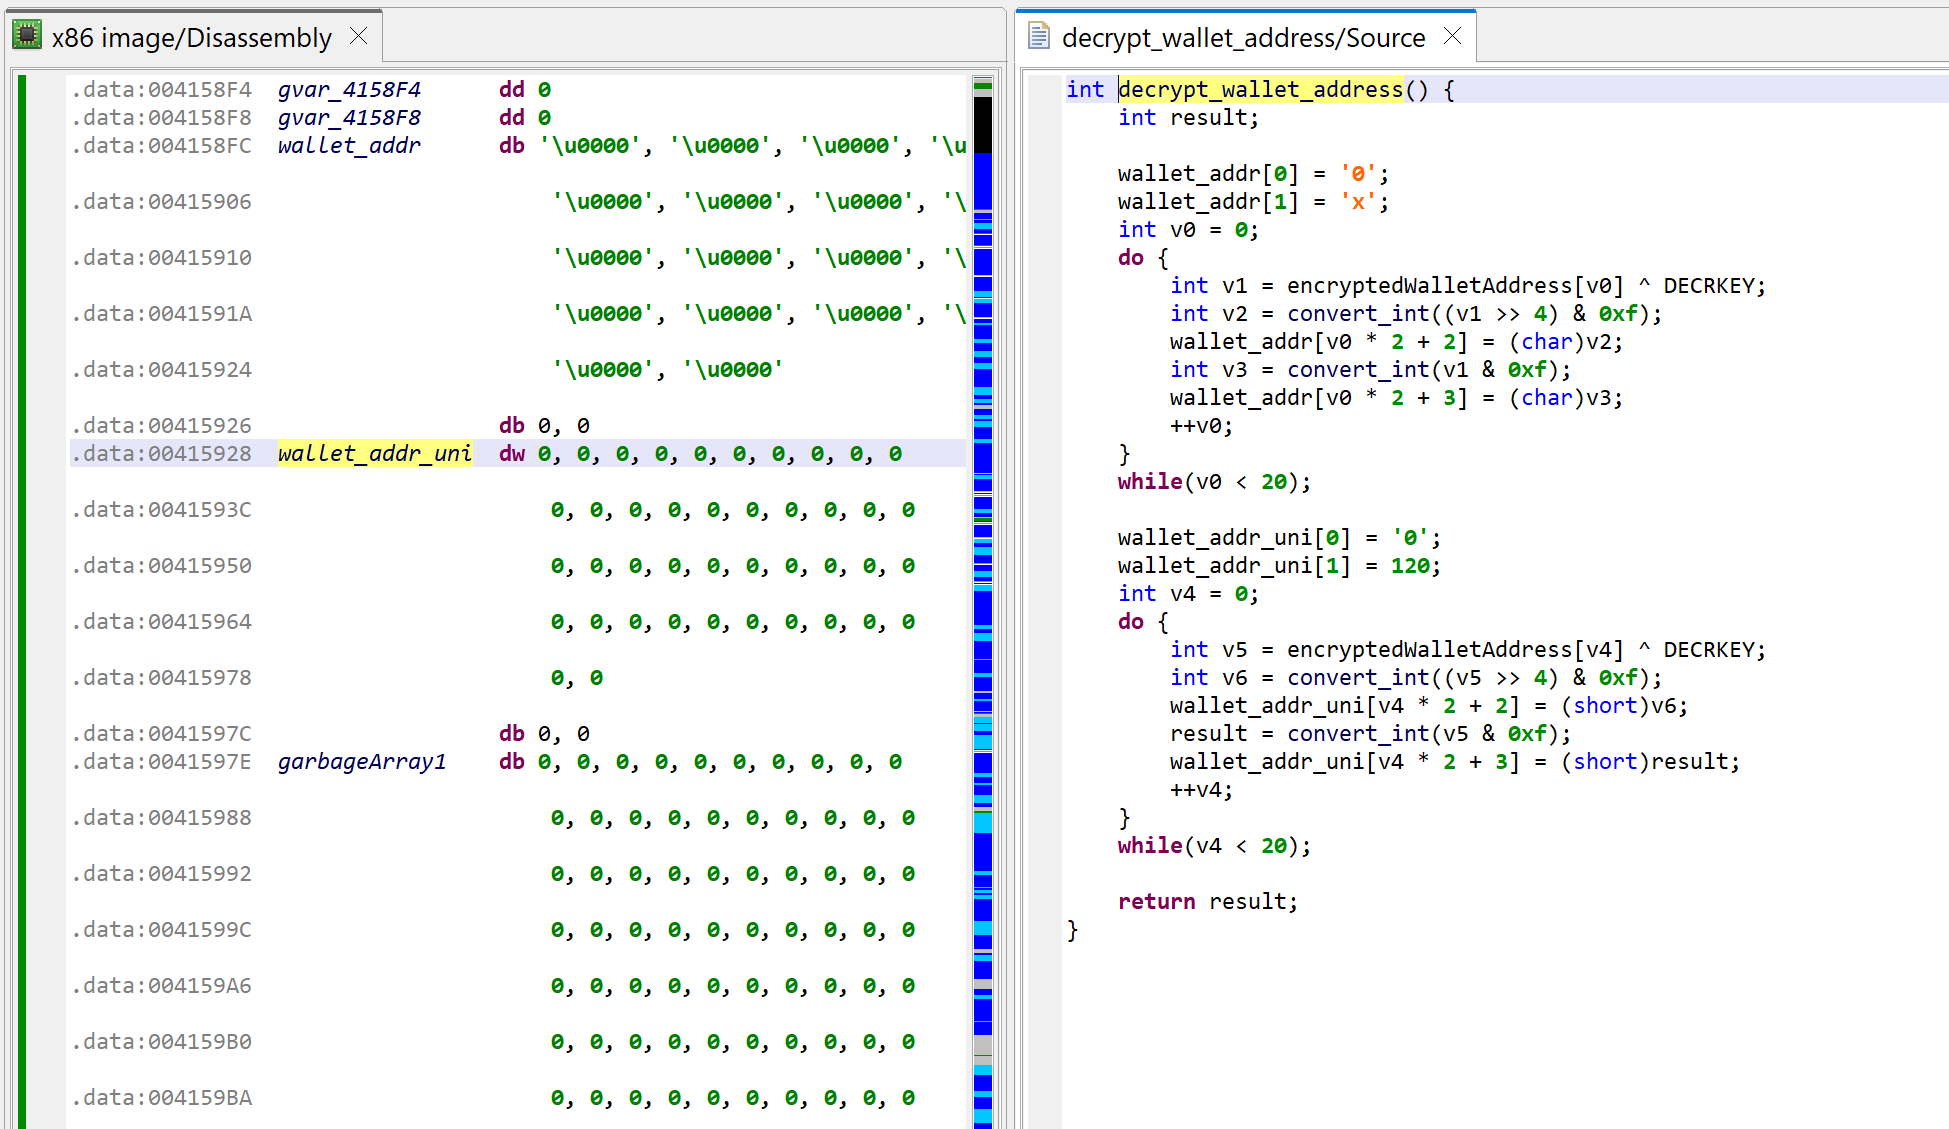
The method at 0x401000, called by WinMain, is decrypting the thief’s wallet address, and generating two hexstring versions of it (ascii and unicode).

Decrypting the target wallet address. The decompilation is shown after proper types were applied on the data structures accessed (encrypted wallet address, hexstrings, etc.) and better names given to those vars

The loop in WinMain is doing the following:

  • Every second, it queries the Windows clipboard with OpenClipboard
  • It checks if it contains text strings or unicode strings
  • If the string is 42 characters in length and starts with “0x”, it proceeds (an Ethereum wallet address is 20 bytes, therefore its hexadecimal representation would be 40 characters)
  • It checks if the string is not the attacker’s wallet address
  • If not, it replaces the contents of the clipboard data by the attacker’s wallet address using SetClipboardData
  • Finally, the other contents found in the clipboard is discarded

Well-known literals

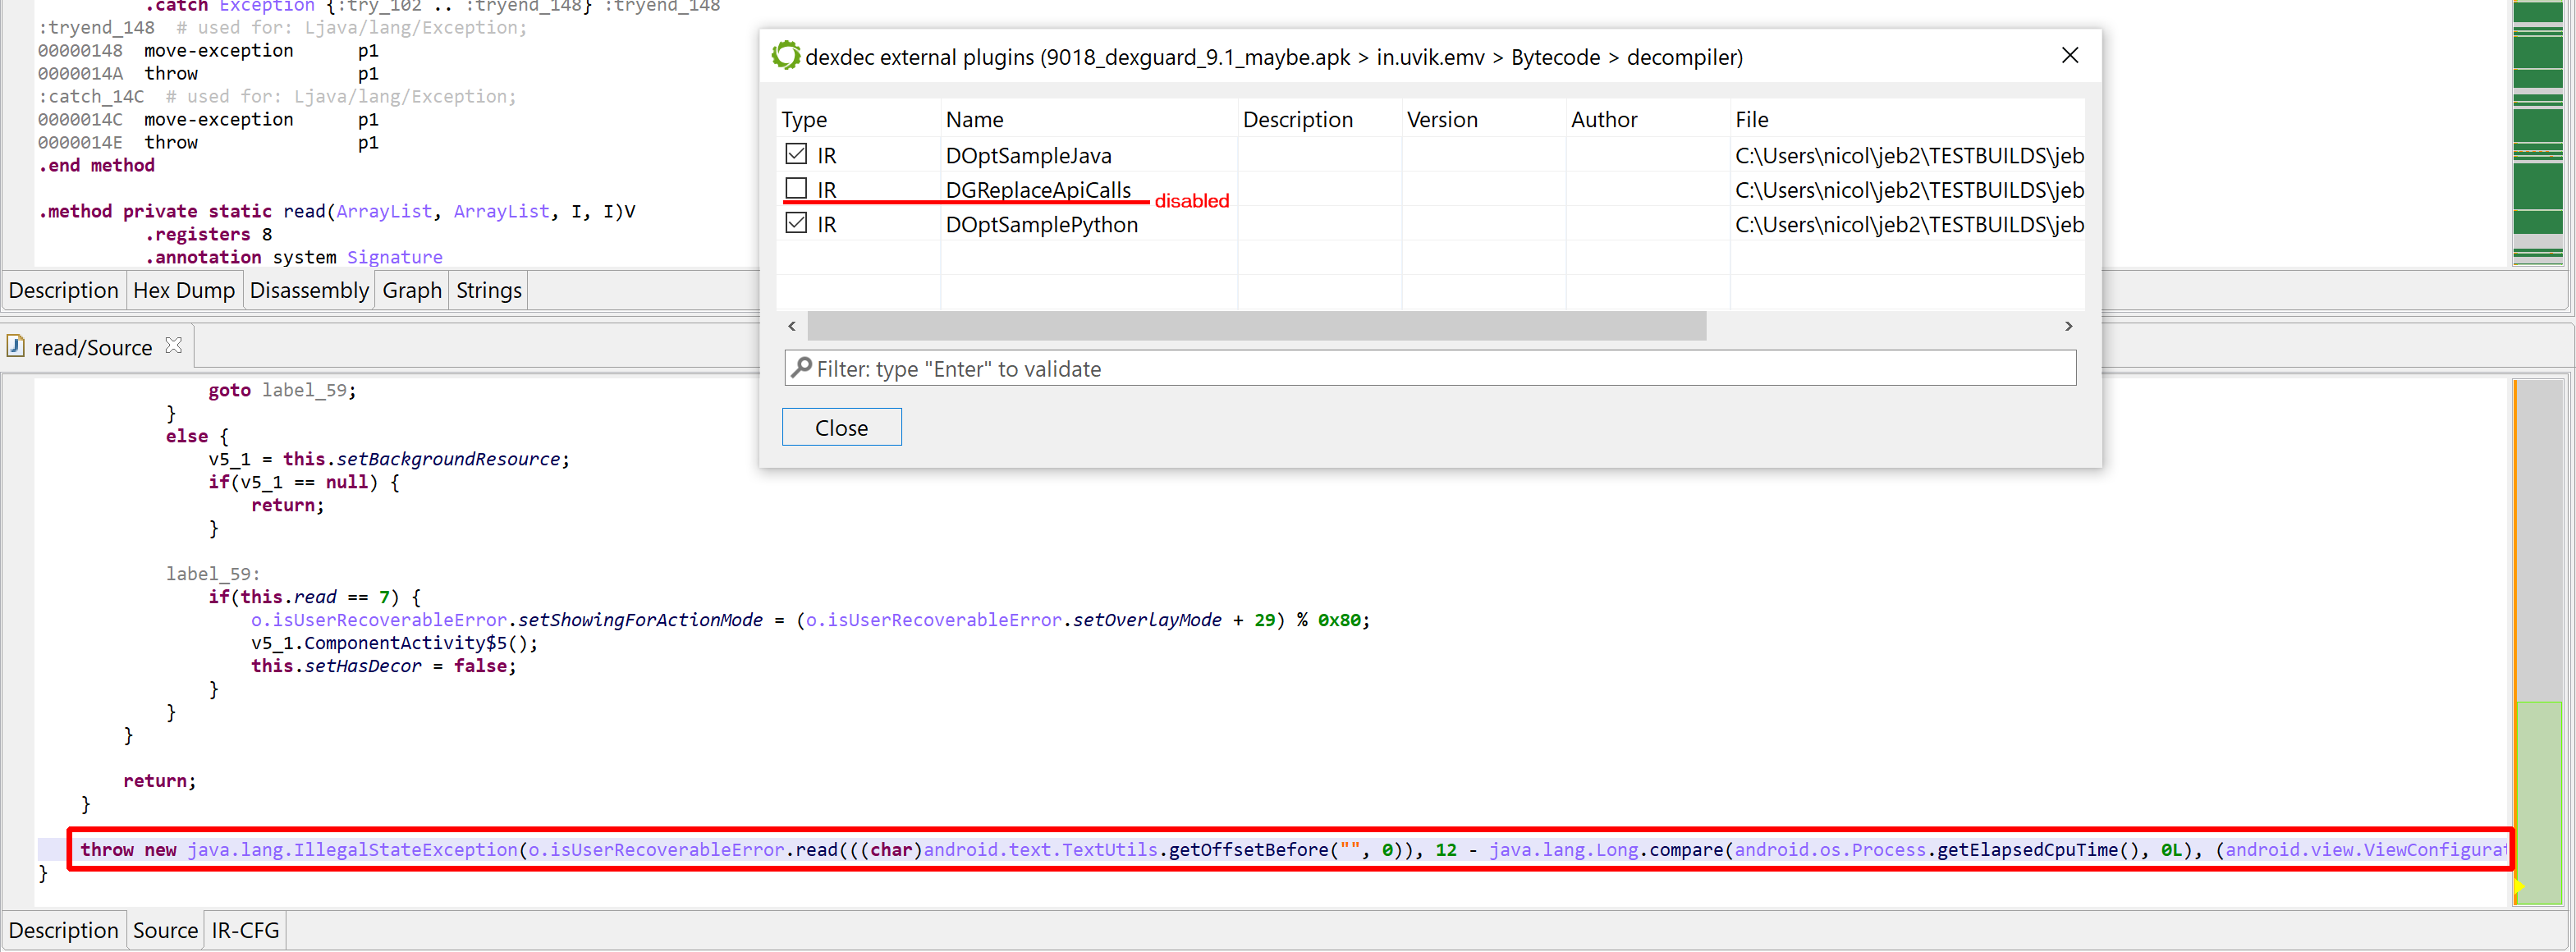
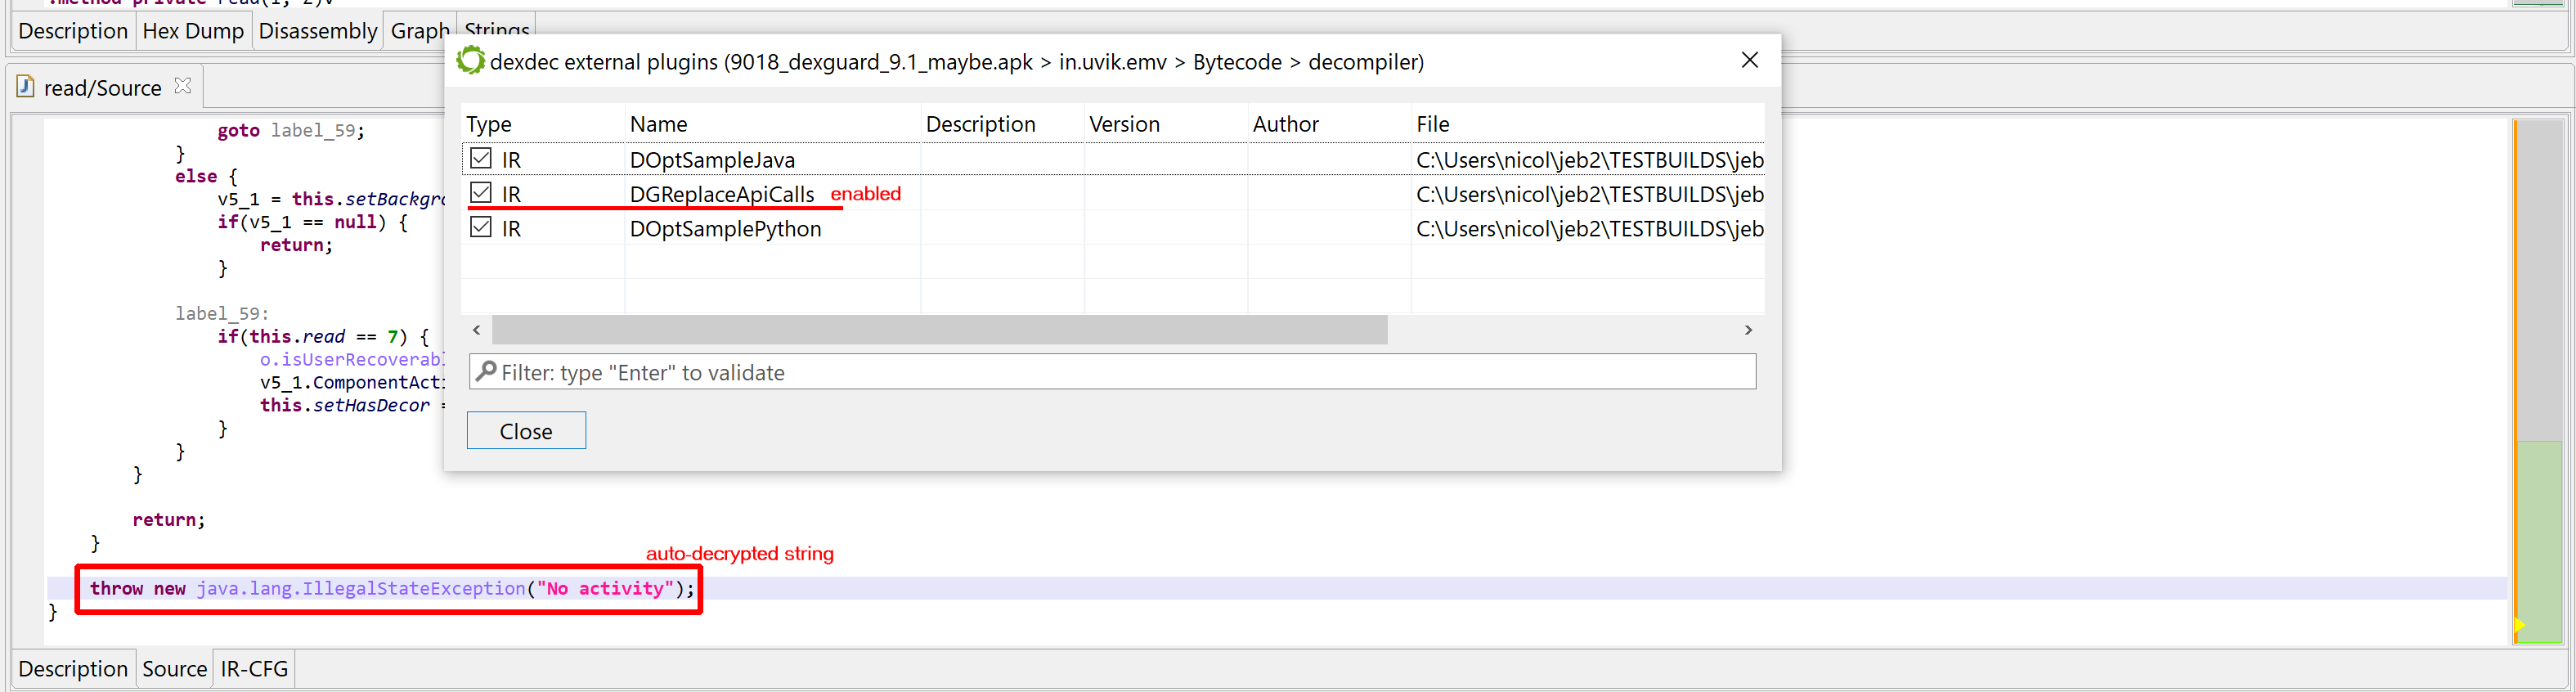
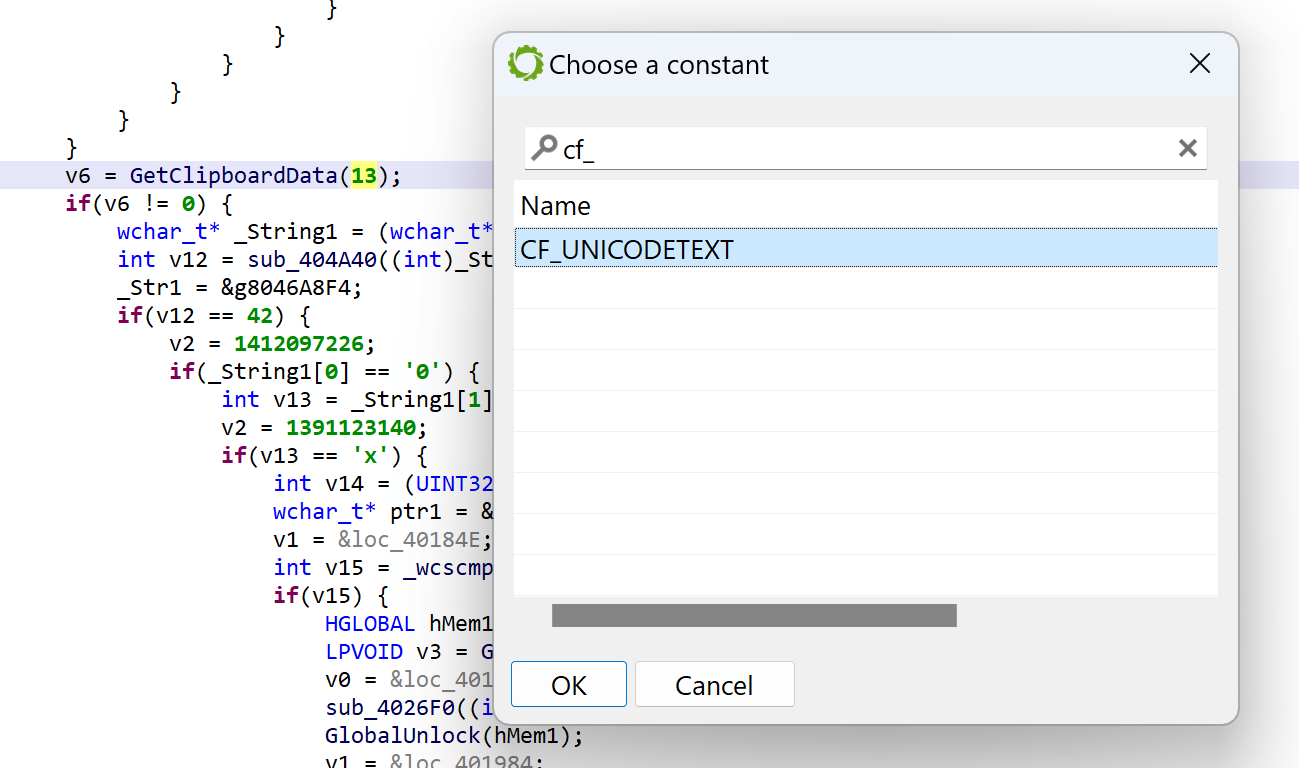
In JEB, you may replace immediates by well-known literals found in type libraries (aka typelibs, such as the win32 typelibs, which were automatically loaded when the analysis of the PE file started). To do that, select the immediate, then hit CTRL+N (menu: Action, Replace…), and select the desired literal 2

For example, per the MSDN, GetClipboardData uses CF_xxx constants to indicate the type of data. We can ask JEB to replace GetClipboardData(13) by GetClipboardData(CF_UNICODETEXT) using the Action/Replace handler:

Replacing 13 by CF_UNICODE in a call to GetClipboardData

Conclusion

That concludes the first blog in this “How to use JEB” series. In the next episodes, we will look at other features, dig deeper into writing IR plugins, look into types and types creation, and reverse other architectures, including exotic code.

To learn more, we encourage you to:

  • Explore this blog, as it contains many technical entries and how-to’s.
  • Look at the sample code (scripts and plugins) shipping with JEB, it will get you started on using the API to write your own extensions.
  • Join our Slack channel to engage with other users in the community and ask questions if you’re stuck on anything.

Thank you very much & Stay tuned 🙂 Happy Holiday to All 🎄

  1. The plugin written to analyze this malware may ship in some upcoming version of JEB.
  2. In many cases, JEB will do that automatically, and it should be the case here.

Writing dexdec IR optimizer plugins

Starting with JEB 4.2, users have the ability to instruct dexdec1 to load external Intermediate Representation (IR) optimizer plugins. 2

From a very high-level perspective, a Dex method scheduled for decompilation goes through the following processing pipeline:

  1. Dalvik method converted to low-level IR
  2. SSA transformation and Typing
  3. IR optimizations
  4. Final high-level IR converted to AST
  5. AST optimizations
  6. Final clean AST rendered as pseudo-Java code (NOTE: access to the AST is already possible via JEB’s Java AST API)

Phase 3 consists of repeatedly calling IR processors, that essentially take an input IR and transform it into another, further refined IR (that process is called “lifting”). IR processors range from junk code cleaner, to variable propagation, immediate propagation, constant folding, higher-level construct rebuilding, compound predicate rebuilding, code restructuring, to all sort of obfuscation removal, advanced optimizers that may involve emulation, dynamic or symbolic execution, etc.

By working at this level, power-users have the ability to write custom deobfuscators, that we may not be able to deliver as JEB built-ins for a variety of reasons (e.g. obfuscation specific to a single group of files, custom protection to files under NDA, etc.).

Sample dexdec IR script plugin applying custom deobfuscation to recover strings on a protected sample

A sample dexdec IR plugin

dexdec IR plugins are JEB back-end plugins (not front-end scripts). Therefore, they are to be dropped in the coreplugins folder (or coreplugins/scripts for plugin scripts). They can be written as:

  • Precompiled jar files: the source language can be anything that compiles to Java bytecode; those plugins cannot be hot-swapped, and therefore are not ideal for prototyping/experimenting; they are great for mature plugins though.
  • Java plugin scripts: single Java source files. Strong typing and IDE integration (e.g. with Eclipse or IntelliJ) with Javadoc makes it ideal for developing complex plugins. Hot reload is supported. (They can be seamlessly modified while JEB is running, making them great for prototyping.)
  • Python plugin scripts: written in 2.7 syntax. Hot reload is supported. Restriction: unlike other plugins, an instance of a Python script plugin may be shared by multiple decompilation threads. Therefore, they must be thread-safe and support concurrency.

In this blog, we will show how to write a Python plugin script. Users familiar with JEB client scripting will be in familiar territory.

IMPORTANT! Note that loading such plugins is not enabled by default in JEB. Add the following line to your bin/jeb-engines.cfg file to enable loading Python plugins: .LoadPythonPlugins = true

dexdec ir plugins must implement the IDOptimizer interface. In practice, it is highly recommended to extend the implementing class AbstractDOptimizer, like this:

from com.pnfsoftware.jeb.core.units.code.android.ir import AbstractDOptimizer

# sample IR plugin, does nothing but log the IR CFG
class DOptSamplePython(AbstractDOptimizer):

  # perform() returns the number of optimizations performed
  def perform(self):
    self.logger.info('MARKER - Input IR-CFG: %s', self.cfg)
    return 0

IMPORTANT! All dexdec IR public interfaces and types are located in the com.pnfsoftware.jeb.core.units.code.android.ir package. Keep a tab opened on this page while you develop IR plugins!

The skeleton above:

  • must have the same filename as the plugin class, therefore DOptSamplePython.py
  • must be dropped in coreplugins/scripts/
  • requires Python script plugins to be enabled in your engines configuration

If you haven’t done so, start JEB. Your plugin should appear in the list of dexdec plugins. Check the Android menu, Decompiler Plugins handler:

A list of external Dex decompiler plugins

Now load a dex/apk, and decompile any class. Your plugin will eventually be called. The logger view should attest to that by displaying multiple “MARKER – Input IR-CFG: …” lines.

dexdec Intermediate Representation

dexdec‘s IR consists of IDElement objects. Every IR statement is an IDInstruction, itself an IDElement. (All those types and their attributes are described in depth in the API doc.) When an IR plugin is called, it “receives” an IDMethodContext (representing a decompiled method), stored in the optimizer’s ctx public field. The IR CFG, a control flow graph consisting of IR statements, can be retrieved via ctx.getCfg(). It is also stored in the cfg public field, for convenience. A formatted IR CFG may look like this:

0000/2+  !onCreate(v4<com.pnfsoftware.raasta.AppHelp>, v5<android.os.Bundle>)<void>                            
0002/2:  !requestWindowFeature(v4<com.pnfsoftware.raasta.AppHelp>, 1)<boolean>                                 
0004/3:  !setContentView(v4<com.pnfsoftware.raasta.AppHelp>, 7F030000)<void>                                   
0007/5:  !x4<android.webkit.WebView> = ((android.webkit.WebView)findViewById(v4<com.pnfsoftware.raasta.AppHelp>, 7F070000)<android.view.View>)<android.webkit.WebView>  
000C/2:  !loadData(x4<android.webkit.WebView>, getString(v4<com.pnfsoftware.raasta.AppHelp>, 7F05005B)<java.lang.String>, "text/html", "utf-8")<void>  
000E/3:  !setBackgroundColor(x4<android.webkit.WebView>, 0)<void>                                              
0011/1:  !setDefaultTextEncodingName(getSettings(x4<android.webkit.WebView>)<android.webkit.WebSettings>, "utf-8")<void>  
0012/1:  return         

Statements (IDInstruction) can have any of the following opcodes (see DOpcodeType):
– IR_NOP: no-operation
– IR_ASSIGN: assignment
– IR_INVOKE: invocation (including new object and new array construction)
– IR_JUMP: unconditional jump
– IR_JCOND: conditional jump
– IR_SWITCH: switch statement
– IR_RETURN: return statement
– IR_THROW: throw statement
– IR_STORE_EXCEPTION: exception retrieval (special)
– IR_MONITOR_ENTER: VM monitor acquisition
– IR_MONITOR_EXIT: VM monitor release

Statement operands are themselves IDElements, usually IDExpressions. Examples: IDImm (immediate values), IDVar (variables), IDOperation (arithmetic/bitwise/cast operations), IDInvokeInfo (method invocation details), IDArrayElt (representing array elements), IDField (representing static or instance fields), etc. Refer to the hierarchy of IDElement for a complete list.

IR statements can be seen as recursive IR expression trees. They can be easily explored (visitXxx method()) and manipulated. They can be replaced by newly-created elements (see IDMethodContext.createXxx methods). Data-flow analysis can be performed on IR CFG, to retrieve use-def and def-use chains, and other variable liveness and reachability information (see cfg.doDataFlowAnalysis).

Use-case: cleaning useless Android calls

Let’s put this new API to practical, real-world use. First, some background: JEB ships with emulator-backed IR optimizers that attempt to auto-decrypt immediates such as strings. While this deobfuscator generally performs well on protected files, lately, we’ve received samples for which strings were not decrypted. The reason is quite straight-forward, see this example:

throw new java.lang.IllegalStateException(o.isUserRecoverableError.read(((char)android.text.TextUtils.getOffsetBefore("", 0)), 12 - java.lang.Long.compare(android.os.Process.getElapsedCpuTime(), 0L), (android.view.ViewConfiguration.getFadingEdgeLength() >> 16) + 798).intern());

In the above code (extracted from a protected method), read is a string decryptor. Alas, the presence of calls such as:

  • TextUtils.getOffsetBefore(“”, 0))
  • Long.compare(Process.getElapsedCpuTime(), 0L)
  • ViewConfiguration.getFadingEdgeLength() >> 16

prevent the generic decryptor from kicking in. Indeed, what would an emulator be supposed to make with those calls to external APIs, whose result is likely to be context-dependent? In practice though, they could be resolved by some ad-hoc optimizations:

  • getOffsetBefore() algorithm is (almost) straightforward
  • getElapsedCpuTime() also returns strictly positive results, making compare() operation predictable
  • getFadingEdgeLength() returns small ints, less than 0x10000

We will craft the following IR optimizer: (file RemoveDummyAndroidApiCalls.py)

from com.pnfsoftware.jeb.core.units.code.android.ir import AbstractDOptimizer, IDVisitor

class RemoveDummyAndroidApiCalls(AbstractDOptimizer):  # note that we extend AbstractDOptimizer for convenience, instead of implementing IDOptimizer from scratch
  def perform(self):
    # create our instruction visitor
    vis = AndroidUtilityVisitor(self.ctx)
    # visit all the instructions of the IR CFG
    for insn in self.cfg.instructions():
      insn.visitInstruction(vis)
    # return the count of replacements
    return vis.cnt

class AndroidUtilityVisitor(IDVisitor):
  def __init__(self, ctx):
    self.ctx = ctx
    self.cnt = 0

  def process(self, e, parent, results):
    repl = None

    if e.isCallInfo():
      sig = e.getMethodSignature()

      # TextUtils.getOffsetBefore("", 0)
      if sig == 'Landroid/text/TextUtils;->getOffsetBefore(Ljava/lang/CharSequence;I)I' and e.getArgument(0).isImm() and e.getArgument(1).isImm():
        buf = e.getArgument(0).getStringValue(self.ctx.getGlobalContext())
        val = e.getArgument(1).toLong()
        if buf == '' and val == 0:
          repl = self.ctx.getGlobalContext().createInt(0)

      # Long.compare(xxx, 0)
      elif sig == 'Ljava/lang/Long;->compare(JJ)I' and e.getArgument(1).isImm() and e.getArgument(1).asImm().isZeroEquivalent():
        val0 = None
        arg0 = e.getArgument(0)
        if arg0.isCallInfo():
          sig2 = arg0.getMethodSignature()
          if sig2 == 'Landroid/os/Process;->getElapsedCpuTime()J':
            # elapsed time always >0, value does not matter since we are comparing against 0
            val0 = 1
        if val0 != None:
          if val0 > 0:
            r = 1
          elif val0 < 0:
            r = -1
          else:
            r = 0
          repl = self.ctx.getGlobalContext().createInt(r)

      # ViewConfiguration.getFadingEdgeLength()
      elif sig == 'Landroid/view/ViewConfiguration;->getFadingEdgeLength()I':
        # always a small positive integer, normally set to FADING_EDGE_LENGTH (12)
        repl = self.ctx.getGlobalContext().createInt(12)

    if repl != None and parent.replaceSubExpression(e, repl):
      # success (this visitor is pre-order, we need to report the replaced node)
      results.setReplacedNode(repl)
      self.cnt += 1

What does this code do:
– First, it enumerates and visits all CFG instructions.
– The visitor checks for IDCallInfo IR expressions matching the kinds of Android framework API calls described above: getOffsetBefore(), compare(getElapsedCpuTime(), 0), getFadingEdgeLength()
– It evaluates and calculates the results, and replaces IR call expressions (IDInvokeInfo) by newly-created constants (IDImm).

The resulting IR, which the plugin could print, would look like:

throw new java.lang.IllegalStateException(o.isUserRecoverableError.read(((char)0, 12 - 1, 0 + 798).intern());

Subsequently, other optimizers, built into dexdec, can kick in, clean the code further (e.g. fold constants), and make the read() invocation a candidate for string auto-decryption, yielding the following result:

Our external IR plugin is enabled. The IR can be cleaned, the auto-decryption takes place.

Done!

The sample script can be found in your coreplugins/scripts folder. Feel free to extend it further.

Tips

  • dexdec IR plugins can also be written as Java source. Have a look at the sample file DOptSampleJava.java, located in coreplugins/scripts. As a plugin grows in size and complexity, working with a strongly-typed language like Java, coupled with excellent javadoc integration in IDE, becomes extremely valuable.
  • When prototyping IR plugins, the Dalvik code targeted for deobfuscation is oftentimes contained in a single method. In such cases, it may be cumbersome or costly to decompile entire classes. To easily decompile a single method in the GUI, do Decompile with Options (Action menu or right-click), and untick “Decompile top level container class”:

With this option disabled, when your caret is positioned on a method, issuing a decompilation request will only decompile the target method, and nothing else (not even inner classes/methods of the target will be decompiled.)

  • Using the previous technique, the generated decompiled view represents an AST IJavaMethod — not the usual IJavaClass. Fully-qualified names are used to represent types, since import statements are not specified. An added value to the views associated with such units lies in the “IR-CFG” fragment, representing the final (most refined) IR before the AST generation phase kicked in:
Final IR viewed in the source unit for an IJavaMethod
  • Many IR utility routines are located in the DUtil class. Generally, explore the ir/ package’s javadoc, you will find plenty useful information in there.
  • We haven’t talked about accessing and using the emulator and sandbox. The main interface is IDState, and we will detail some of its functionality in a later post. In the meantime, you will find sample code on our GitHub repo.

That’s it for now – Have fun crafting your own IR plugins. As usual, reach us on Twitter’s @jebdec, Slack’s jebdecompiler, or privately over email. Until next time! – Nicolas

  1. dexdec is JEB’s Dex/Dalvik decompiler; gendec is JEB’s generic decompiler for all other architectures (x86, arm, etc.).
  2. Note that gendec has been allowing that for quite some time; its IR is different than dexdec‘s IR though.

DEX and APK Updates in JEB 2.3.5

This post highlights changes and additions related to Android app processing that shipped with JEB 2.3.5 (and the upcoming 2.3.6 release). Per usual, consult the full changelog for a complete list of changes.

Contributions for Units

We added plugin support for unit contributions. These back-end extensions can be written in Python! Practically, contributions for text documents (eg, disassembly) take the form of pop-ups when the user hovers the mouse over a text item. Several JEB modules already ship with contributions, eg the Live Registers view of the jdb/gdb/lldb debbuggers plugins.

With JEB 2.3.6, users may write their own contribution in Java or Python. They extend the IUnitContribution interface and are fairly straightforward to implement. (We will upload an example of a cross-unit contribution written in Python on GitHub shortly.)

JEB 2.3.5 ships with a Javadoc contribution, whose immediate use can be seen in the Dalvik disassembly view of an APK: hover over an interactive code item to display its documentation. (The plugin works whether your system is connected to the Internet or not.)

The javadoc contribution kicks-in when hovering on a type name or method name, here, newWakeLock().

DEX Header Summary

The DEX disassembly view now starts with a comment header summarizing the principal features of the bytecode, and optionally, its containing application (APK) unit.

Basic information is identified, such as package names, application details (if there is one1), activities and other end-point classes, as well as dangerous permission groups.

Various APK and DEX features of a known Android malware; notice that some phone and text permissions are requested by the app.

This legitimate APK is not an application, and the disassembly header emphasizes this fact.

Full Field and Method Refactoring

Up until JEB 2.3.4, renaming fields and methods only renamed the directly accessed field/method reference. We now support renaming “related” references as well, to cover cases like method overrides or “out-of-class” field access.

Here is a simple example with fields:

class A {
    int x;
    void f() {x = 1;}    //(1)
}

class B extends A {
    void g() {x = 2;}    //(2)
}

Technically, accessing x in (1) is not the same as in (2): f() uses a reference to A; g() uses a reference to B. However, the same concrete field is being accessed — because B is not defining (masking in this case) its own field named x. Even if B were to define its own field x (of type int or else), we could still access A.x by casting thisto B.  Similar issues arise with methods, with the added complexity of interface definitions and overrides.

JEB now handles renaming those references properly. Also remember that viewing the list of cross-references (key: X) does not display related references. You can see those by executing the Overrides action (key: O).

Various accesses to field A.i0 (here accessing it via type B) can be seen by using the O key. The O key also works for method references.

Miscellaneous API Updates

The API was augmented in various places. This blog being focused on Android changes, have a look at the definition updates in those interfaces:

  • IDexUnit and IDexFile: those interfaces have been present since day 1 or almost; we added a few convenience routines such as getDisassembly(). Remember that IDexUnit represents an entire DEX unit, possibly the result of an underlying merger of several DEX files, if the app in question is a multi-DEX one. If you need to access physical details of a given classesX.dex, use the corresponding IDexFile object, which can be retrieved via the master IDexUnit.
  • IApkUnit: also a well-known interface; several convenience methods were added to access common Android Manifest properties, such as activities, services, providers, receivers, etc. Obviously, you may access the Manifest directly (it is an IXmlUnit) and perform your own XML navigation.
  • IXApkUnit: this new interface represents Extended APK (XAPK) files and is self-explanatory.
  • ICertificateUnit: the certificate unit is also self-explanatory. It offers a direct reference to a parsed X509 certificate object.


  1. Unlike what the official doc says, a Manifest tag may not contain an Application element.

Debugging Dynamically Loaded DEX Bytecode Files

The JEB 2.3.2 release contains several enhancements of our JDWP and GDB/LLDB1 debugger clients used to debug both the Dalvik bytecode and native code of Android applications.

Dynamically loaded DEX files

In this post, we wanted to highlight a neat addition to our Dalvik debugger. Up until now, we did not support debugging several DEX files within a single debugging session. 2

So, we decided to add support for debugging DEX files loaded in a dynamic fashion. Below is a use-case, step-by-step study of a simple app whose workflow goes along these lines:

  1. A routine in the principal classes.dex file looks for an encrypted asset
  2. That asset is extracted and decrypted; it is a Jar file containing additional DEX bytecode
  3. The Jar file is dynamically loaded using DexClassLoader, and its code is executed

Now, we want to debug that additional bytecode. How do we proceed?

An example of debugging dynamically loaded bytecode

The app is called EnDyna (a benign crackme-like app, download it here). It offers a simple text box, and waits for the user to input a passcode. When entering the proper passcode, a success message is displayed.

The app requires the right password

Open the app in JEB. It contains a seemingly-encrypted asset file called edd.bin.

Encrypted asset file

A closer look at the MainActivity class shows that the edd.bin file is extracted, decrypted (using a simple XOR cipher) and loaded using DexClassLoader in order to validate the user input.

Passcode verification routine

Let’s attach the debugger to the app, and set a breakpoint where the call to the DexClassLoader constuctor is made.

A breakpoint was set on the DexClassLoader constructor invocation

We then trigger the verify() routine by inputting a passcode and hitting the Verify button. Our breakpoint is immediately hit. By examining the stackframe of the paused thread, we can retrieve the class loader variables and see where the decrypted DEX file was written to – and is about to get loaded from.

The decrypted Jar file about to be loaded from the path referenced by the stack variable v8

We use the Dalvik debugger interpreter to retrieve the file (command “pull”).

We now have the Jar file containing our dynamically-loaded DEX file in hand! We load it in JEB by adding an additional artifact to the project (command File, Add an Artifact…).

After processing is complete, the Android debugger notices that the added artifact contains a DEX file, and integrates it in its list of managed units.

We can set a breakpoint on the method of the second DEX file that’s about to be called.3

The second DEX file; notice the decompiled chk() method on the right-side. Here, we set a breakpoint on the method’s first instruction. It’s about to be called from MainActivity.verify(), in the primary classes.dex file.

We resume execution, our breakpoint is hit: we can start debugging the dynamically dropped DEX file!

Of course, all of the above actions can be automated by a Python script or a Java plugin. (We will upload a sample script that hooks DexClassLoader on our public GitHub repository shortly.)

We published a short video that demos the above steps, have a look at it if you want to know precisely the steps that we took to get to debug the additional DEX file.

Thank you – stay tuned for more updates, and happy debugging!

  1. Our native GDB debugger client underwent a major revamp, as we upgraded to the LLDB debugger server instead of gdbserver. More details in a separate post!
  2. It was a non-issue for standard multi-DEX APKs since JEB automatically merges them into a single, virtual DEX file, bypassing the 64Kref limits if it has to
  3. Note that the class in question (com.xyz.kf.Ver) may not even be loaded at this point; it is perfectly fine to do so: JEB handles dynamically loaded types fine and will register breakpoints timely and accordingly.

Library Code Matching for Android with JEB

We have released and open-sourced Androsig, a JEB plugin that can be used to sign and match library code for Android applications. That plugin was written by our summer intern, Ruoxiao Wang.

The purpose of the plugin is to help deobfuscate lightly-obfuscated applications that perform name mangling and hierarchy flattening (such as Proguard and other common Java and Dalvik protectors). Using our generic collection of signatures for common libraries, library code can be recognized; methods and classes can be renamed; package hierarchies can be rebuilt

Example on a random obfuscated application, obfuscated by Proguard, before and after matching:

Code before matching: class, method, and package names obfuscated; hierarchy was flattened

After matching: class and method names restored, code hierarchy and packages restored (partially)

Installation

First, download the latest version of the compiled binary JebAndroidSigPlugin-x.y.z.jar and drop it into the JEB coreplugins/ folder. You will need a JEB Pro license for the plugin to operate.

This single JAR offers two plugin entry-points, as can be seen in the picture below:

Secondly, download a bundle of signatures for various versions of the most common Android library.

Link to signatures library archive.

Reference: list of library signatures contained in this archive

Extract the contents of the archive into the coreplugins/android_sigs/ folder.

Matching obfuscated code

  • Open an Android APK or Dalvik DEX file to be analyzed
  • Execute the Android Code Recognition engines plugin

  • Customize the matching parameters, if necessary (See below for details)

  • Press OK. The code will be analyzed, and methods and classes that match signatures present in the database will be renamed and refactored.

Generating signatures

Generating your own library signatures (for library code, analyzed malware, or else) is as easy as its matching counterpart.

  • Open the APK containing the code to be signed
  • Execute the “Android Code Recognition” engines plugin

  • Specify the library name and other options

  • Press OK. The signature *.sig file will be created in the coreplugins/android_sigs/ folder. (Always make sure that all your signature files are in that folder.)

About the Matching Results

Upon successful execution, the matching plugin will generate two files in the temporary folder: androsig-mapping.txt and androsig-report.txt.

The mapping file shows which obfuscated methods and classes were matched, and to what:

The report file gives you a summary of how many methods and classes were unmatched and matched,  where they are coming from, as well as library distribution code. That result data is also output to the JEB logger:

About the Matching Parameters

The matching process can be customized by two parameters, as shown on the picture below:

For most use cases, the default values will suffice. However, both parameters can be fine tuned to have more aggressive or less aggressive (looser) matching:

  • More aggressive matching will result in more matches, at the expense of false positives (FP in this context refer to methods or classes incorrectly matched)
  • Looser matching will result in less matches, at the expense of false negatives (FN in this context refer to methods or classes that should have been matched)

Typically, false positives happen on either small methods or classes containing lots of unmatched methods. Experiment with those parameters if need be; as said, the defaults generally yield correct results.

Also feel free to customize the plugin if need be, or use it as a learning tool and tutorial in order to bootstrap your own plugins development needs. It is by no means a robust plugin, but should help reverse engineers focus on code that matters (that is, non-library code) in the case of many Android applications.

User interface how-to in JEB

The release of JEB 2.1.2 is being distributed to our customers today and tomorrow. We thought it would be a good time to present/recap some of the UI changes that were introduced since version 2.1.

Layouts

The RCP client comes with a default layout that has the Project view on the left-hand side, the Logger and Console at the bottom, and a large empty workspace area in the center. The layout can (and should!) be customized to fit your analysis needs.

Drag views around by their title areas. Expand a view to full-screen by double clicking on its title area. Minimize or maximize view groups using the icons located in the view trimbar. (Circled in red in the picture below.)

Customized layout with a code hierarchy on the lower-left corner.

Since you may want to have different layouts for different use cases, layouts can be duplicated and customized. You can achieve this via the Window/New Layout… menu option.

Auto-sync the Project tree selection

Enable this feature via the double-arrow icon located in the Project Explorer view. (As seen on the picture below.) When enabled, the simple selection of a unit element in the tree will automatically bring up the associated unit view. No need for Enter, no need for double-click: a simple selection is enough.

This option is especially useful when navigating large swarm of resource files, eg pictures.

Open same-type unit in same views

When enabled, a unit of view X will be opened in an already existing view representing another unit of the same type (X).

This option is extremely useful when opening many views of the same type, but only the last one is important: example, when decompiling and navigating code.

Navigating a text view with a non-sticky caret

By default, the navigation of a text view in JEB2 may be a bit confusing: due to the way very large buffers are handled by these views, it is often more resource-efficient to keep the caret on its viewport location. That means that, upon scrolling up or down, the caret will visually remain where it is.

When highlighting interactive items, and wanting to keep track of other related items across the buffer, that default behavior is not ideal: it is better to maintain the caret position within the buffer, as opposed to within the viewport.

Use Control (Control on Mac) +Shift +  Up|Down to keep the caret where it is when scrolling up/down.

More to come

We will keep this entry updated as we add more how-to and gotchas regarding the RCP client user interface. If you have questions or requests, feel free to email us at support@pnfsoftware.com.