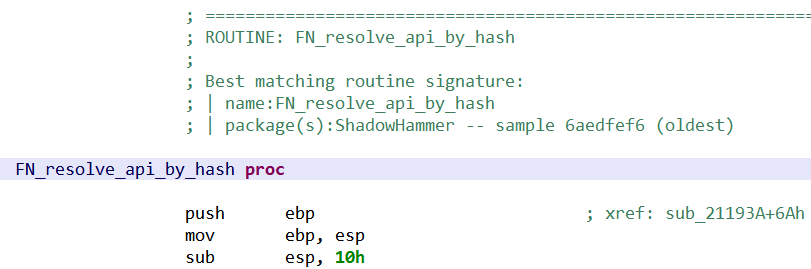
The third part of this series is about bytecode virtualization. The analyses that follow were done statically.
Bytecode virtualization is the most interesting and technically challenging feature of this protector.
TL;DR: – JEB Pro can un-virtualize protected methods. – A Global Analysis (Android menu) will point you to p-code VM routines. – Make sure to disable Parse Exceptions when decompiling such methods. – For even clearer results, rename opaque predicates of the method to guard0/guard1 (refer part 1 of this blog for details)
What Is Code Virtualization
Relatively novel, code virtualization is possibly one of the most effective protection technique there is 1. With it come relatively heavy disadvantages, such as hampered speed of execution 2 and the difficulty to troubleshoot production code. The advantages are heightened reverse-engineering hurdles over other more traditional software protection techniques.
Virtualization in the context of code protection means:
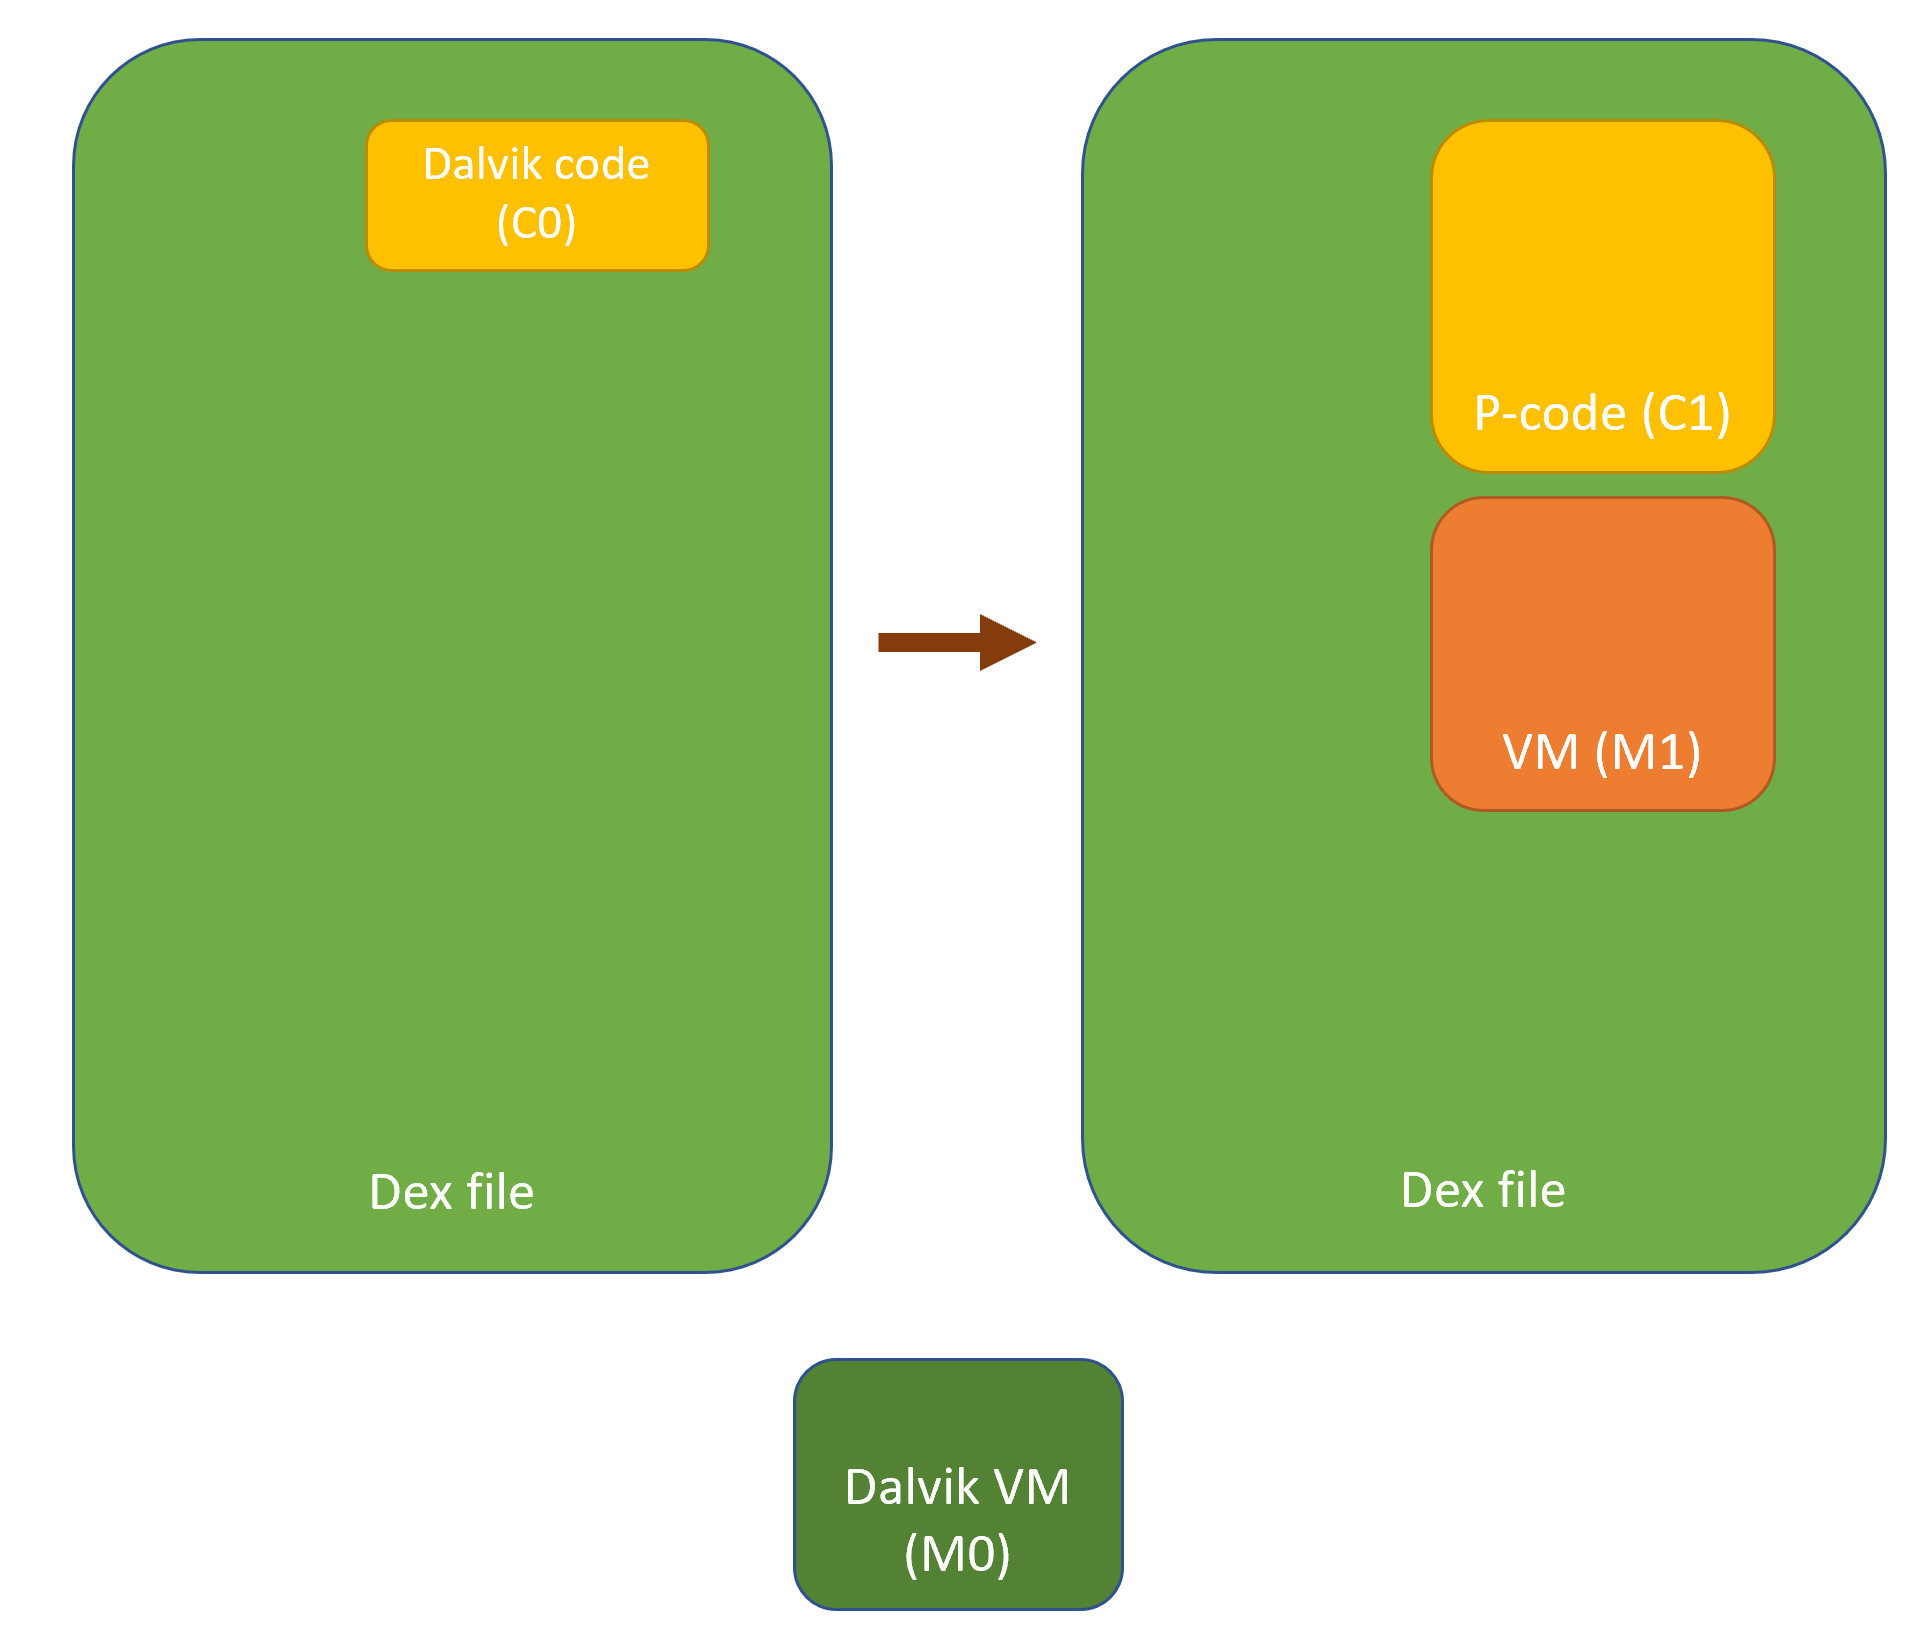
Generating a virtual machine M1
Translating an original code object C0 meant to be executed on a machine M03, into a semantically-equivalent code object C1, to be run on M1.
While the general features of M1 are likely to be fixed (e.g., all generations of M1 are stack machines with such and such characteristics), the Instruction Set Architecture (ISA) of M1 may not necessarily be. For example, opcodes, microcodes and their implementation may vary from generation to generation. As for C1, the characteristics of a generation are only constrained by the capabilities of the converter. Needless to say, standard obfuscation techniques can be applied on C1. The virtualization process can possibly be recursive (C1 could be a VM implementing the specifications of a machine M2, executing a code object C2, emulating the original behavior of C0, etc.).
All in all, in practice, this makes M1 and C1 unique and hard to reverse-engineer.
Before and after virtualization of a code object C0 into C1
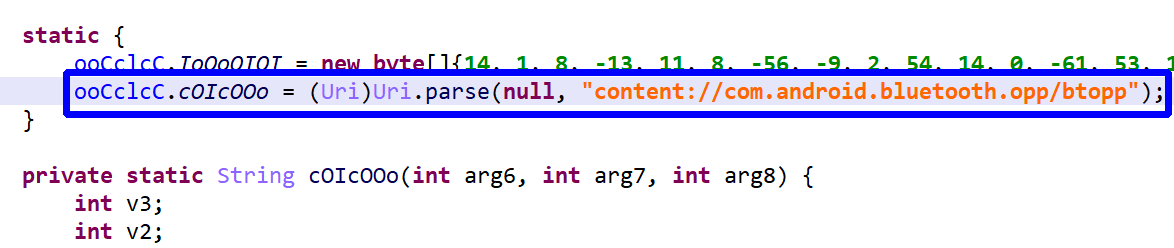
Example of a Protected Method
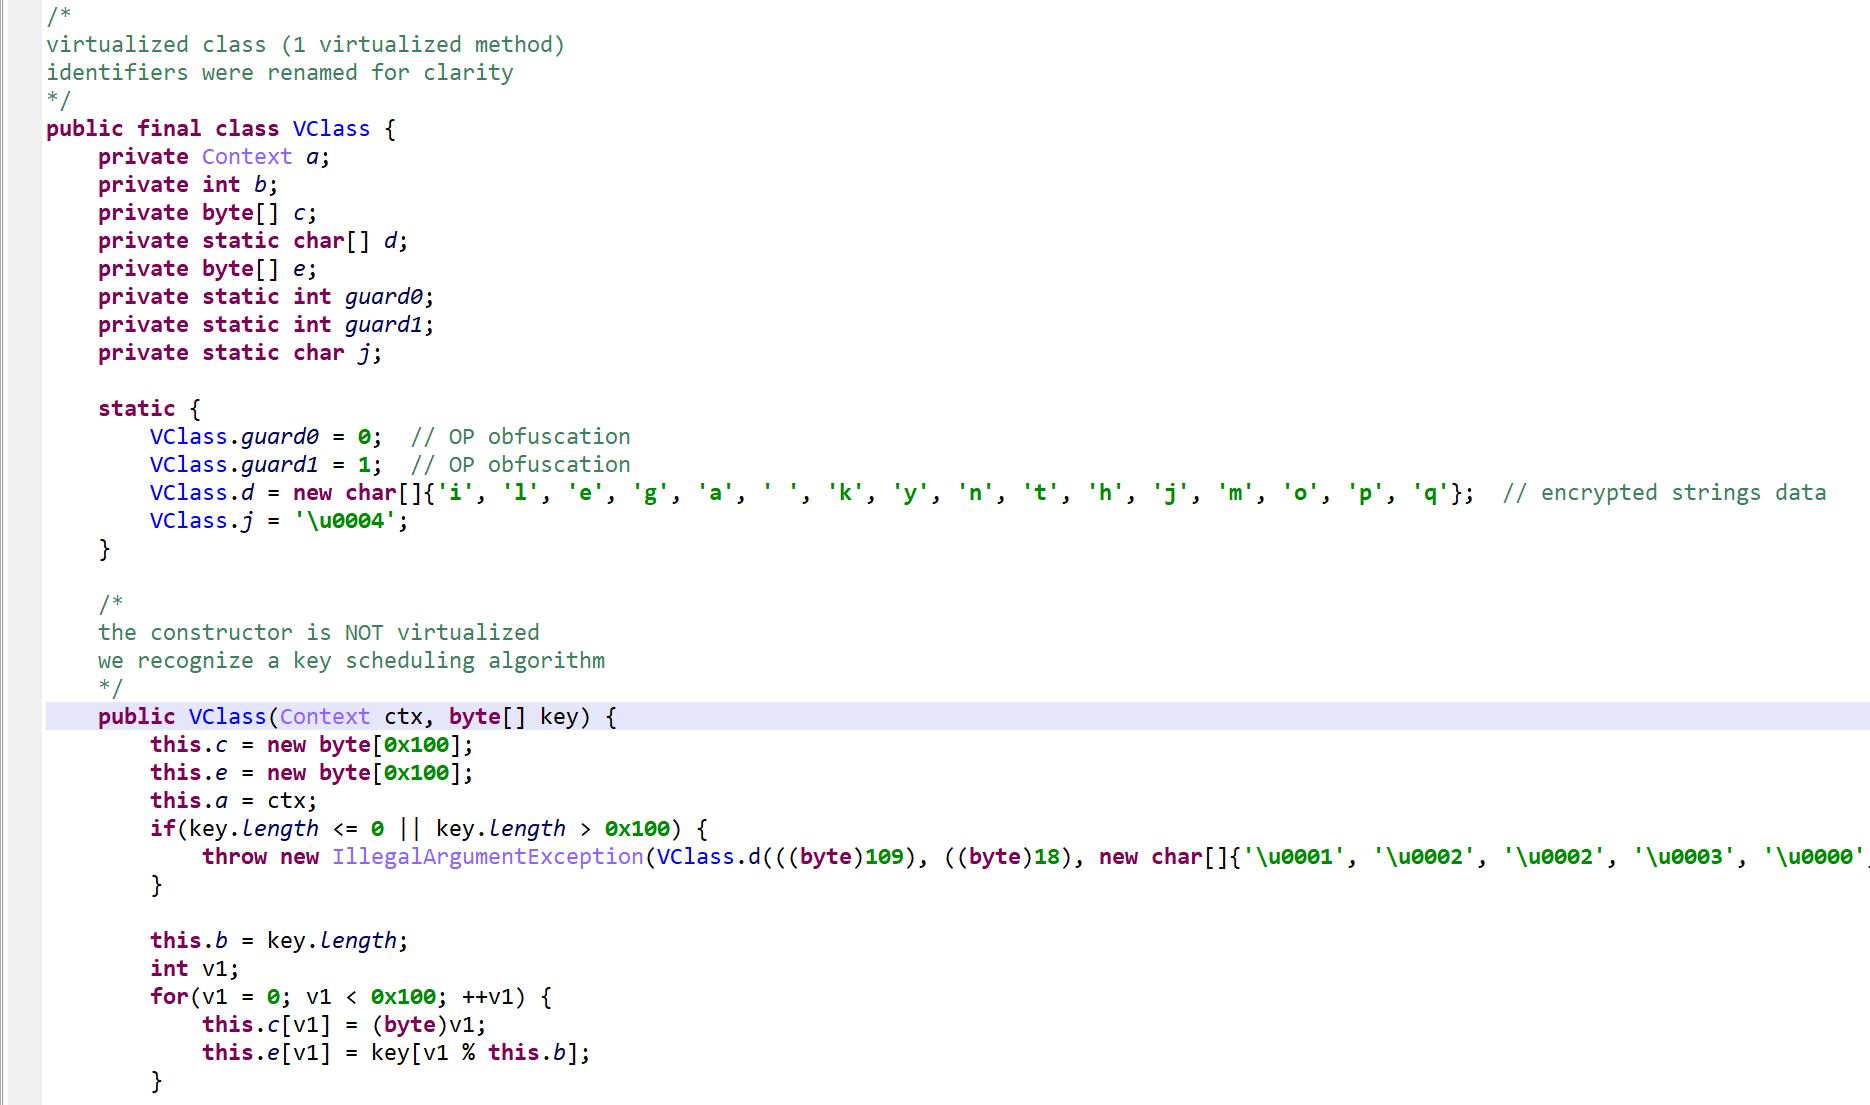
Note: all identifier names had been obfuscated. They were renamed for clarity and understanding.
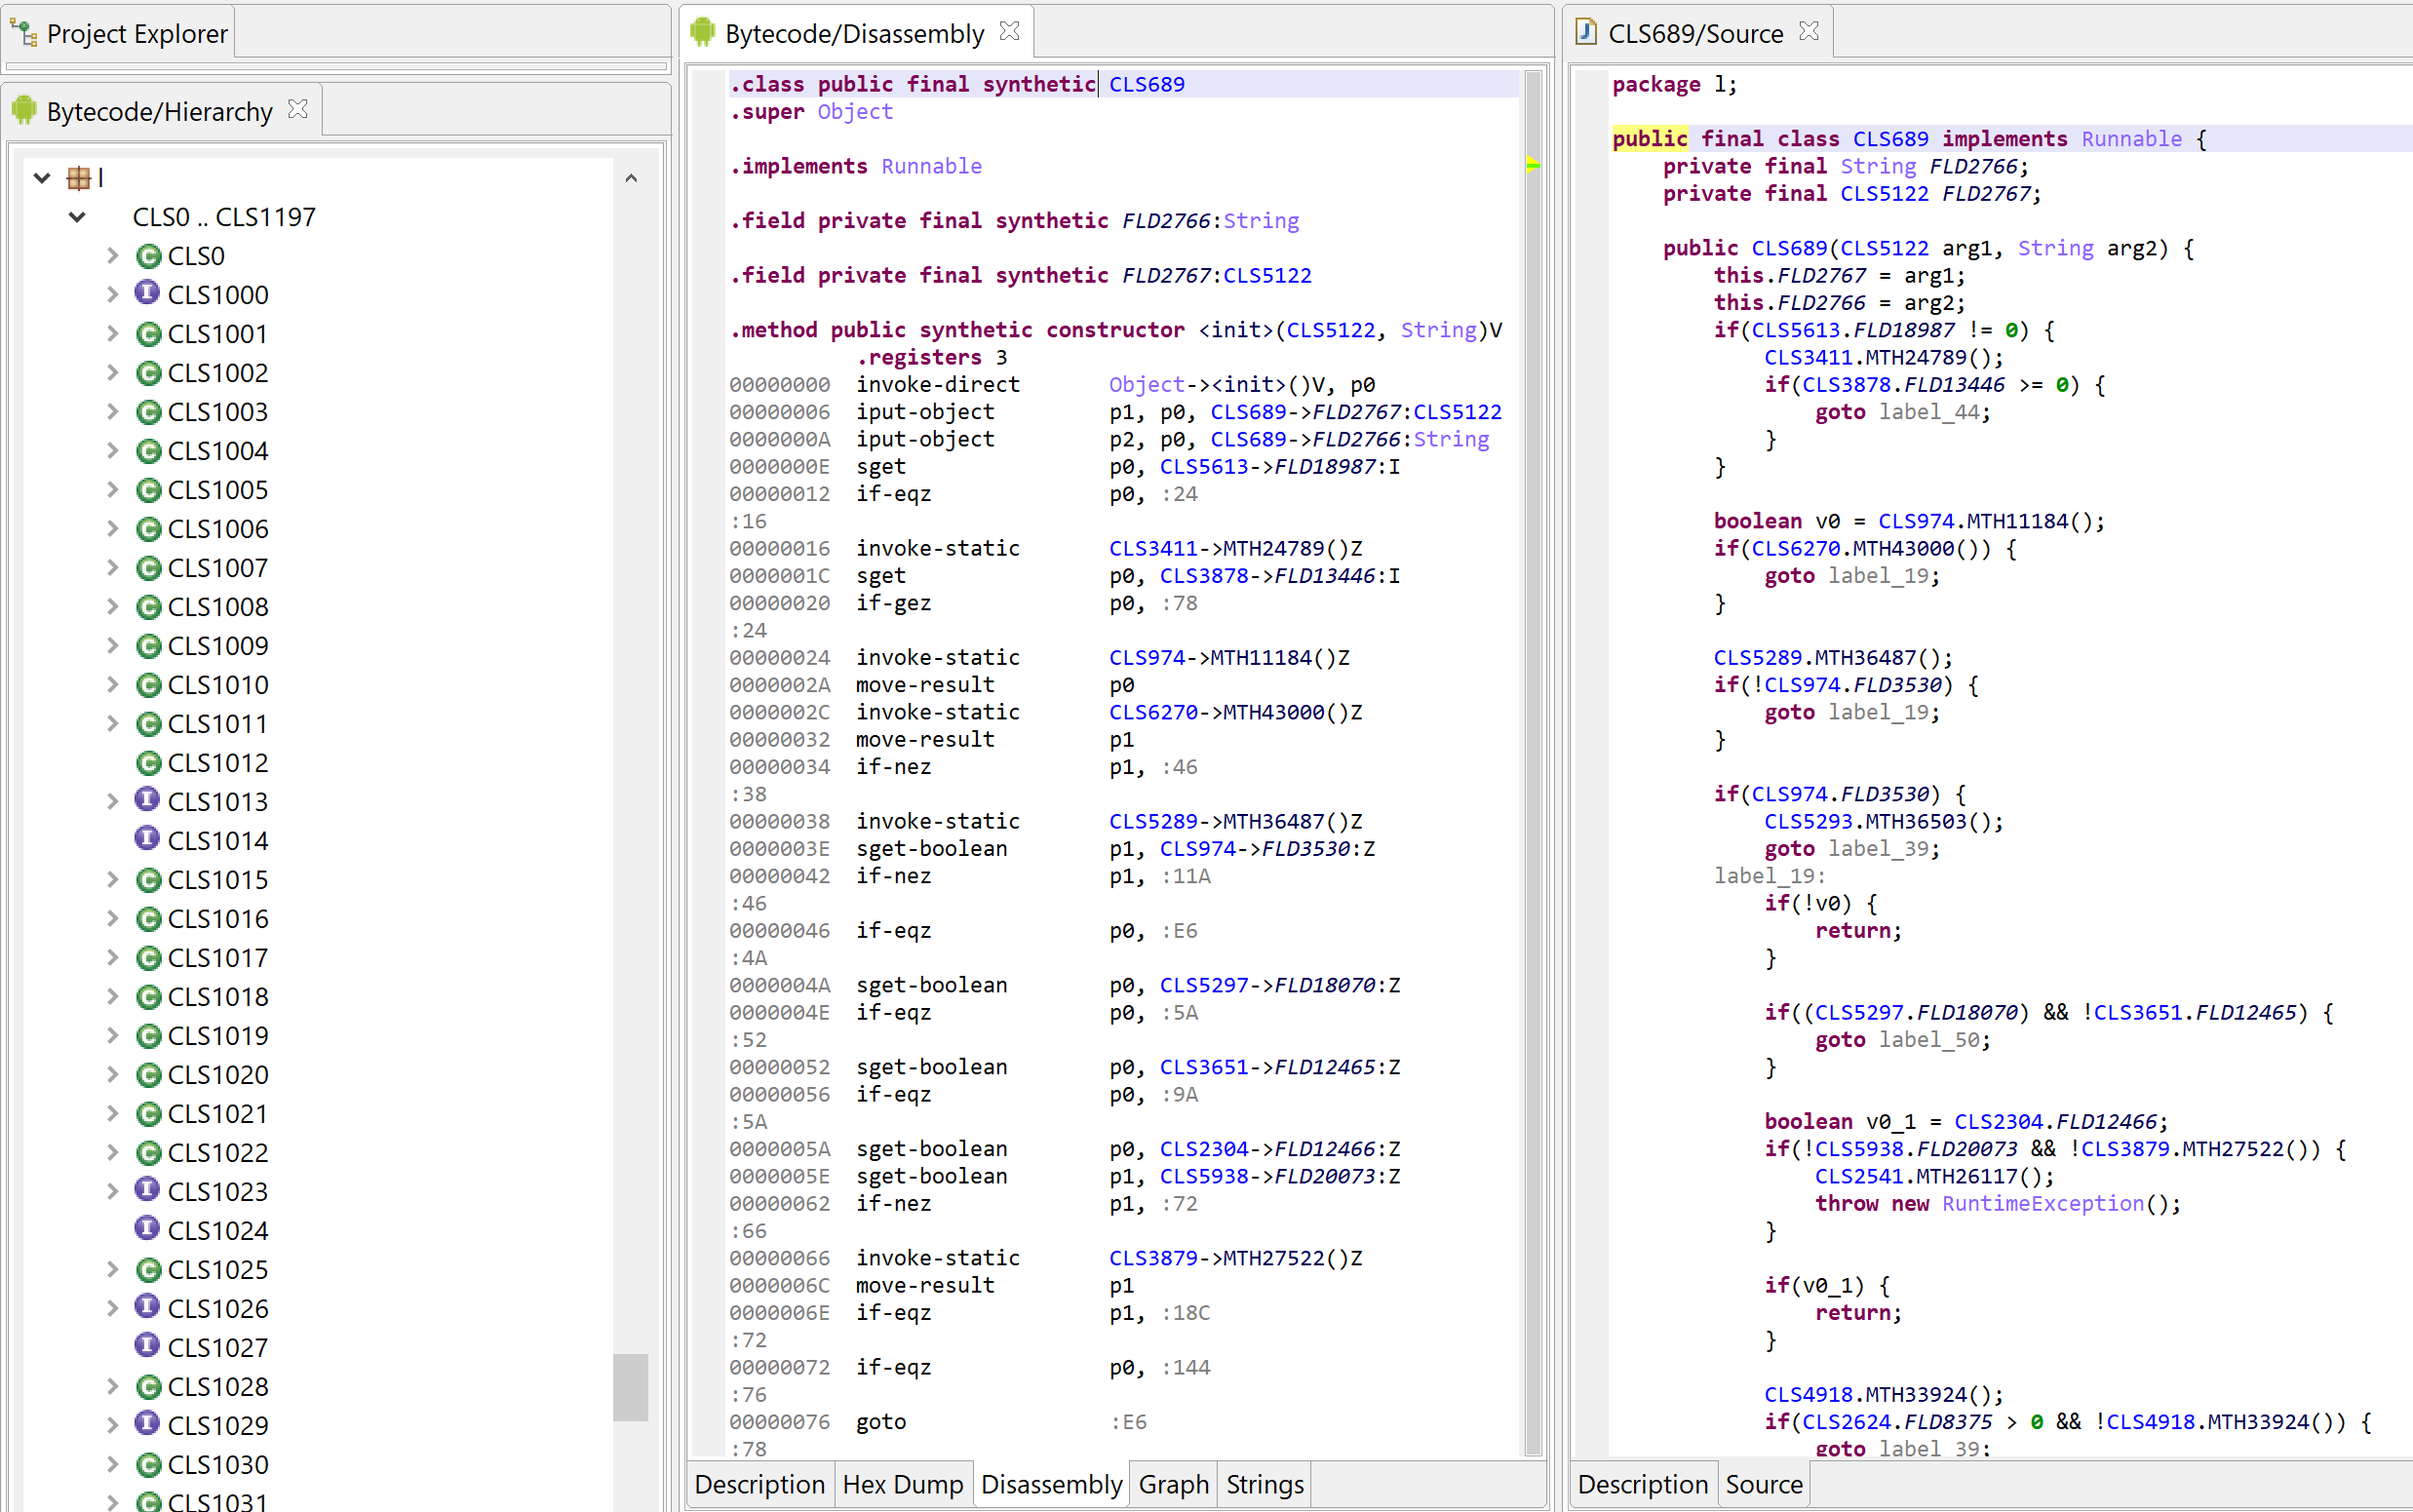
Below, the class VClass was found to be “virtualized”. A virtualized class means that all non-constructor (all but <init>(*)V and <clinit>()V) methods were virtualized.
Interestingly, the constructors were not virtualized
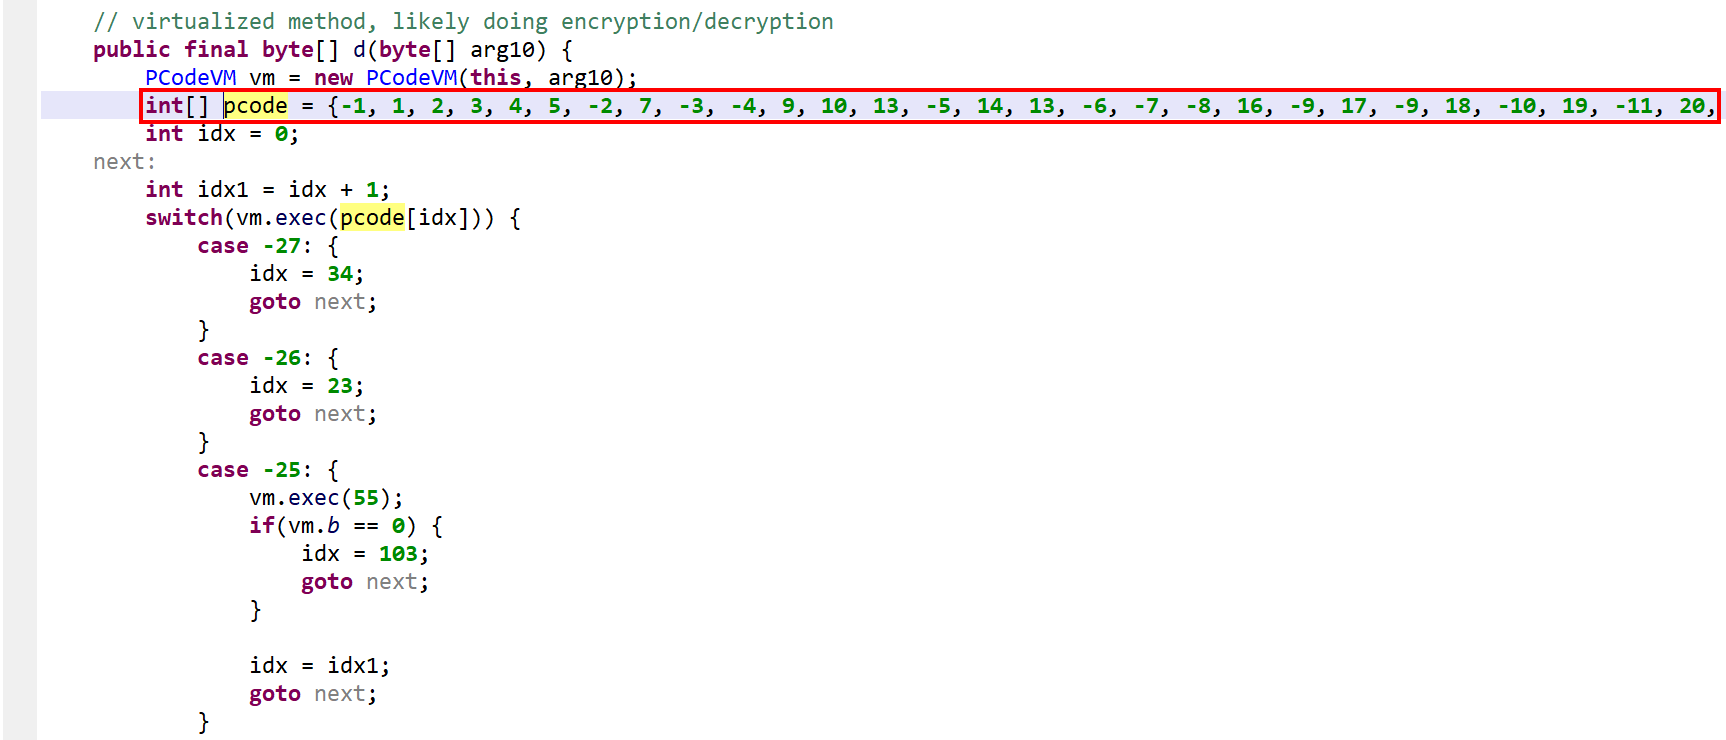
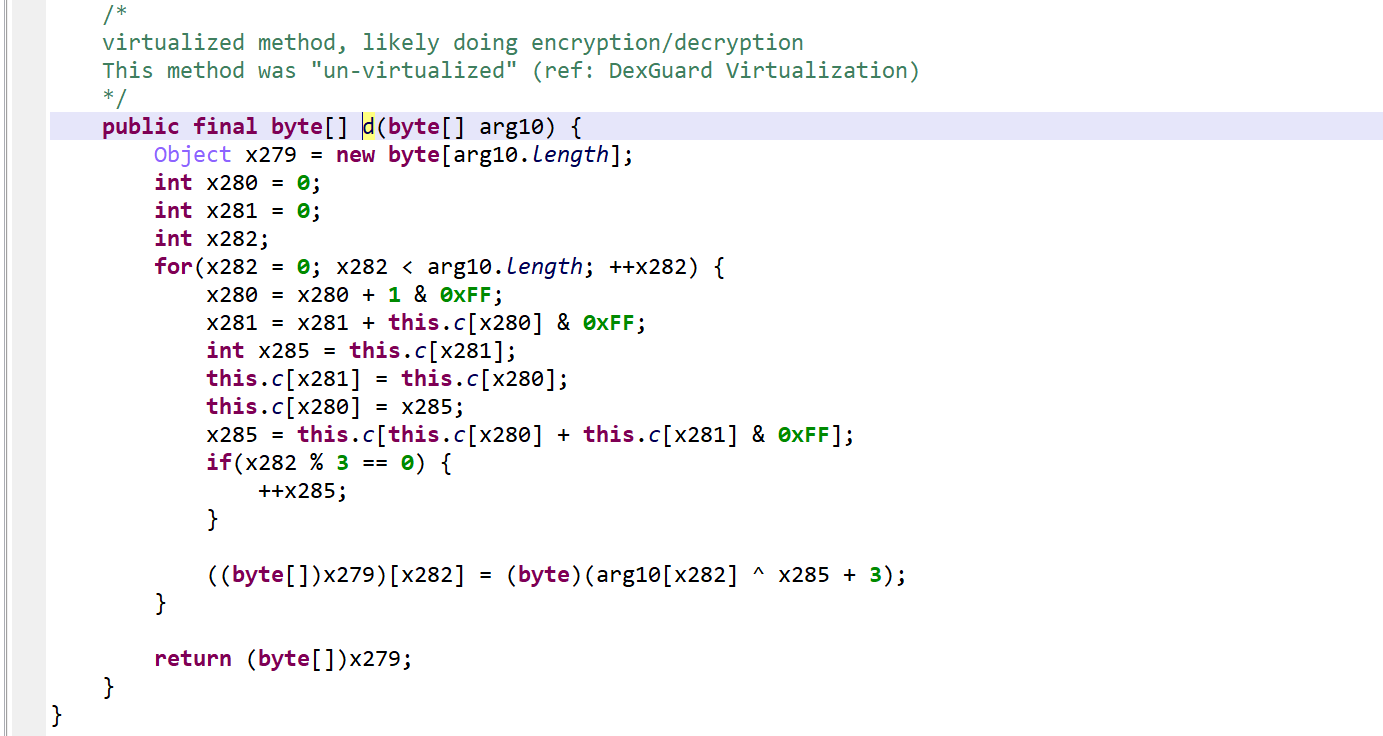
The method d(byte[])byte[] is virtualized:
It was converted into an interpreter loop over two large switch constructs that branch on pseudo-code entries stored in the local array pcode.
A PCodeVM class was added. It is a modified stack-based virtual machine (more below) that performs basic load/store operations, custom loads/stores, as well as some arithmetic, binary and logical operations.
Virtualized method. Note the pcode array. The opcode handlers are located in two switches. This picture shows the second switch, used to handle specific operations and API calls.
A snippet of the p-code VM class. Full code here, also contains the virtualized class.
The generic interpreter is called via vm.exec(opcode). Execution falls back to a second switch entry, in the virtualized method, if the operation was not handled.
Please refer to the gist linked above for a full list of “generic” VM operations. Three examples, including one showing that the operations are not as generic as the term implies:
(specific to this VM) opcode 6, used to peek the most recently pushed object(specific to this VM) opcode 8, a push-int operation(specific to this VM) opcode 23 is relatively specialized, it implements an add-xor stack operation (pop, pop, push). It is quite interesting to see that the protection system does not simply generate one-to-one, dalvik-to-VM opcodes. Instead, the target routine is thoroughly analyzed, most likely lifted, high-level (compounded) arithmetic operations isolated, and pseudo-generic (in PCodeVM) or specialized (in the virtualized method) opcodes generated.
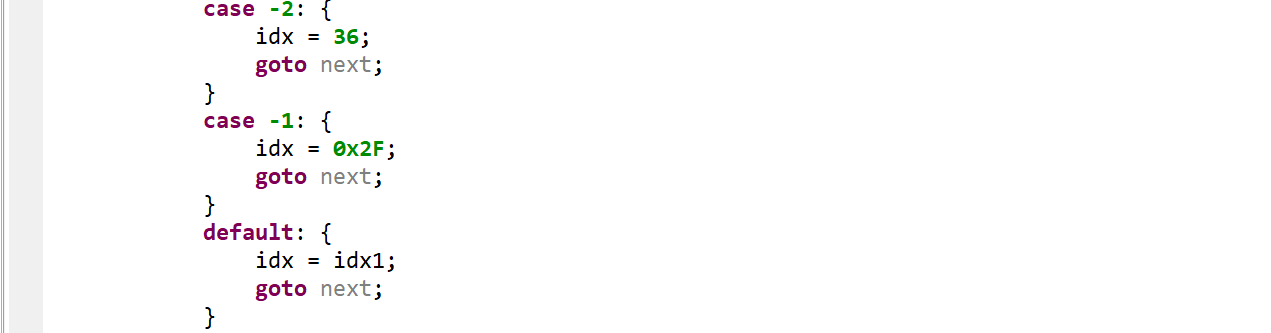
As said, negative opcodes represent custom operations specific to a virtualized method, including control flow changes. An example:
opcode -25: a if(a >=b) goto LABEL operation (first, call into opcode 55 to do a GE operation on the top two integers; then, use the result to do conditional branching)
Characteristics of the P-code VM
From the analysis of that code as well as virtualized methods found in other binaries, the characteristics of the p-code VM generated by the app protector can be inferred:
The VM is a hybrid stack machine that uses 5 parallel stacks of the same height, stored in arrays of:
java.lang.Object (accommodating all objects, including arrays)
int (accommodating all small integers, including boolean and char)
long
float
double
For each one of the 5 stack types above, the VM uses two additional registers for storing and loading
Two stack pointers are used: one indicates the stack TOP, the other one seems to be used more liberally, and is akin to a peek register
The stack has a reserved area to store the virtualized method parameters (including this if the method is non-static)
The ISA encoding is trivial: each instruction is exactly one-word long, it is the opcode of the p-code instruction to be executed. There is no concept of register, index, or immediate value embedded into the instruction, as most stack machine ISA’s have.
Because the ISA is so simple, the implementation of the semantics of an instruction falls almost entirely on the p-code handler. For this reason, they were grouped into two categories:
Semi-generic VM operations (load/store, arithmetic, binary, tests) are handled by the VM class and have a positive id. (A VM object is used by every virtualized method in a virtualized class.)
Operations specific to a given virtualized method (e.g., method invocations) use negative ids and are handled within the virtualized method itself.
While the PCodeVM opcodes are all “useful”, many specific opcodes of a virtualized method (negative ids) achieve nothing but the execution of code semantically equivalent to NOP or GOTO.
opcodes -2, -1: essentially branching instructions. A substantial amount of those can be found, including some branching to blocks with no other input but that source (i.e., an unnecessary GOTO – =spaghetti code -, or a NOP operation if the next block is the follow.)
Rebuilding Virtualized Methods
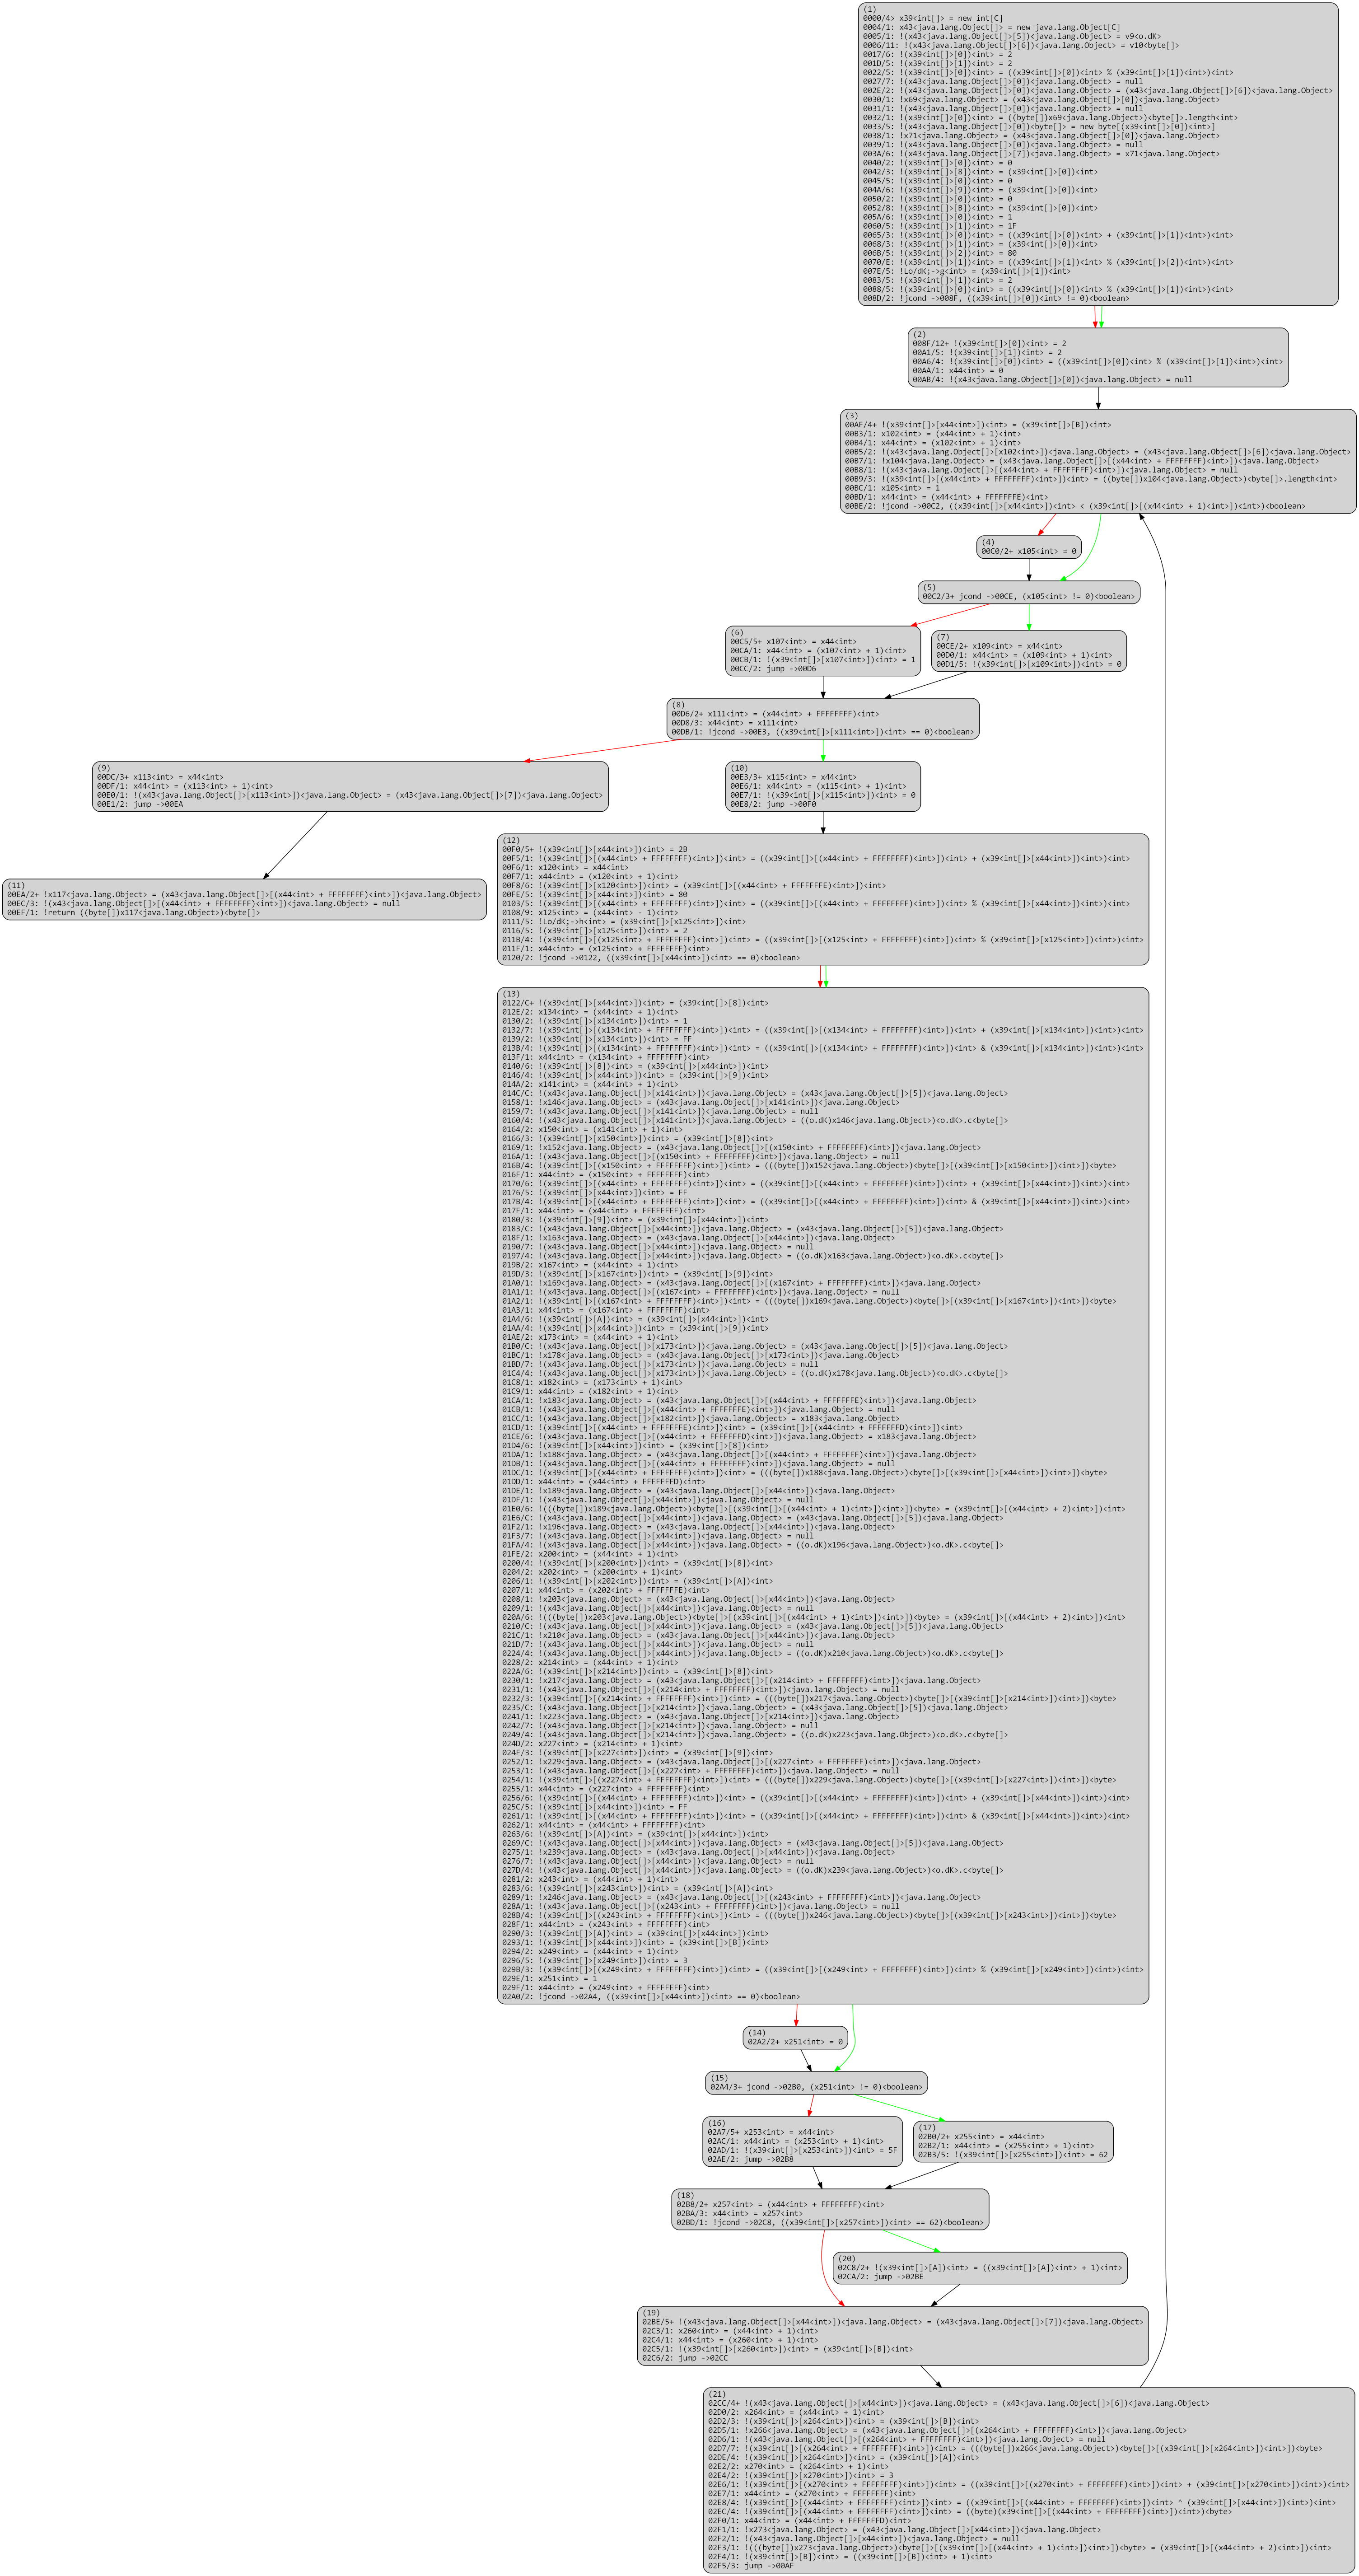
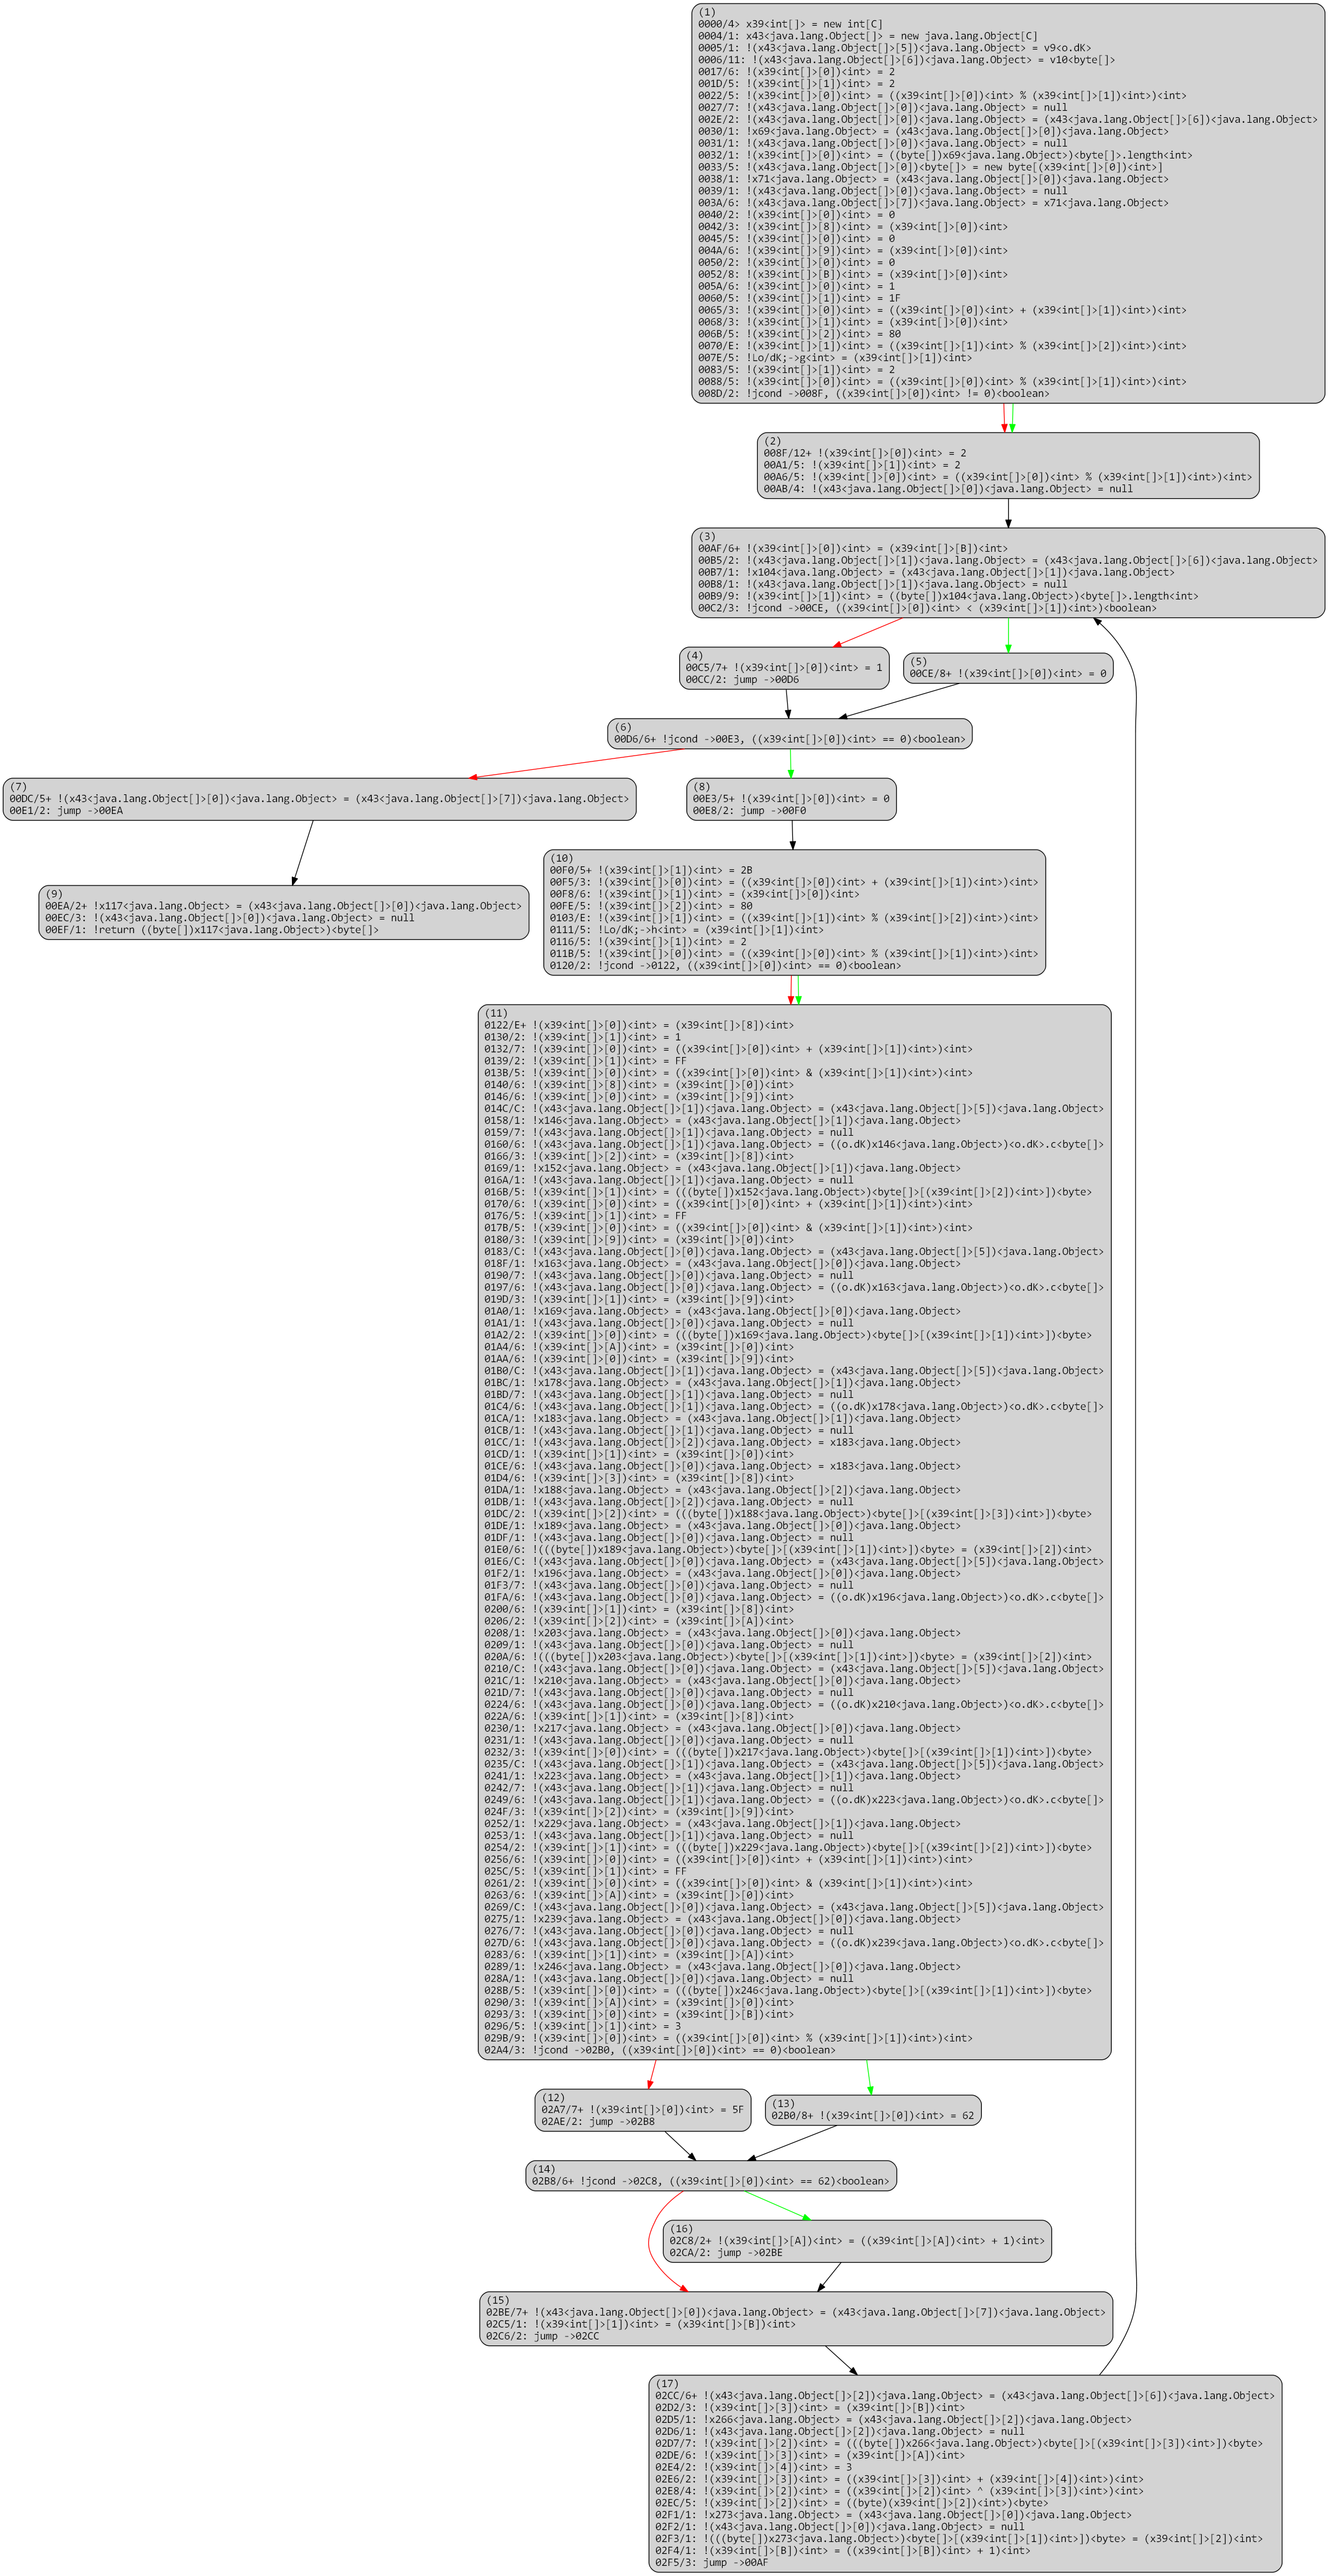
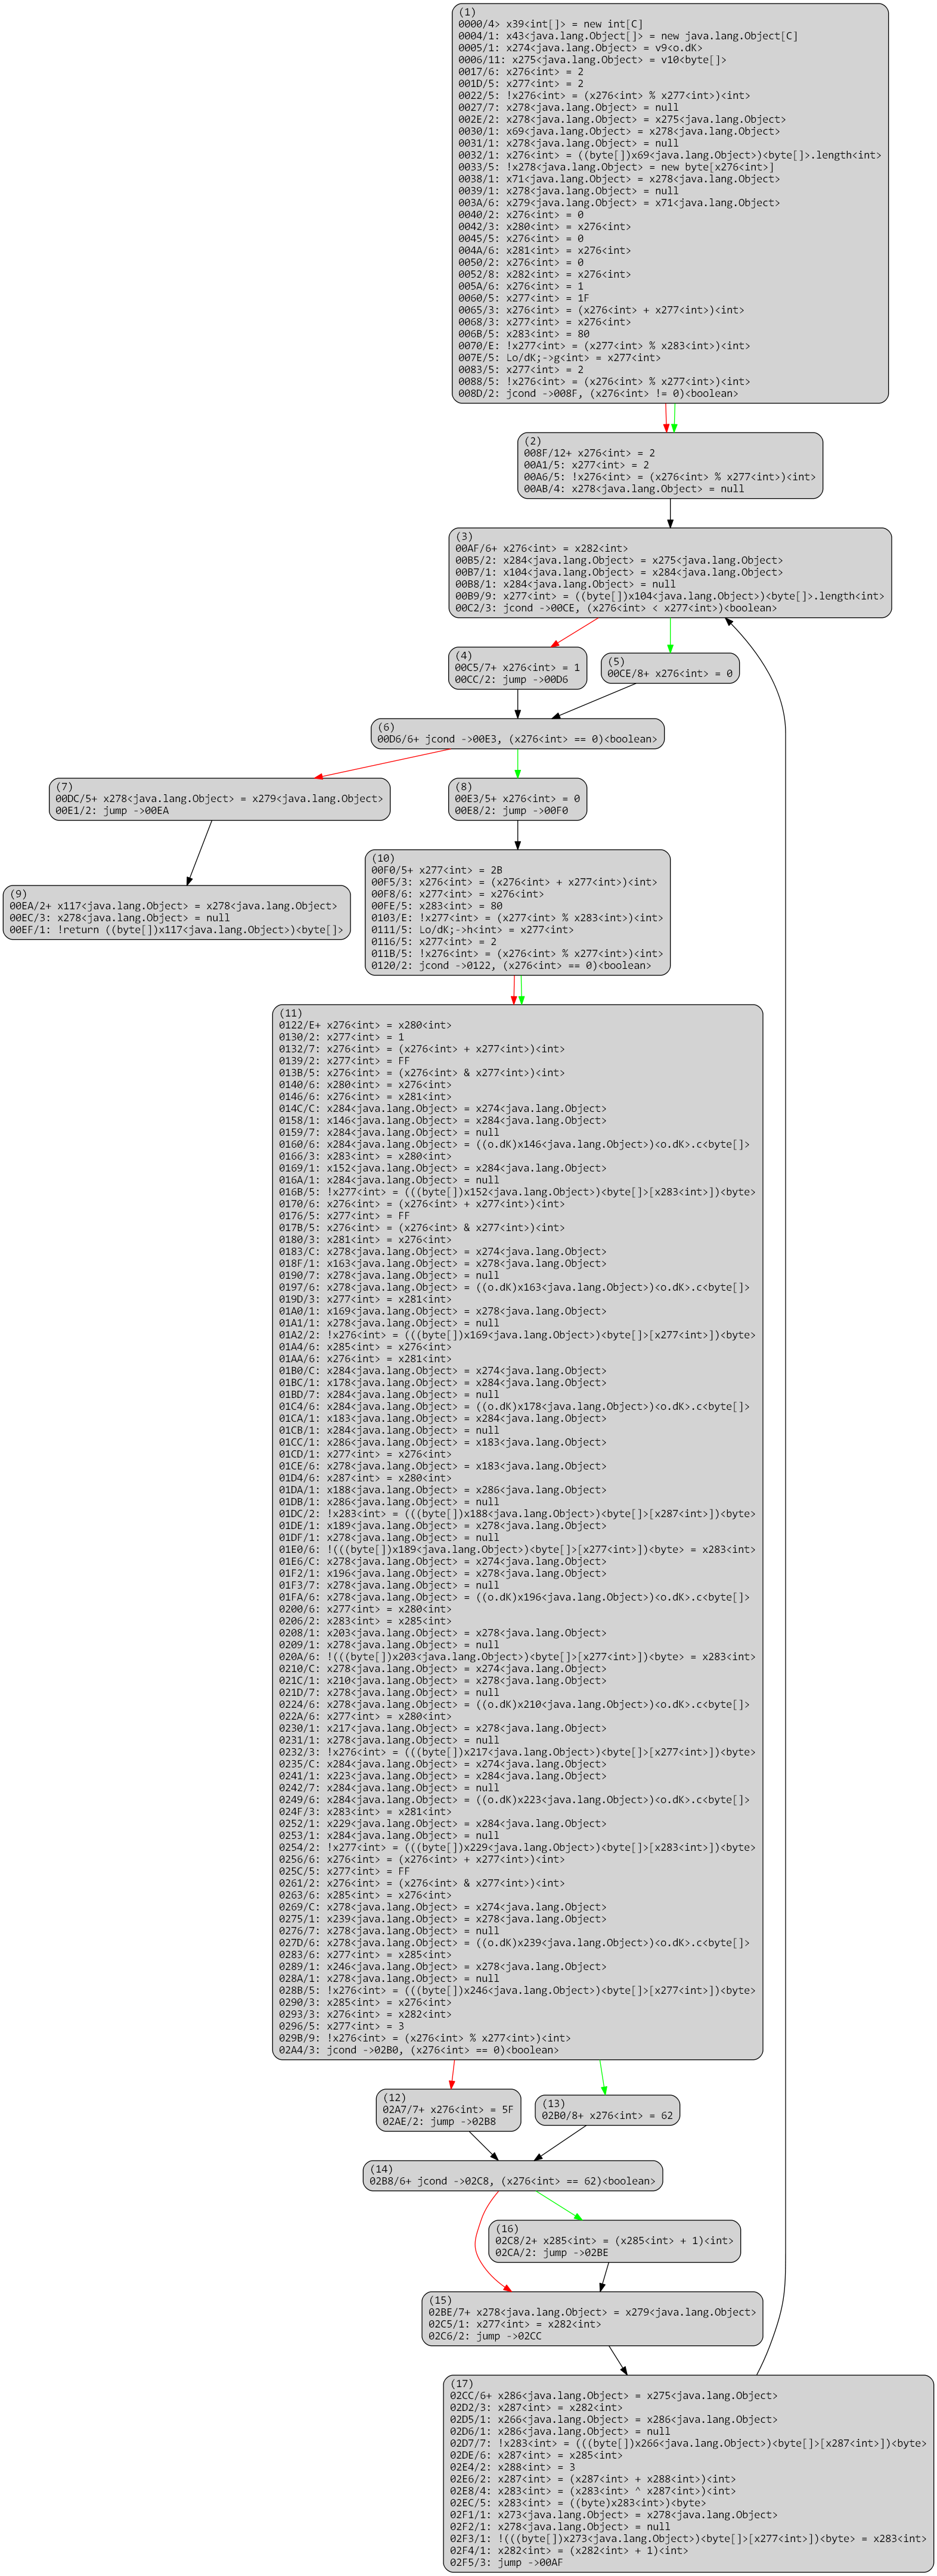
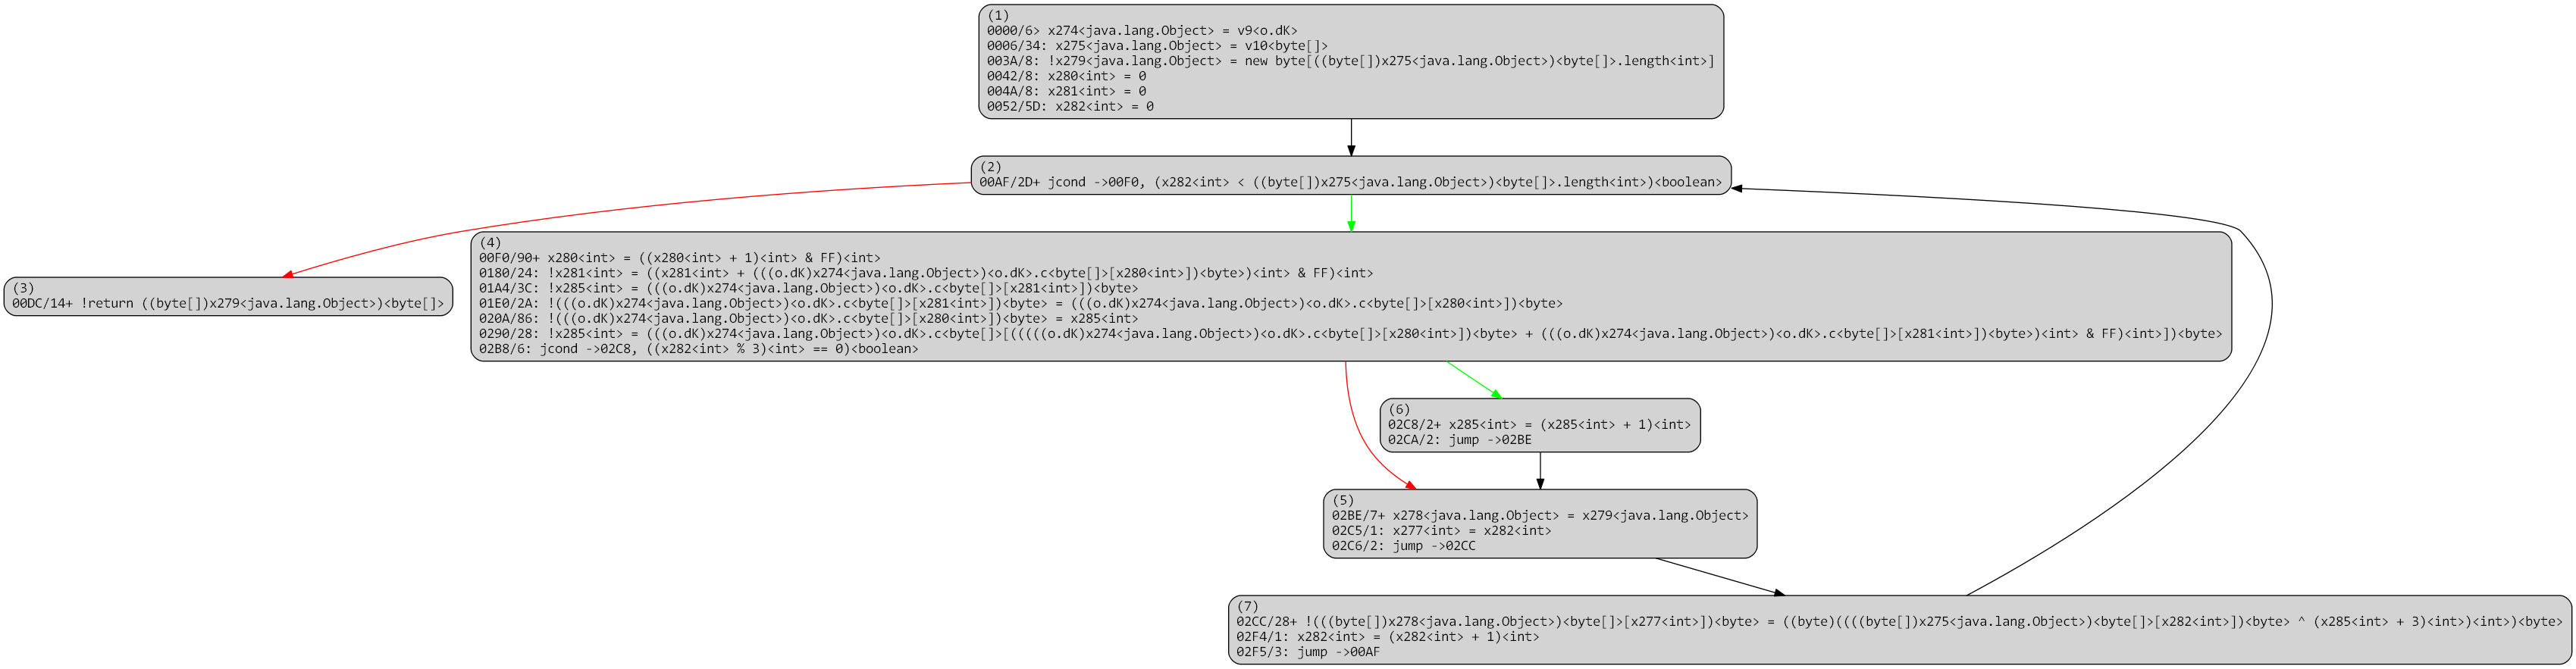
Below, we explain the process used to rebuild a virtualized method. The CFG’s presented are IR-CFG’s (Intermediate Representations) used by the dexdec4 pipeline. Note that unlike gendec‘s IR 5, dexdec‘s IR is not exposed publicly, but its textual representation is mostly self-explanatory.
Overall, a virtualized routine, once processed by dexdec like any other routine, looks like the following: A loop over p-code entries (stored in x8 below), processed by a() at 0xE first, or by the large routine switch.
Virtualized method, optimized, virtualized
The routine a() is PCodeVM.exec(), and its optimized IR boils down to a large single switch. 6
PCodeVM.exec()
The unvirtualizer needs to identify key items in order to get started, such as the p-code entries, identifiers used as indices into the p-code array, etc. Once they have been gathered, concolic execution of the virtualized routine becomes possible, and allows rebuilding a raw version of the original execution flow. Multiple caveats need to be taken care of, such as p-code inlining, branching, or flow termination. In its current state, the unvirtualizer disregards exceptional control flow.
Below, a raw version of the unflattened CFG. Note that all operations are stack-based; the code itself has not been modified at this point, it still consists of VM stack-based operations.
Virtualized method after unflattening, raw
dexdec’s standard IR optimization passes (dead-code removal, constant and variable propagation, folding, arithmetic simplification, flow simplifications, etc.) clean up the code substantially:
Virtualized method after unflattening and IR optimizations (opt1)
At this stage, all operations are stack-based. The high-level code generated from the above would be quite unwieldy and difficult to analyze, although substantially better than the original double-switch.
The next stage is to analyze stack-based operations to recover stack slots uses and convert them back to identifiers (which can be viewed as virtual registers; essentially, we realize the conversion of stack-based operations into register-based ones). Stack analysis can be done in a variety of ways, for example, using fixed-point analysis. Again, several caveats apply, and the need to properly identify stacks as well as their indices is crucial for this operations.
Virtualized method after unflattening, IR optimizations, VM stack analysis (opt2)
After another round of optimizations:
Virtualized method after unflattening, IR optimizations, VM stack analysis, IR optimizations (opt2_1)
Once the stack analysis is complete, we can replace stack slot accesses by identifier accesses.
Virtualized method after unflattening, IR optimizations, VM stack analysis, IR optimizations, virtual registers insertion (opt3)
After a round of optimizations:
Virtualized method after unflattening, IR optimizations, VM stack analysis, IR optimizations, virtual registers insertion, IR optimizations (opt3)
At this point, the “original” CFG is essentially reconstructed, and other advanced deobfuscation passes (e.g., emulated-based deobfuscators) can be applied.
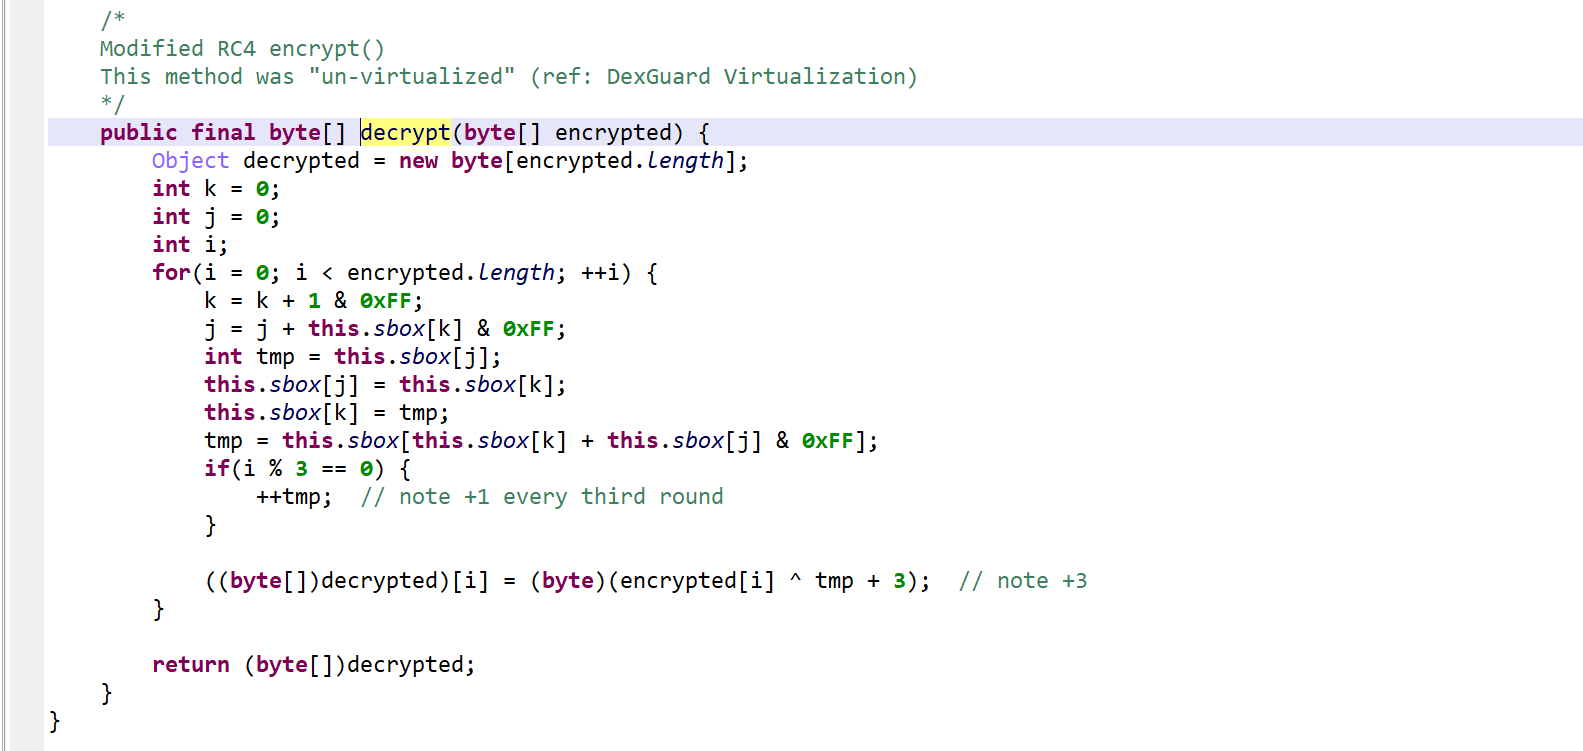
The high-level code generation yields a clean, unvirtualized routine:
High-level code, unvirtualized, unmarked
After reversing, it appears to be a modified RC4 algorithm. Note the +3/+4 added to the key.
High-level code, unvirtualized, marked
Detecting Virtualized Methods
All versions of JEB detect virtualized methods and classes: run Global Analysis (GUI menu: Android) on your APK/DEX and look for those special events:
JEB Pro version 3.22 7 ships with the unvirtualizer module.
Tips:
Make sure to enable the Obfuscators, and enable Unvirtualization (enabled by default in the options).
The try-blocks analysis must be disabled for the class to unvirtualize. (Use MOD1+TAB to redecompile, untick “Parse Exception Blocks”).
After a first decompilation pass, it may be easier to identify guard0/guard1, rename, and recompile, else OP obfuscation will remain and make the code unnecessarily difficult to read. (Refer to part 1 of this series to learn about what renaming those fields to those special names means and does when a protected app is detected.)
Conclusion
We hope you enjoyed this third installment on code (un)virtualization.
There may be a fourth and final chapter to this series on native code protection. Until next time!
—
On a personal note, my first foray into VM-based protection dates back to 2009 with the analysis of Trojan.Clampi, a Windows malware protected with VMProtect ↩
Although one could argue that with current hardware (fast x64/ARM64 processors) and software (JIT’er and AOT compilers), that drawback may not be as relevant as it used to be. ↩
Machine here may be understood as physical machine or virtual machine ↩
Note the similarities with CFG flattened by chenxification and similar techniques. One key difference here is that the next block may be determined using the p-code array, instead of a key variable, updated after each operation. I.e., is the FSM – controlling what the next state (= the next basic block) is – embedded in the flattened code itself, or implemented as a p-code array. ↩
JEB Android and JEB demo builds do not ship the unvirtualizer module. I initially wrote this module as a proof-of-concept not intended for release, but eventually decided to offer it to our professional users who have legitimate (non malicious) use cases, e.g. code audits and black-box assessments. ↩
The second part of this series focuses on encryption:
Asset encryption
Class encryption
Full application encryption
Those analyses were done statically using JEB 3.21.
Asset Encryption
Assets can be encrypted, while combining other techniques, such as class encryption (seen in several high-profile apps), and bytecode obfuscation (control-flow obfuscation, string encryption, reflected API access). With most bytecode obfuscation being automatically cleaned up, Assets are being accessed in the following way:
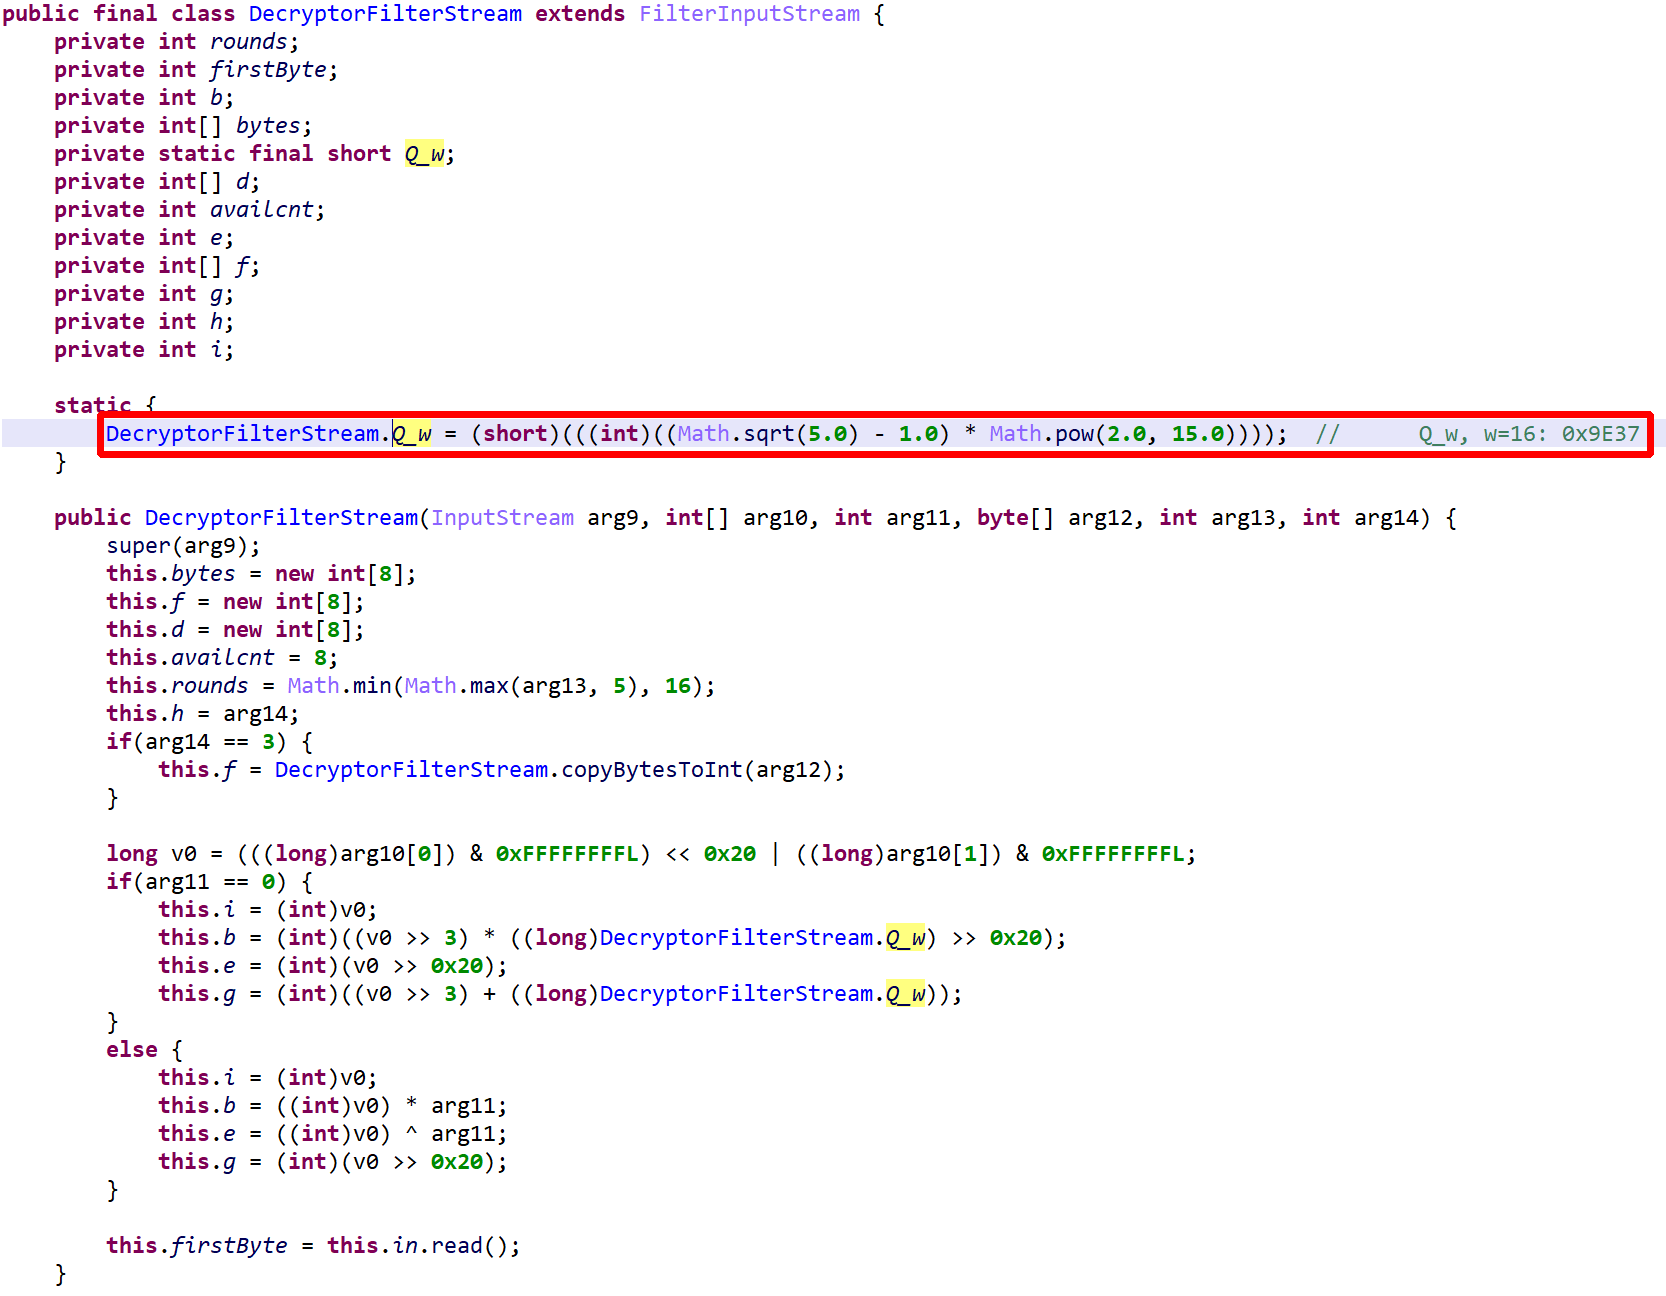
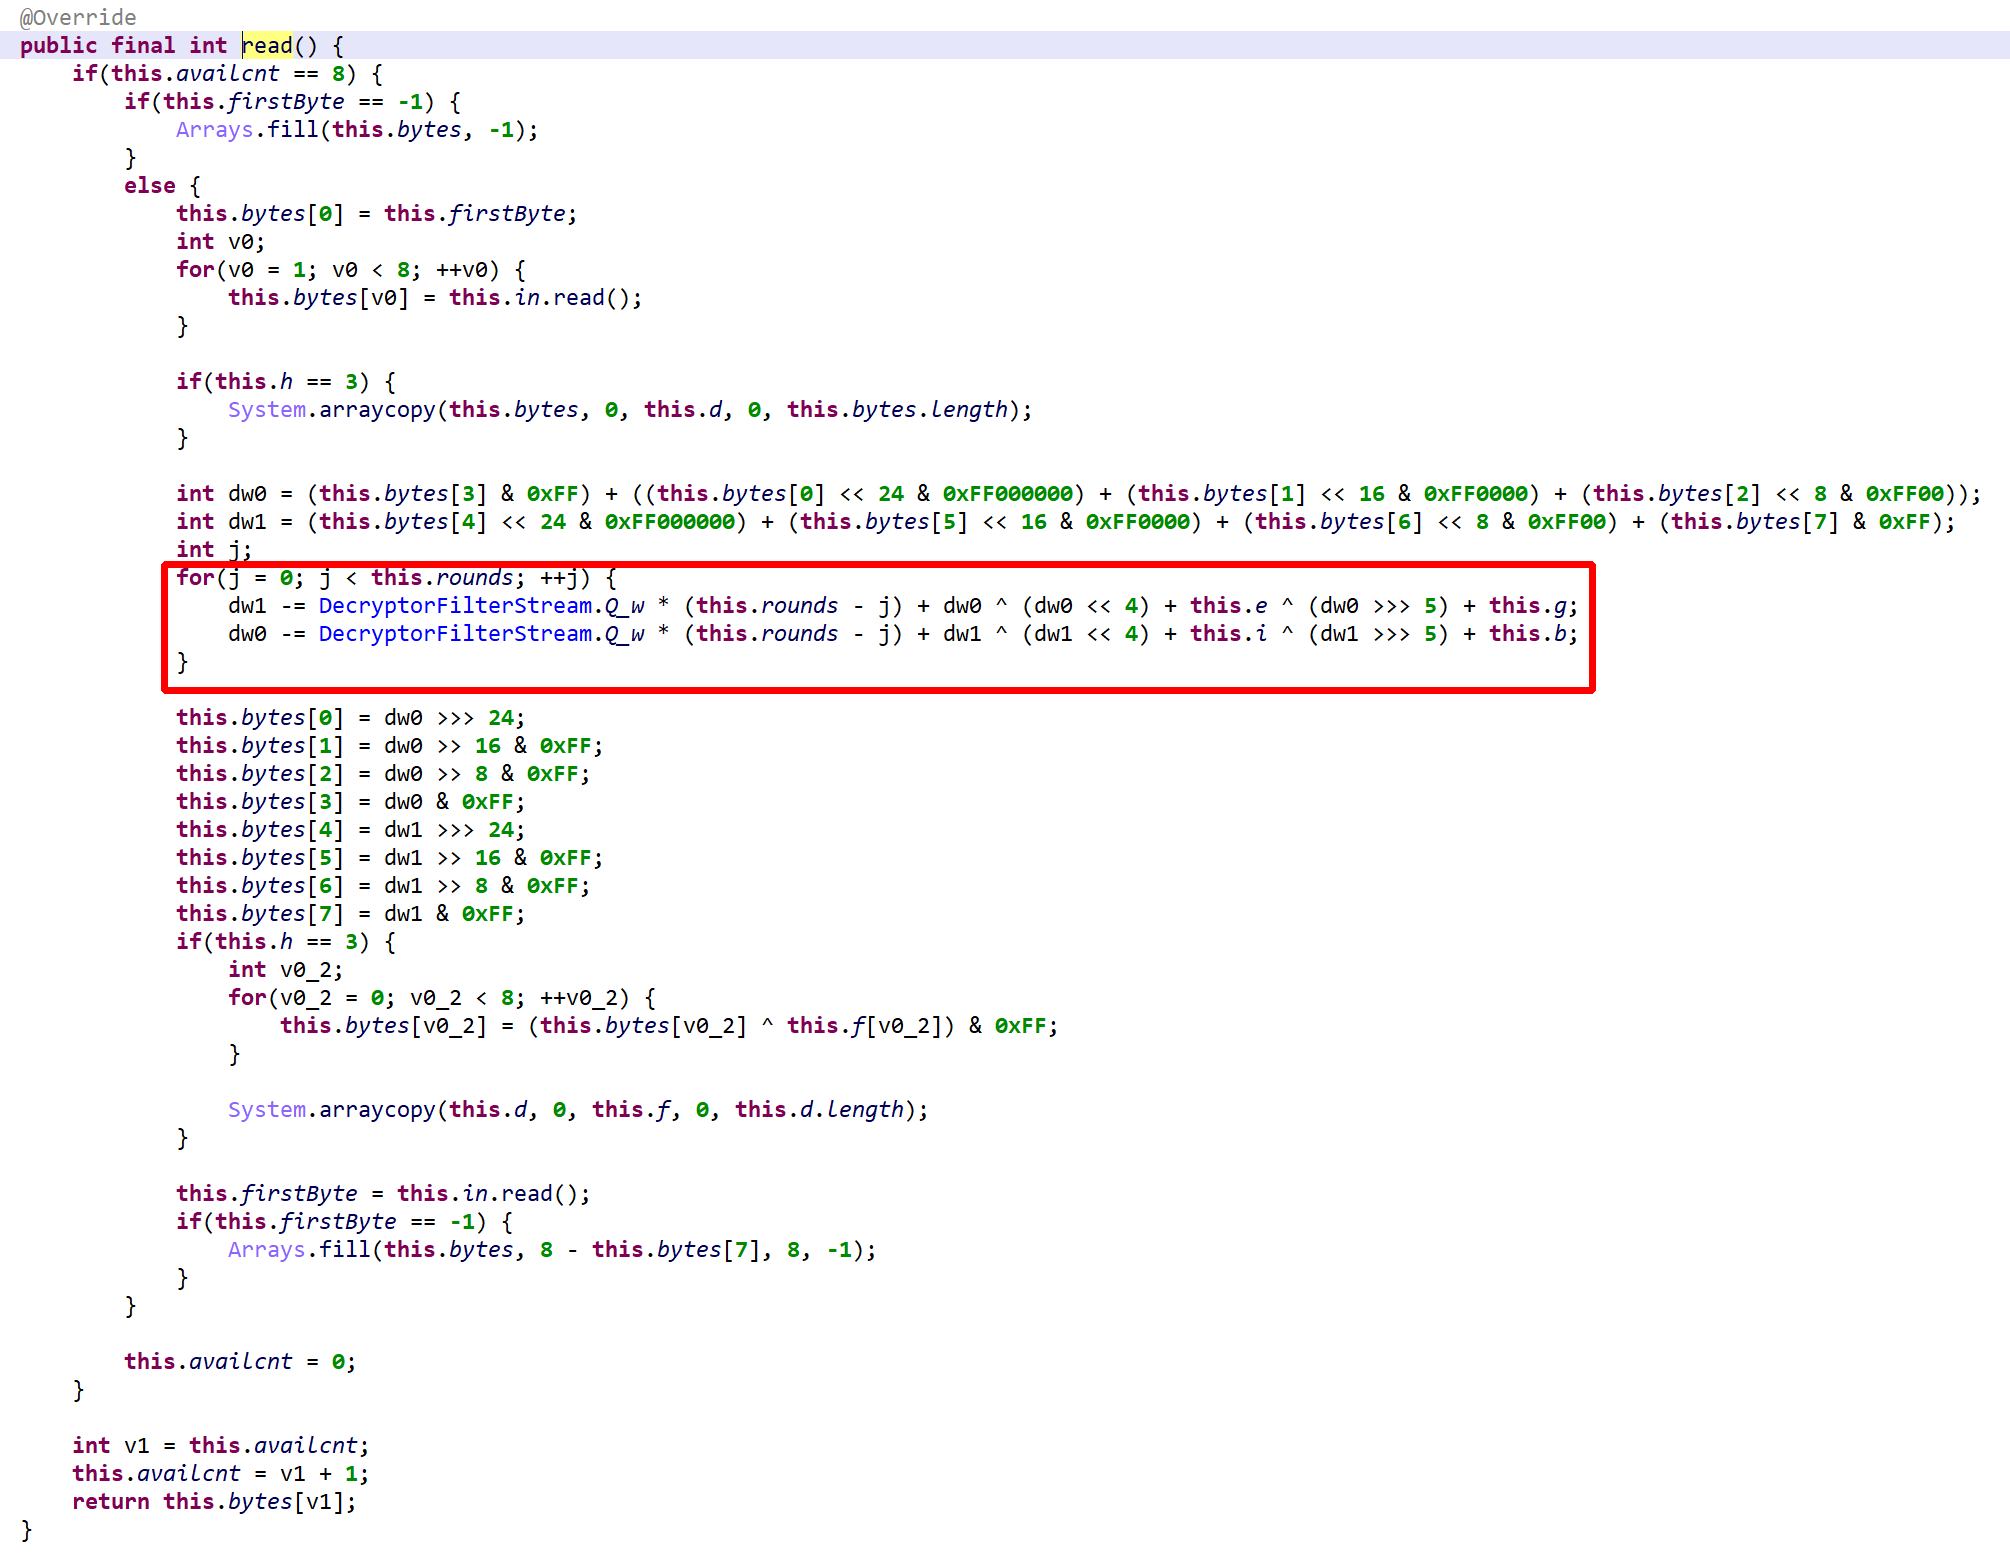
Purple and cyan tokens represent auto-decrypted code. The assets decryptor method was renamed to ‘dec’, it provides a FilterInputStream that transparently decrypts contents.The DecryptorFilterStream (renamed) factory method
The DecryptorFilterStream object implements a variant of TEA (Tiny Encryption Algorithm), known for its simplicity of implementation and great performance 1.
Note the convoluted generation of Q_w, instead of hard-coding the immediate 0x9E37. Incidentally, a variant of that constant is also used by RC5 and RC6.read() decrypts and buffers 64 bits of data at a time. The decryption loop consists of a variable number of rounds, between 5 and 16. Note that Q_w is used as a multiplier instead of an offset, as TEA/XTEA normally does.
It seems reasonable to assume that the encryption and decryption algorithms may not always be the same as this one. This app protector making extensive use of polymorphism throughout its protection layers, it could be the case that during the protection phase, the encryption primitive is either user-selected or selected semi-randomly.
JEB can automatically emulate throughout this code and extract assets, and in fact, this is how encrypted classes, described in the next section, were extracted for analysis. However, this functionality is not present in current JEB Release builds. Since the vast majority of uses are legitimate, we thought that shipping one-click auto-decryptors for data and code at this time was unnecessary, and would jeopardize the app security of several high-profile vendors.
Class Encryption
Class encryption, as seen in multiple recent apps as well, works as follows:
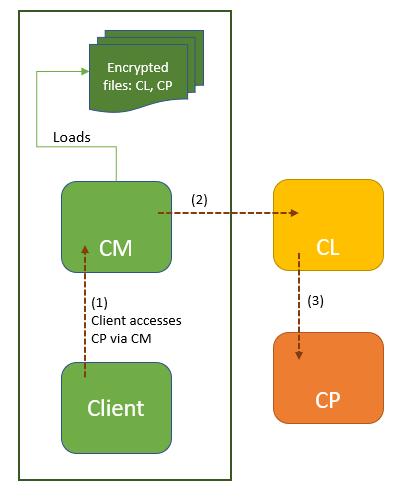
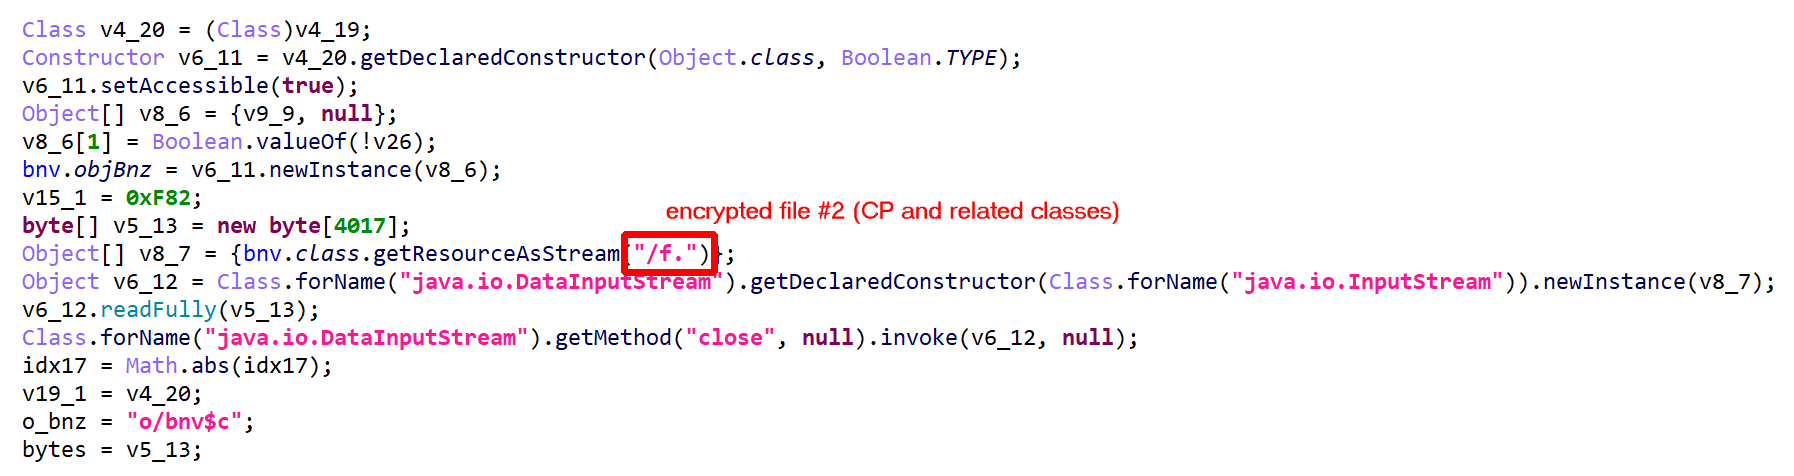
The class to be protected, CP, is encrypted, compressed, and stored in a file within the app folder. (The filename is random and seems to be terminated by a dot, although that could easily change.) Once decrypted, the file is a JAR containing a DEX holding CP and related classes.
CL is also encrypted, compressed, and stored in a file within the app folder. Once decrypted, the file is a JAR containing a DEX holding the custom class loader CL.
Within the application, code using CP (that is, any client that loads CP, invokes CP methods, or accesses CP fields) is replaced by code using CM, a class manager responsible for extracting CP and CL, and loading CL. CM offers bridge methods to the clients of CP, in order to achieve the original functionality.
The following diagram summarizes this mechanism:
Class encryption mechanism
Since protected applications use the extensive RASP (Runtime Application Self-Protection) facility to validate the environment they’re running on, the dynamic retrieval of CL and CP may prove difficult. In this analysis, it was retrieved statically by JEB.
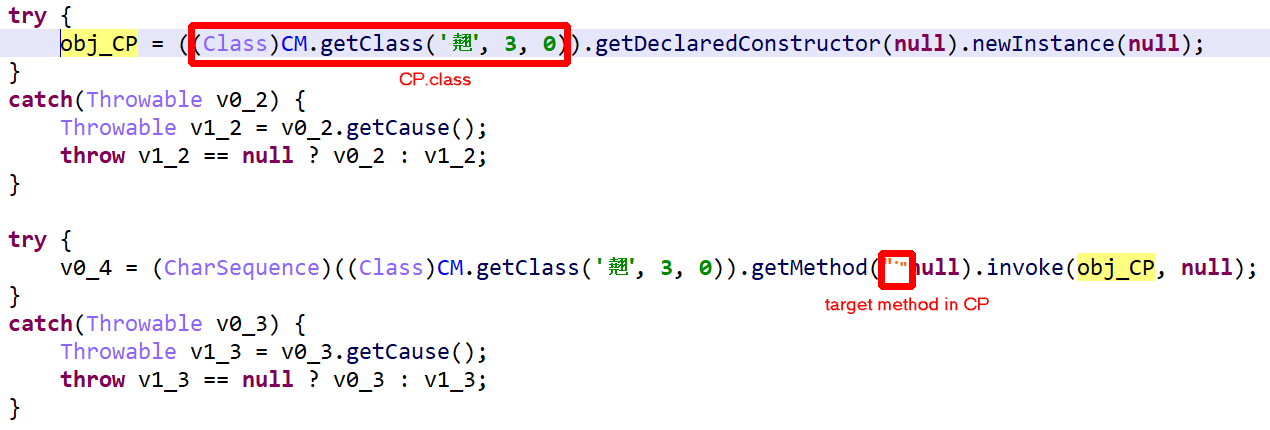
Below, some client code using CM to create an encrypted-class object CP and execute a method on it. Everything is done via reflection. Items were renamed for enhanced clarity.
Encrypted class loading and virtual method invocation
CM is a heavy class, highly obfuscated. The first step in understanding it is to:
disable rendering of catch-blocks that clutter the view.
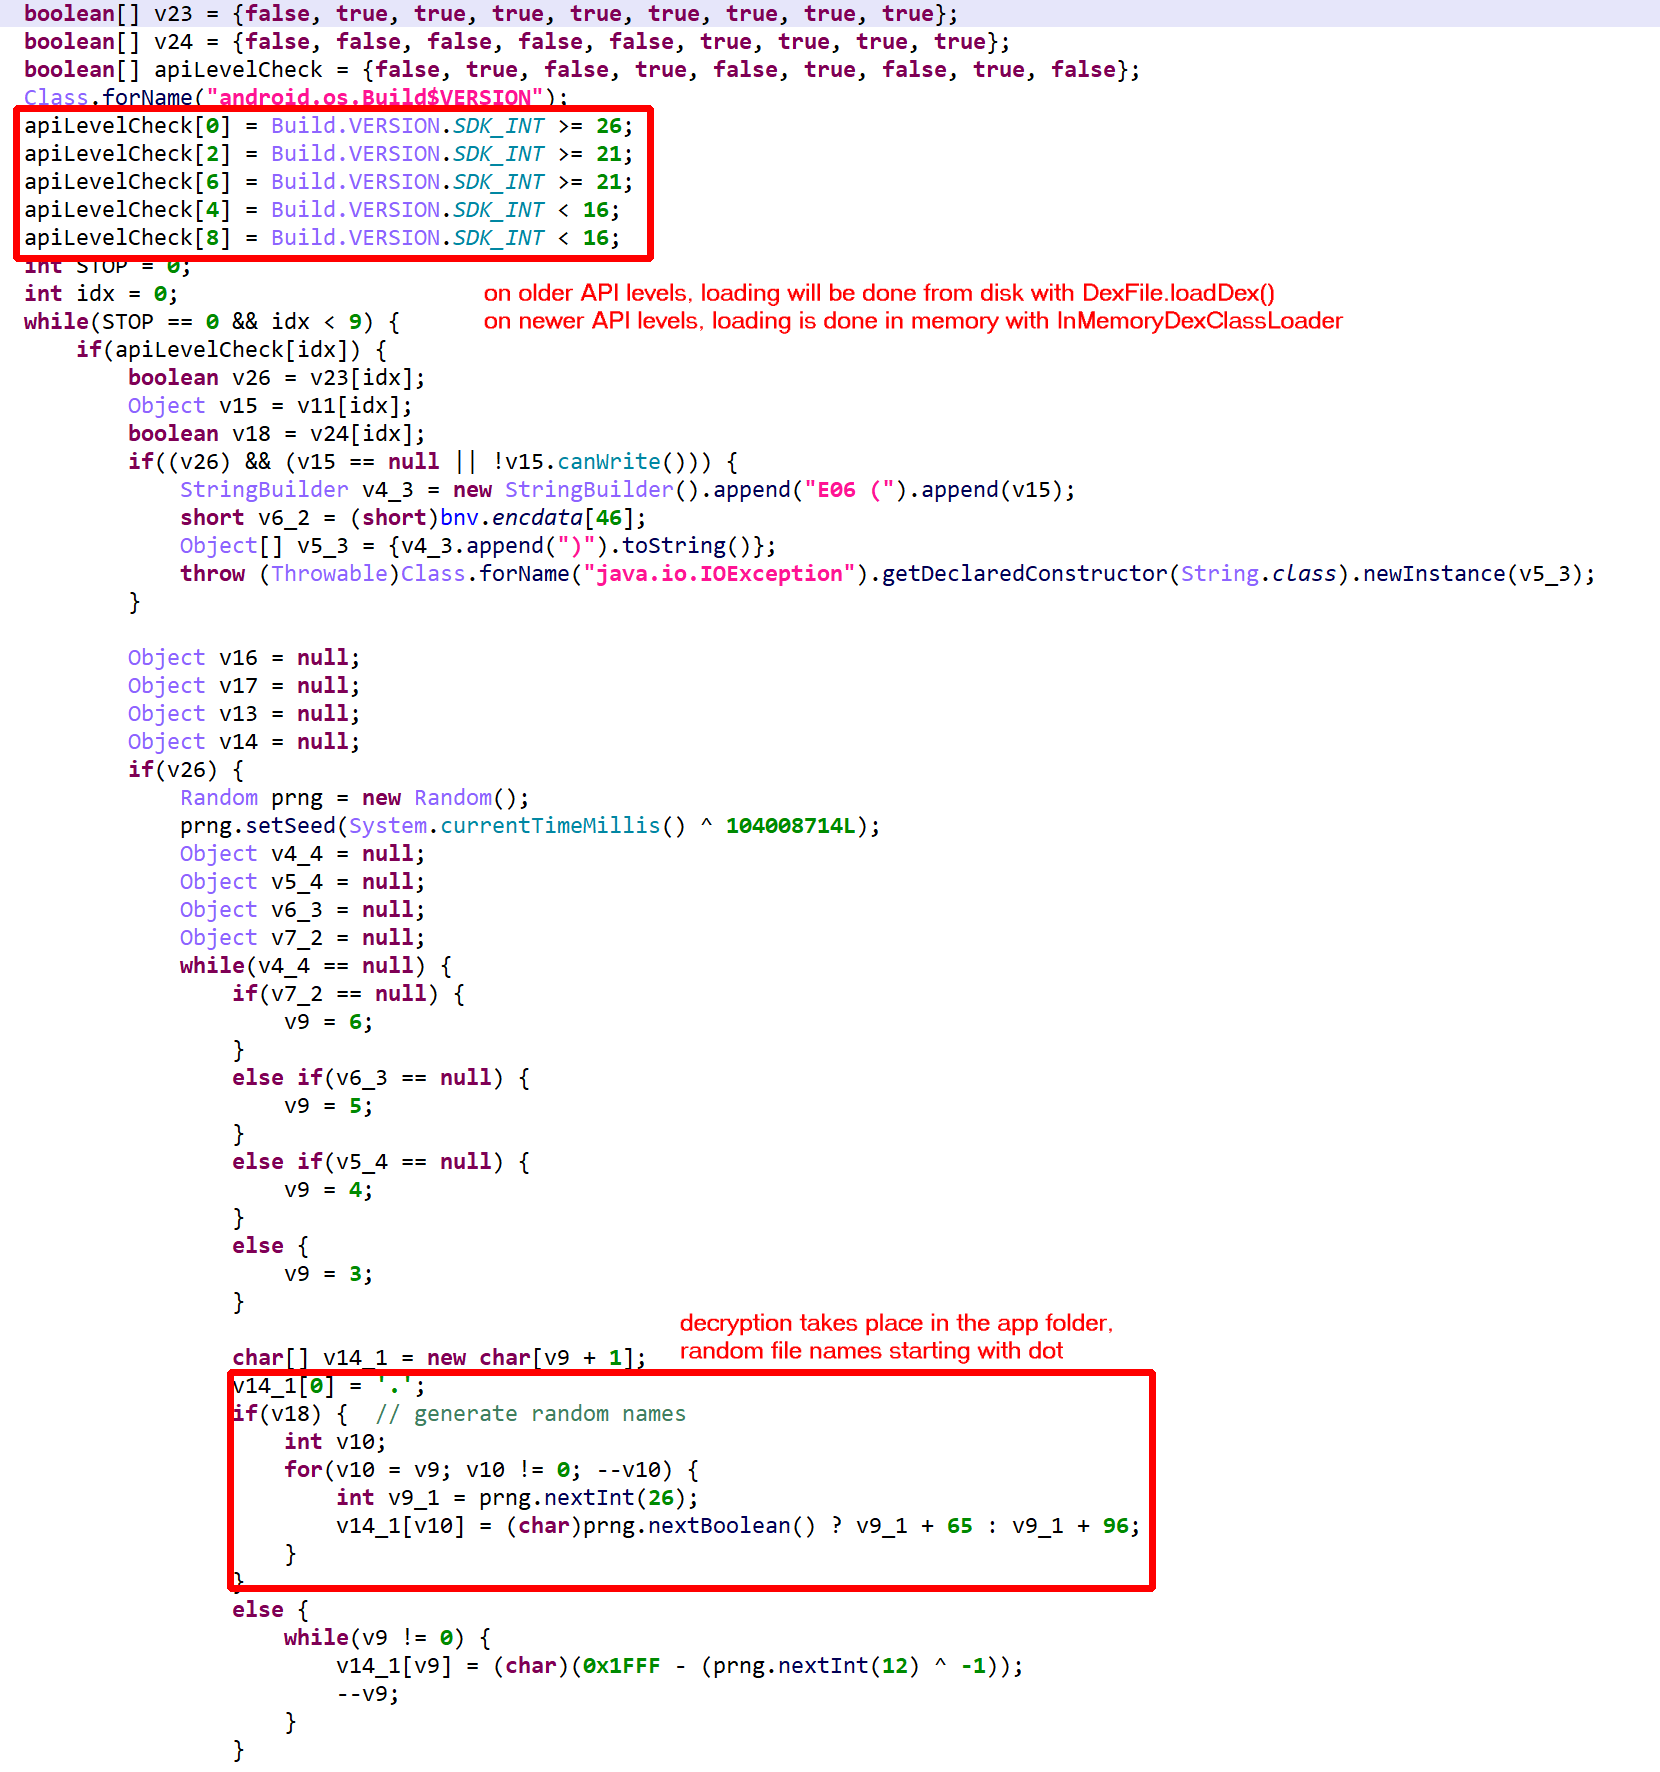
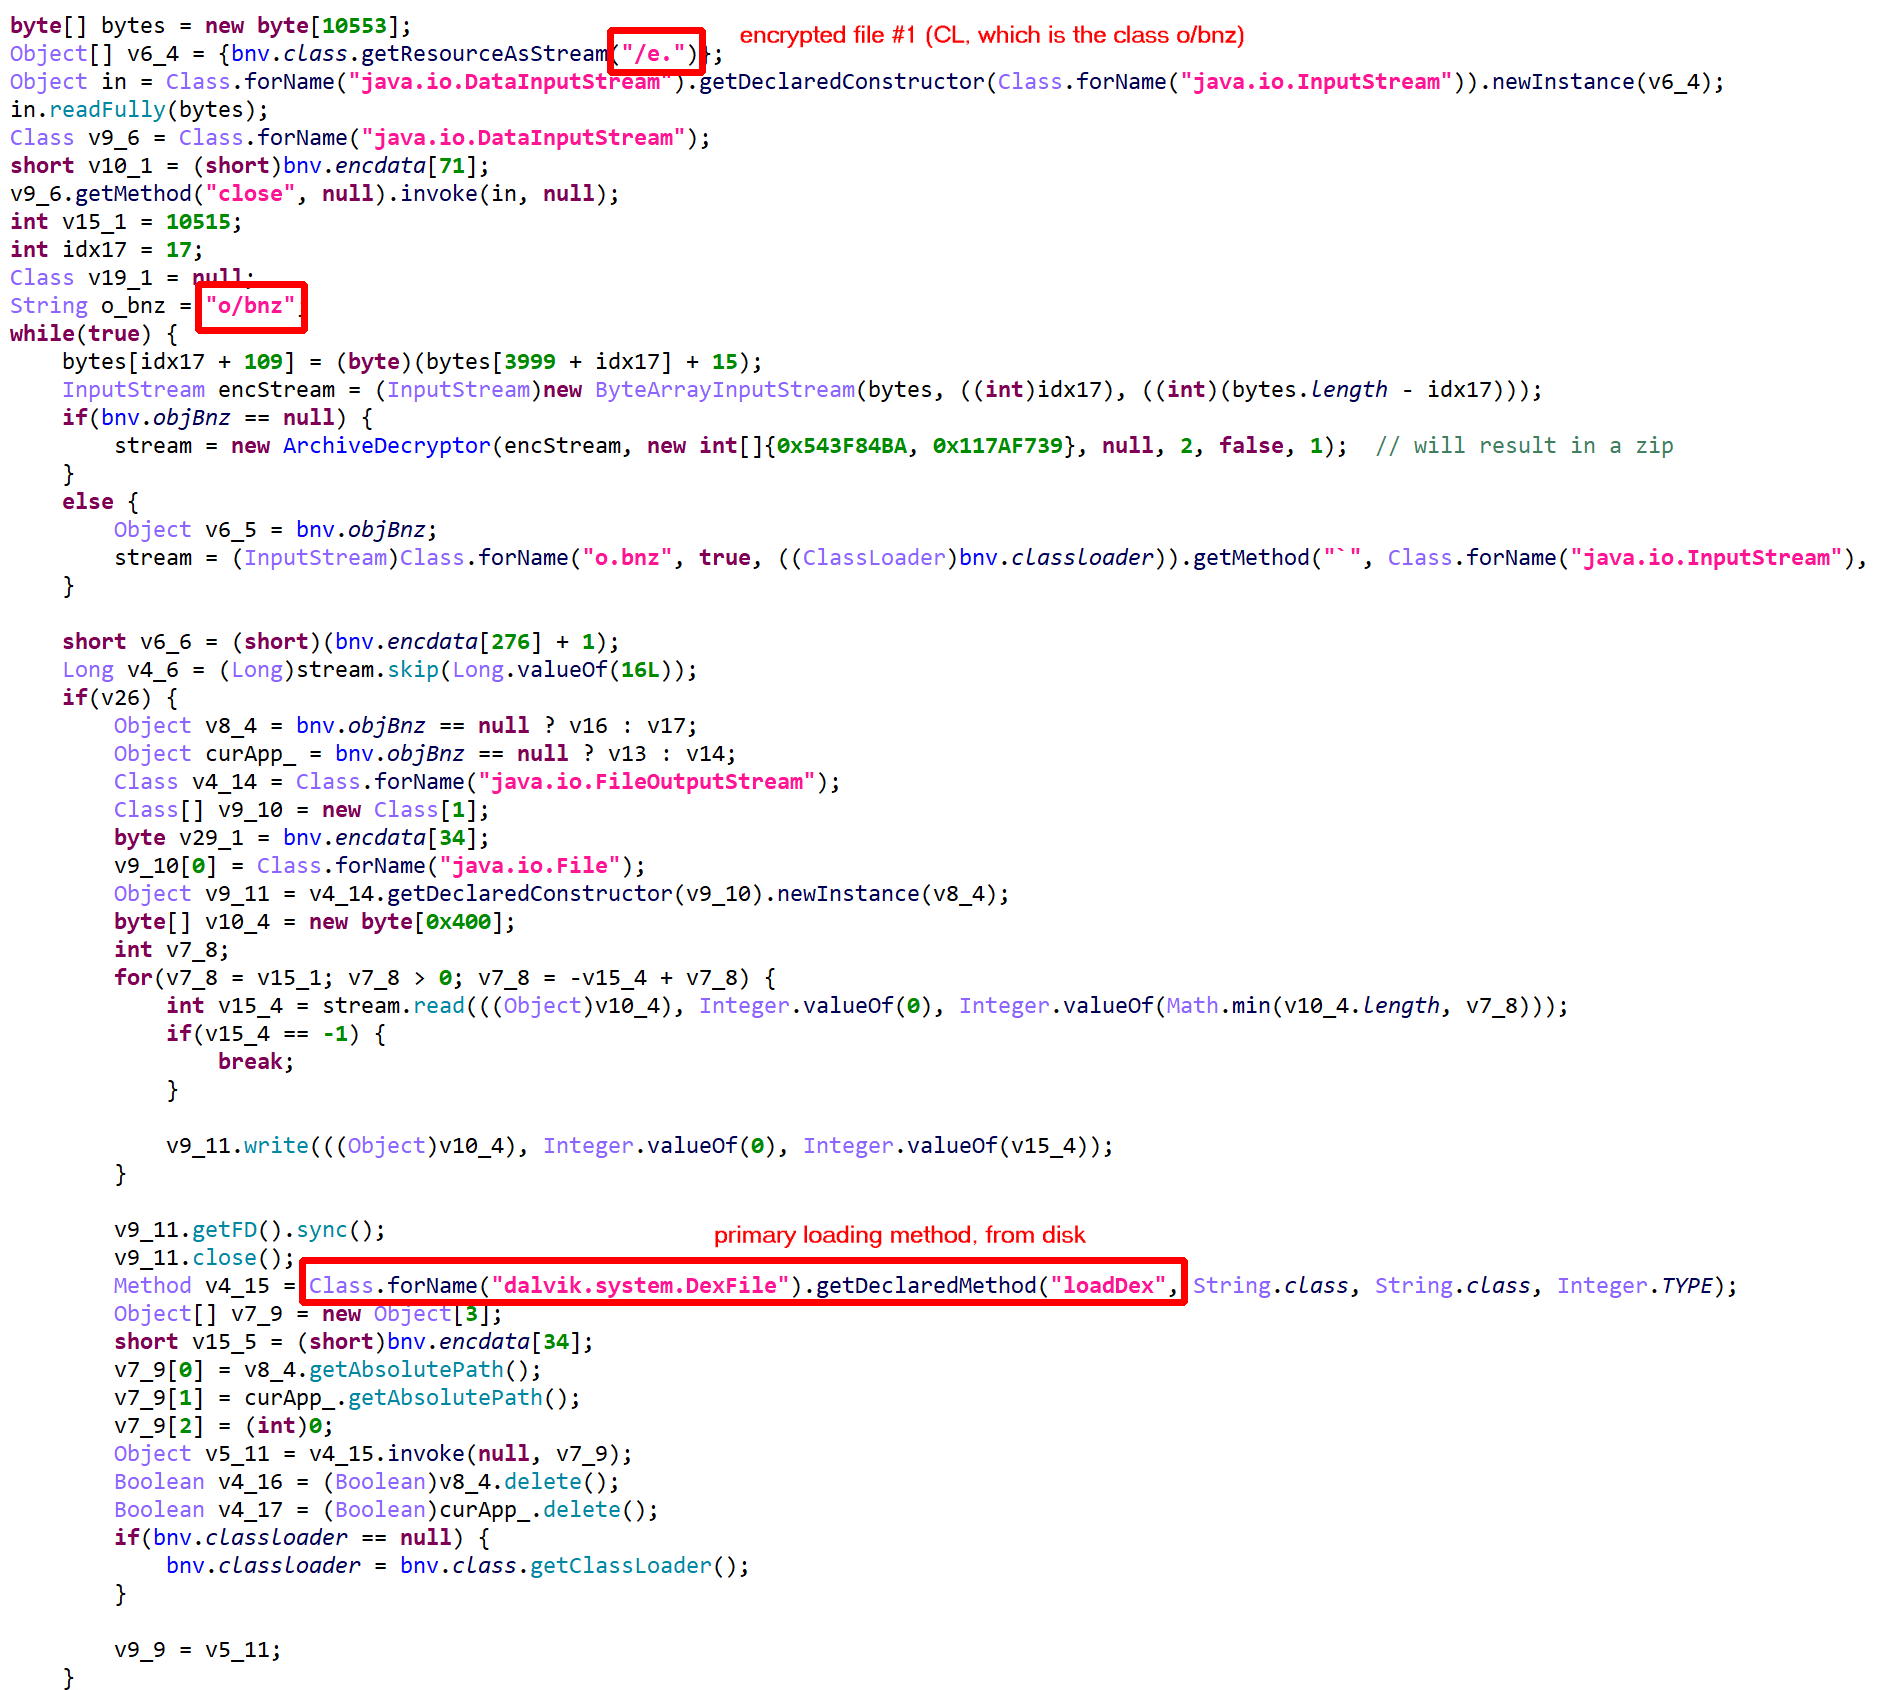
With auto-decryption and auto-unreflection enabled, the result is quite readable. A few snippets follow:
Decrypted files are deleted after loading. On older devices, loading is done with DexFile; on newer devices, it is done using InMemoryDexClassLoader.In this case, the first encrypted JAR file (holding CL) is stored as “/e.”.In this case, the second encrypted JAR file (holding CP and related) is stored as “/f.”. The application held two additional couples, (“/a.”, “/b.”) and (“/c.”, “/d.”)
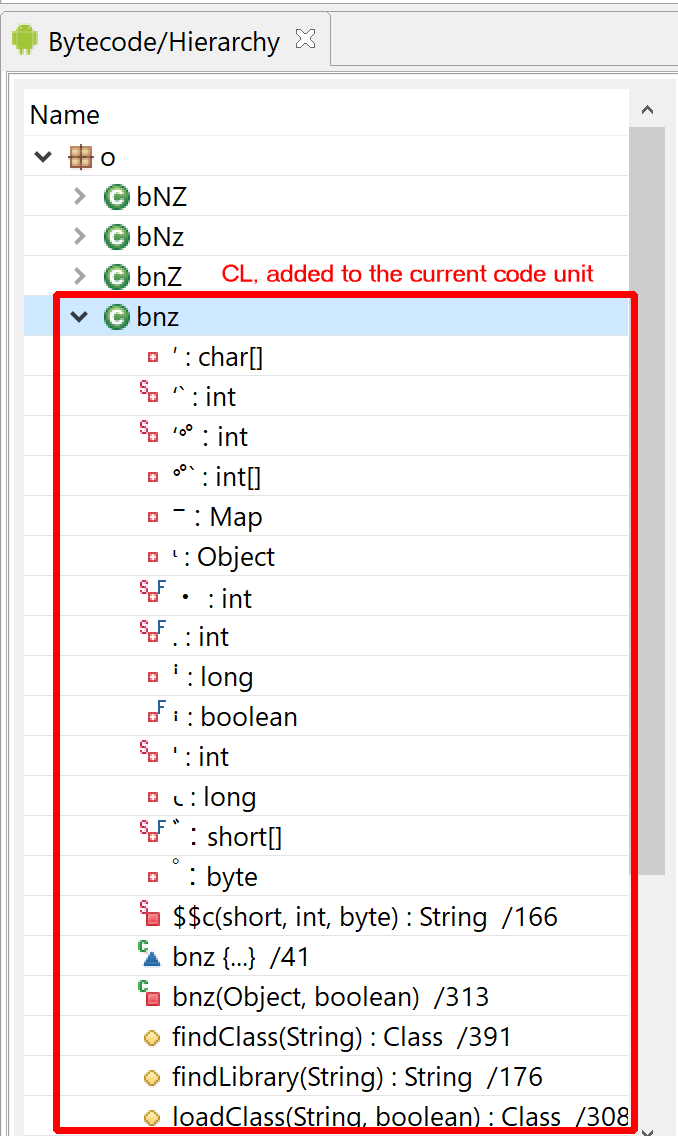
Once retrieved, those additional files can easily be “added” to the current DEX unit with IDexUnit.addDex() of your JEB project. Switch to the Terminal fragment, activate the Python interpreter (use py), and issue a command like:
Using Jython’s to add code to an existing DEX unitThe bnz class (CL) is a ClassLoader for the protected class (CP).
The protected class CP and other related classes, stored in “/f.” contained… anti-tampering verification code, which is part of the RASP facility! In other instances that were looked at, the protected classes contained: encrypted assets manager, custom code, API key maps, more RASP code, etc.
Full Application Encryption
“Full” encryption is taking class encryption to the extreme by encrypting almost all classes of an application. A custom Application object is generated, which simply overloads attachBaseContext(). On execution, the encrypted class manager will be called to decrypt and load the “original” application (all other protections still apply).
Custom application object used to provide full program encryption.
Note that activities can be encrypted as well. In the above case, the main activity is part of the encrypted jar.
Conclusion
That’s it for part 2. We focused on the encryption features. Both offer relatively limited protection for reverse-engineers willing to go the extra mile to retrieve original assets and bytecodes.
In Part 3, we will present what I think is the most interesting feature of this protector, code virtualization.
Until next time!
—
The TEA encryption family is used by many win32 packers ↩
What started as a ProGuard + basic string encryption + code reflection tool evolved into a multi-platform, complex solution including: control-flow obfuscation, complex and varied data and resources encryption, bytecode encryption, virtual environment and rooted system detection, application signature and certificate pinning enforcement, native code protection, as well as bytecode virtualization 1, and more.
This article presents the obfuscation techniques used by this app protector, as well as facility made available at runtime to protected programs 2. The analysis that follows was done statically, with JEB 3.20.
Identification
Identifying apps protected by this protector is relatively easy. It seems the default bytecode obfuscation settings place most classes in the o package, and some will be renamed to invalid names on a Windows system, such as con or aux. Closer inspection of the code will reveal stronger hints than obfuscated names: decryption stubs, specific encrypted data, the presence of some so library files, are all tell tale signs, as shown below.
Running a Global Analysis
Let’s run a Global Analysis (menu Android, Global analysis…) with standard settings on the file and see what gets auto-decrypted and auto-unreflected:
Results subset of Global Analysis (redacted areas are meant to keep the analyzed program anonymous; it is a clean app, whose business logic is irrelevant to the analysis of the app protector)
Lots of strings were decrypted, many of them specific to the app’s business logic itself, others related to RASP – that is, library code embedded within the APK, responsible for performing app signature verification for instance. That gives us valuable pointers into where we should be looking at if we’d like to focus on the protection code specifically.
Deobfuscating Code
The first section of this blog focuses on bytecode obfuscation and how JEB deals with it. It is mostly automated, but a final step requires manual assistance to achieve the best results.
Most obfuscated routines exhibit the following characteristics:
Dynamically generated strings via the use of per-class decryption routines
Most calls to external routines are done via reflection
Flow obfuscation via the use of a couple of opaque integer fields – let’s call them OPI0, OPI1. They are class fields generally initialized to 0 and 1.
Arithmetic operation obfuscation
Garbage code insertion
Unusual protected block structure, leading to fragmented try-blocks, unavoidable to produce semantically accurate raw code
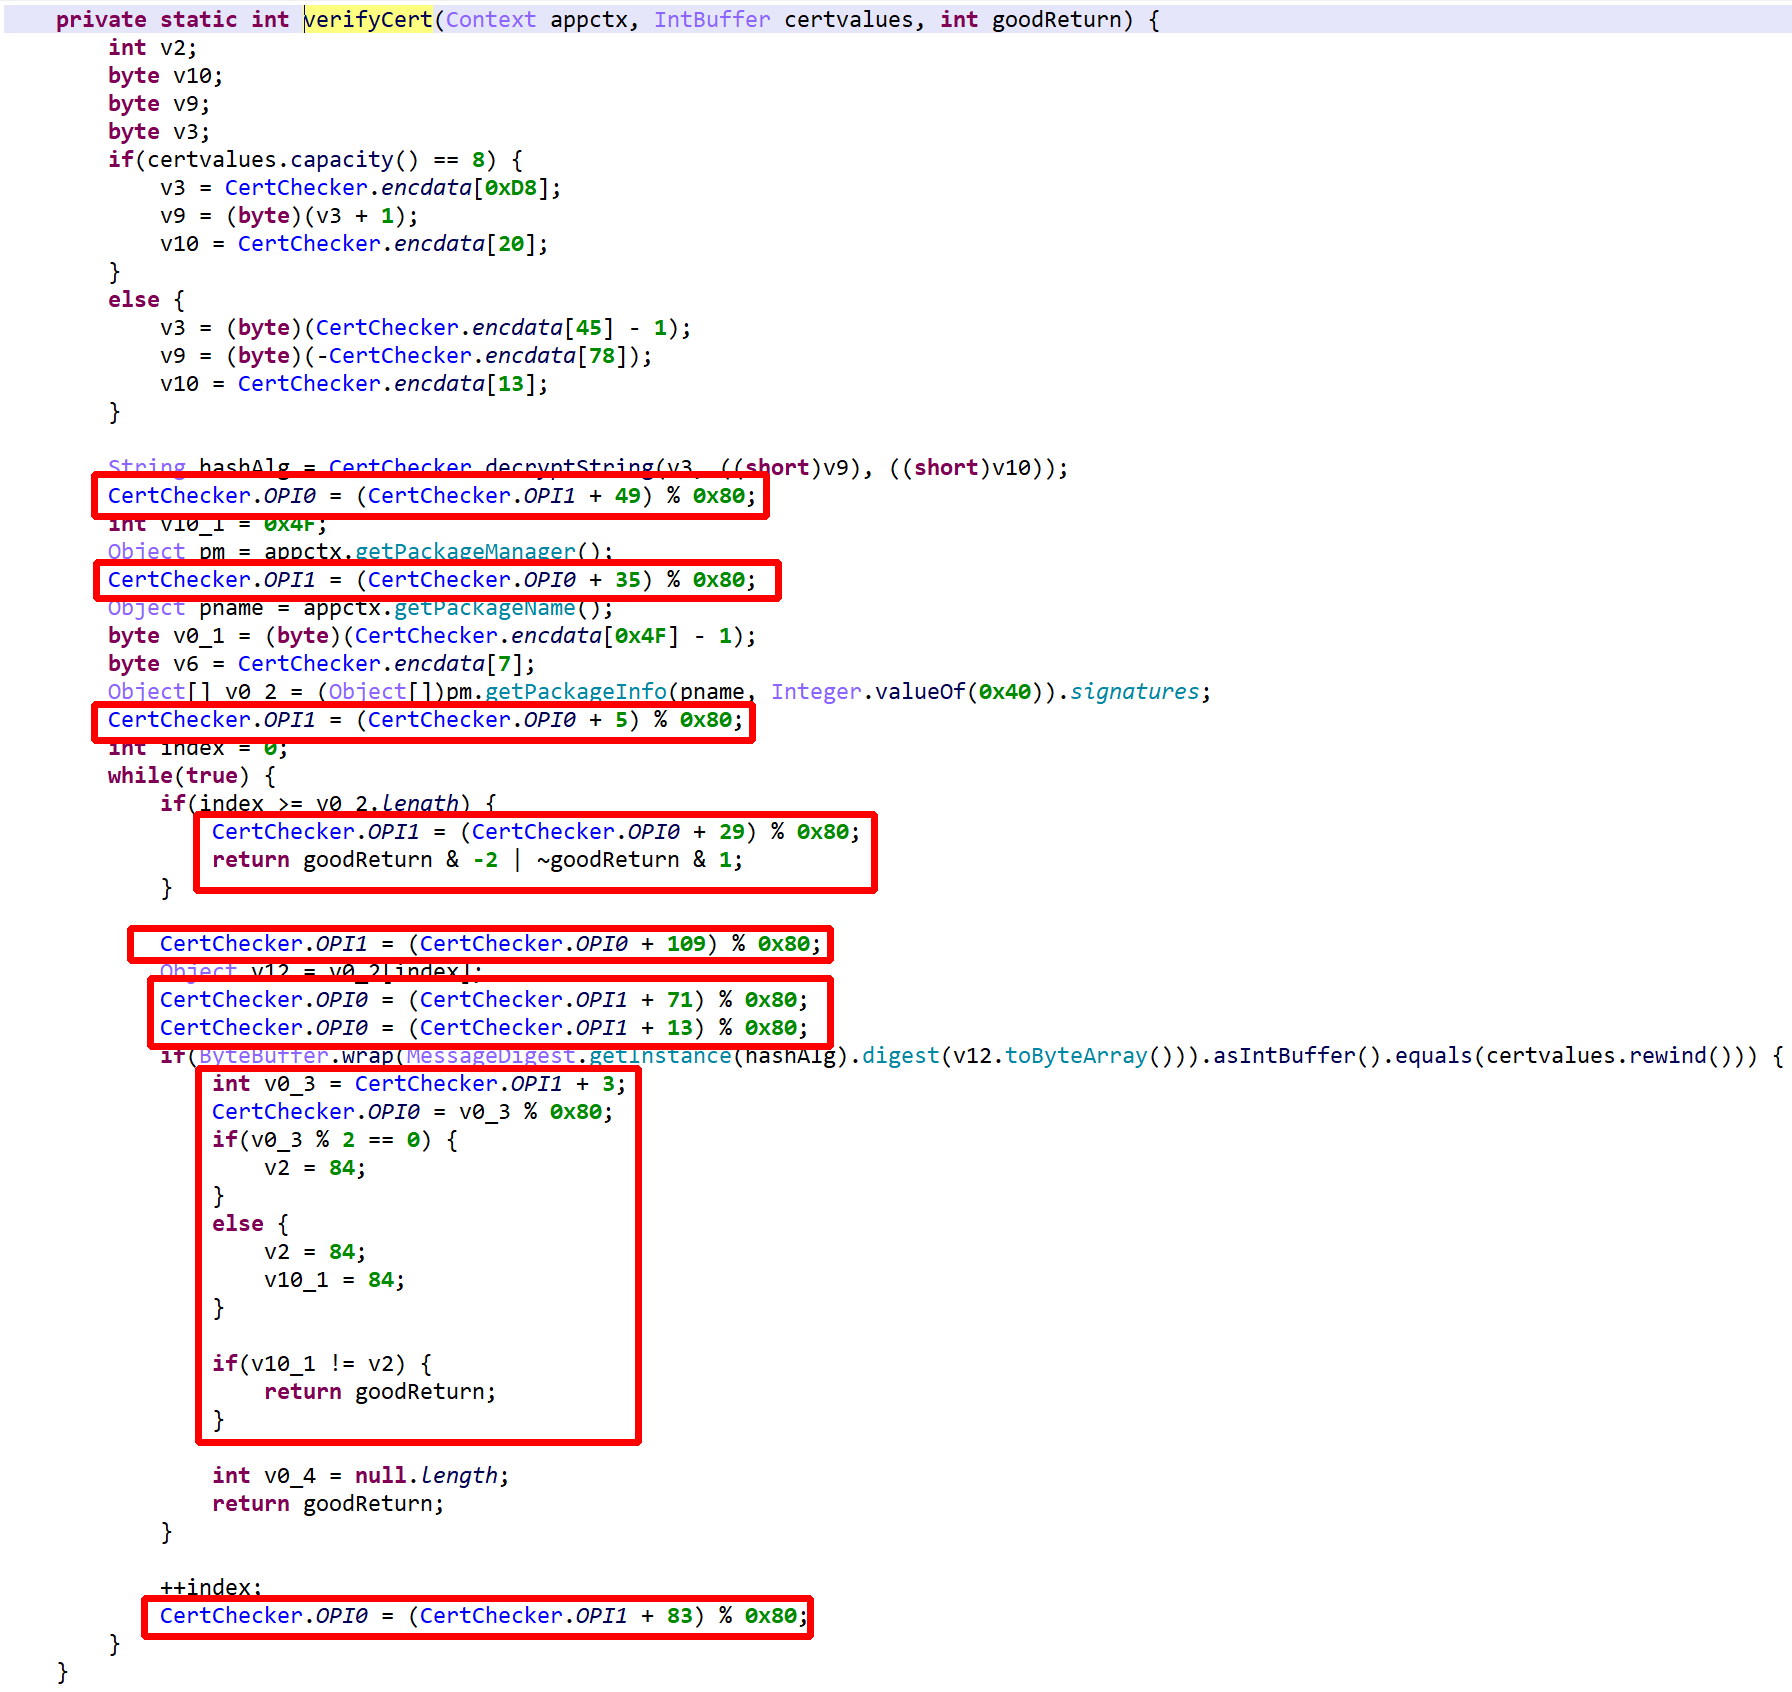
As an example, the following class is used to perform app certificate validation in order, for instance, to prevent resigned apps from functioning. A few items were renamed for clarity; decompilation is done with disabled Deobfuscators (MOD1+TAB, untick “Enable deobfuscators”):
Take #1 (snippet) – The protected class is decompiled without deobfuscation in order to show semi-raw output (a few optimizers doing all sort of code cleanup are not categorized as deobfuscators internally, and will perform even if Deobfuscation is disabled). Note that a few items were also renamed for clarity.
In practice, such code is quite hard to comprehend on complex methods. With obfuscators enabled (the default setting), most of the above will be cleared.
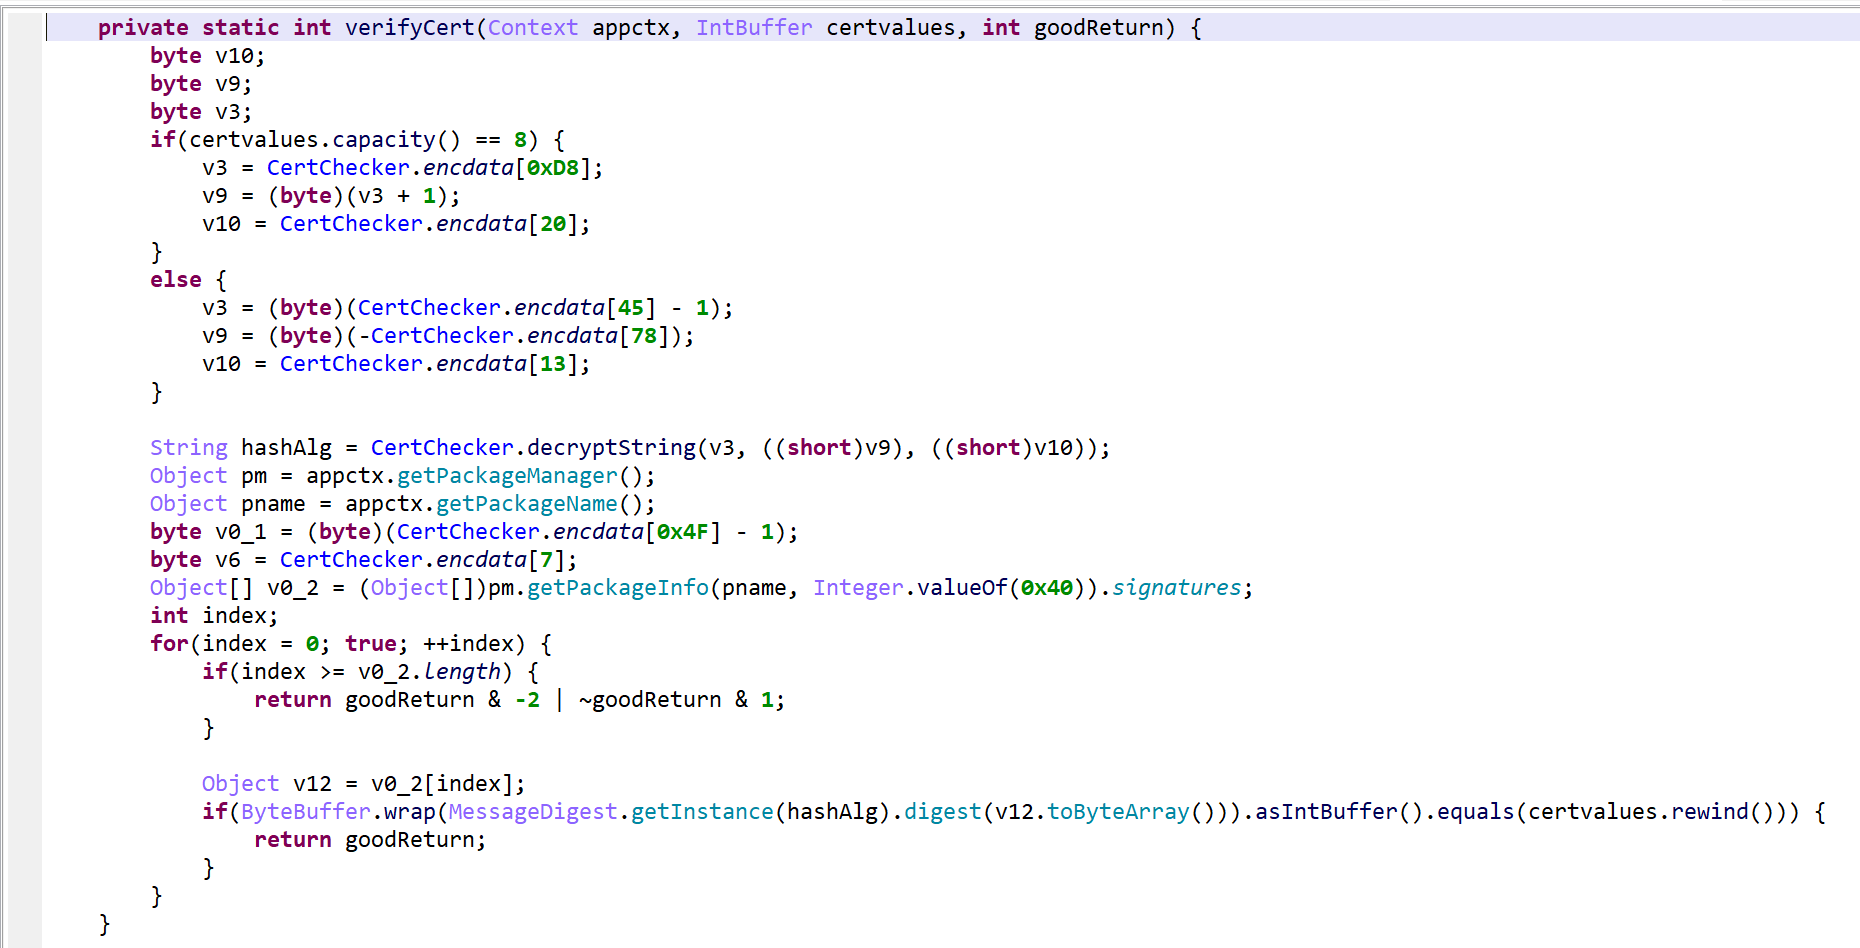
See the re-decompilation of the same class, below.
strings are decrypted…
…enabling unreflection
most obfuscation is removed…
except for some control flow obfuscation that remains because JEB was unable to process OPI0/OPI1 directly (below,
Take #2 (full routine) – obfuscators enabled (default). The red blocks highlight use of opaque variables used to obfuscate control flow.
Let’s give a hint to JEB as to what OPI0/OPI1 are.
When analyzing protected apps, you can rename OPI0 and OPI1 to guard0 and guard1, respectively, to allow JEB go aggressively clean the code
Redecompile the class after renaming the fields
Take #3 (full routine) – with explicit guard0/guard1
That final output is clean and readable.
Other obfuscation techniques not exposed in this short routine above are arithmetic obfuscation and other operation complexification techniques. JEB will seamlessly deal with many of them. Example:
is optimized to
To summarize bytecode obfuscation:
decryption and unreflection is done automatically 3
garbage clean-up, code clean-up is also generic and done automatically
control flow deobfuscation needs a bit of guidance to operate (guard0/guard1 renaming)
Runtime Verification
RASP library routines are used at the developers’ discretion. They consist of a set of classes that the application code can call at any time, to perform tasks such as:
App signing verification
Debuggability/debugger detection
Emulator detection
Root detection
Instrumentation toolkits detection
Certificate pinning
Manifest check
Permission checks
The client decides when and where to use them as well as what action should be taken on the results. The code itself is protected, that goes without saying.
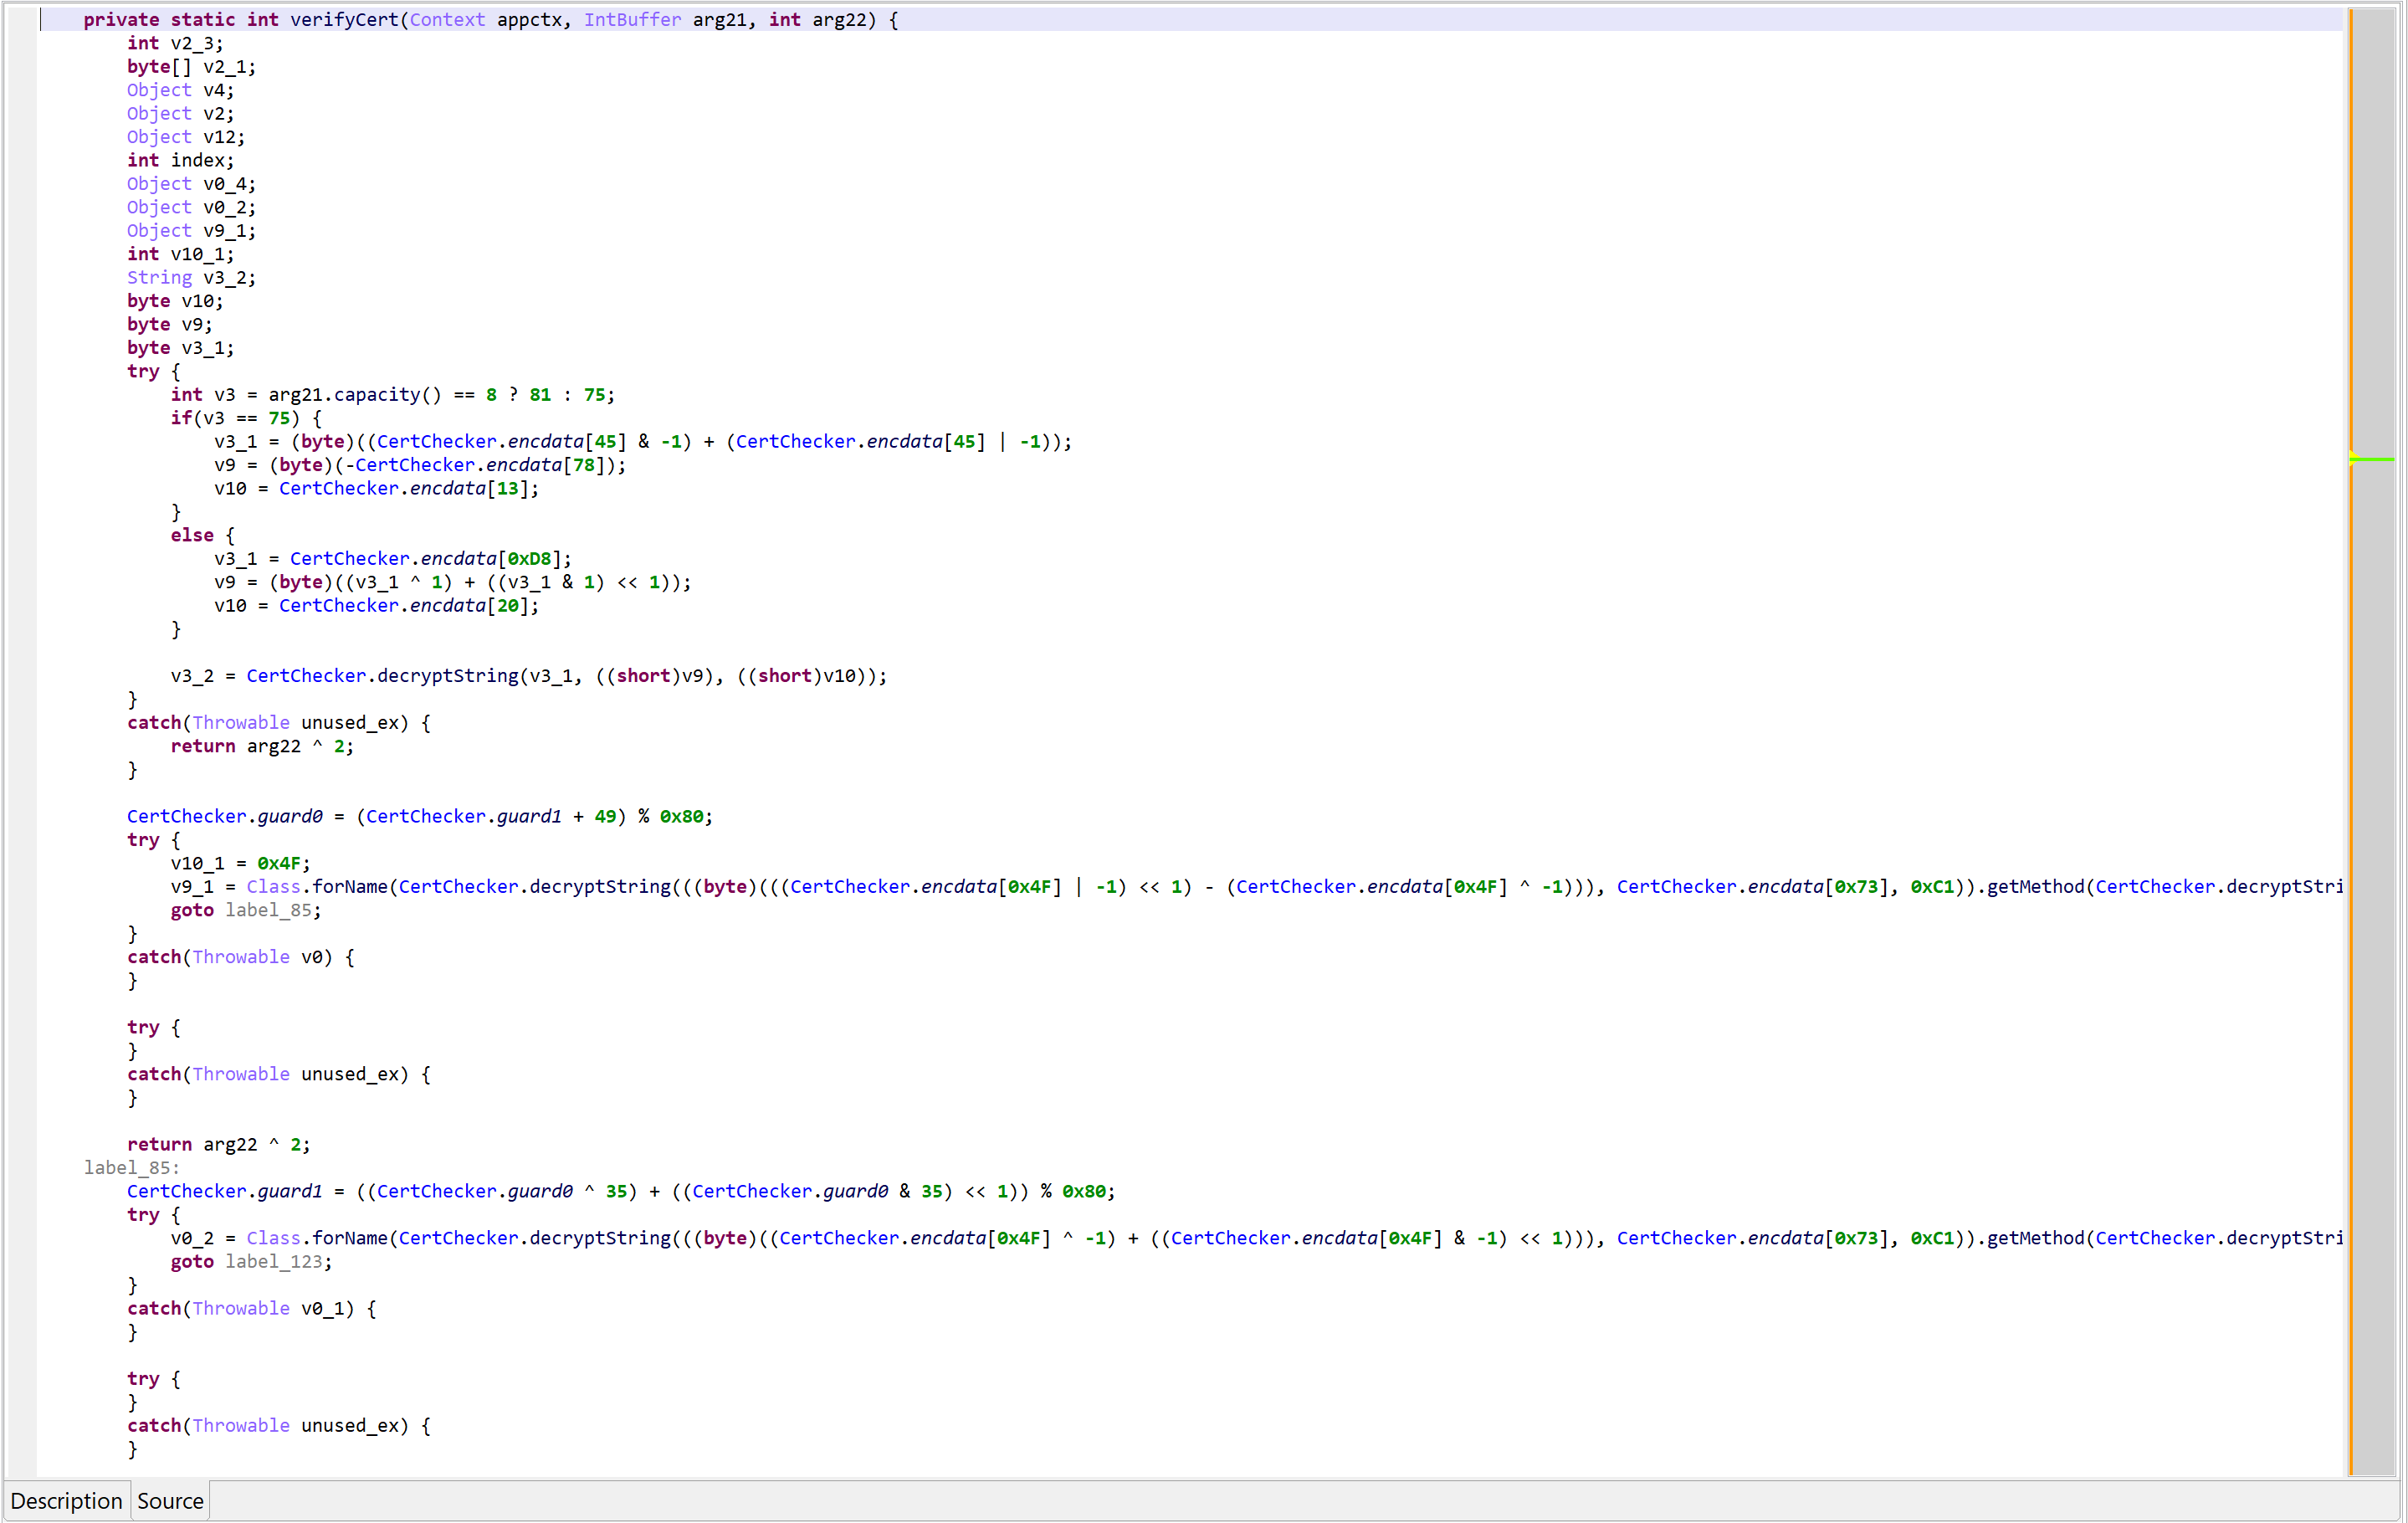
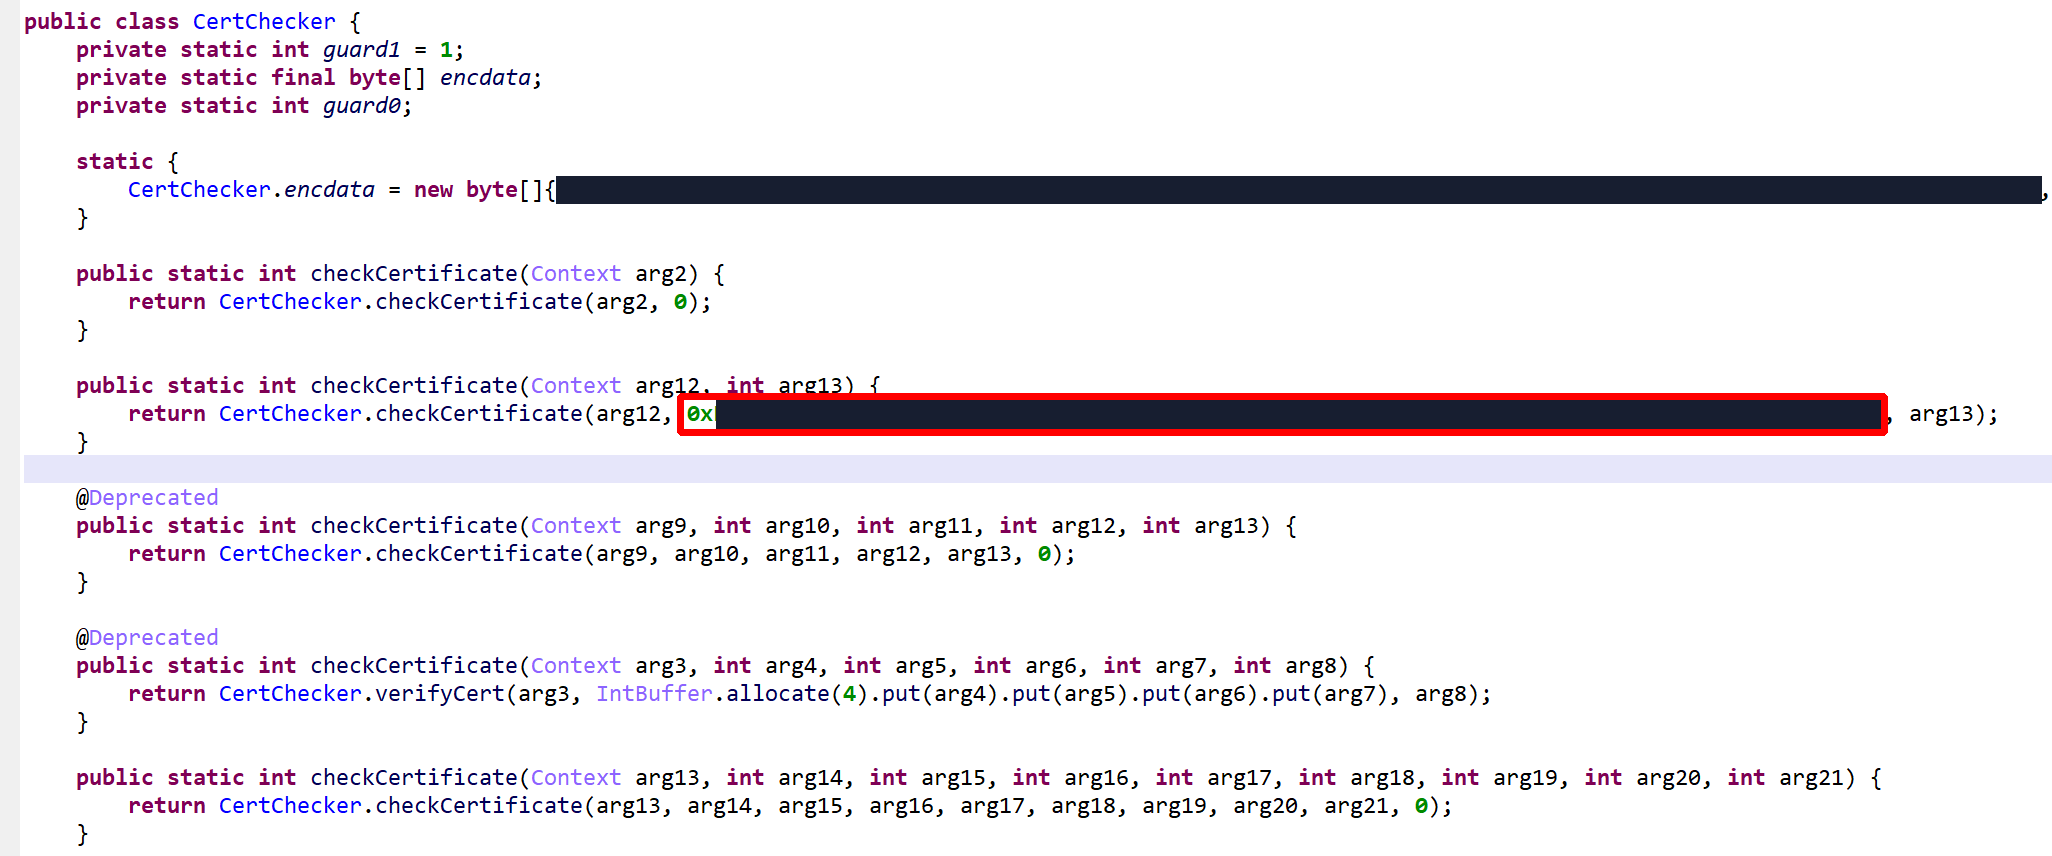
App Signing Verification
Certificate verification uses the PackageManager to retrieve app’s signatures: PackageManager.getPackageInfo(packageName, GET_SIGNATURES).signatures
The signatures are hashed and compared to caller-provided values in an IntBuffer or LongBuffer.
Debug Detection
Debuggability check
The following checks must pass:
assert that Context.ctx.getApplicationInfo().flags & ApplicationInfo.FLAG_DEBUGGABLE is false
check the ro.debuggable property, in two ways to ensure consistency
using android.os.SystemProperties.get() (private API)
using the getprop‘s binary
verify that no hooking framework is detected (see specific section below)
Debugging session check
The following checks must pass:
assert that android.os.Debug.isDebuggerConnected() is false
verify no tracer process: tracerpid entry in /proc/<pid>/status must be <= 0
verify that no hooking framework is detected (see specific section below)
Debug key signing
enumerate the app’s signatures via PackageInfo.signatures
use getSubjectX500Principal() to verify that no certificate has a subject distinguished name (DN) equals to "CN=Android Debug,O=Android,C=US", which is the standard DN for debug certificates generated by the SDK tools
Emulator Detection
Emulator detection is done by checking any of the below.
1) All properties defined in system/build.prop are retrieved, hashed, and matched against a small set of hard-coded hashes:
Unfortunately, we were not able to reverse those hashes back to known property strings – however, it was tried only on AOSP emulator images. If anybody wants to help and run the below on other build.prop files, feel free to let us know what property strings those hashes match to. Here is the hash verification source, to be run be on build.prop files.
4) Check for the presence of wired network interfaces: (via NetworkInterface.getNetworkInterfaces)
eth0
eth1
5) If the app has the permission READ_PHONE_STATE, telephony information is verified, an emulator is detected if any of the below matches (standard emulator image settings):
/proc/ioports: entry "0ff :" (unknown port, likely used by some emulators)
/proc/self/maps: entry "gralloc.goldfish.so" (GF: older emulator kernel name)
7) Property checks (done in multiple ways with a consistency checks, as explained earlier), failed if any entry is found and start with one of the provided values:
Class loading is done in different ways in an attempt to circumvent hooking itself, using Class.forName with a variety of class loaders, custom class loaders and ClassLoader.getLoadedClass, as well as lower-level private methods, such as Class.classForName.
4) Stack frame verification: an exception is generated in order to retrieve a stack frame. The callers are hashed and compared to an expected hard-coded value.
5) Native code checks. This will be detailed in another blog, if time allows.
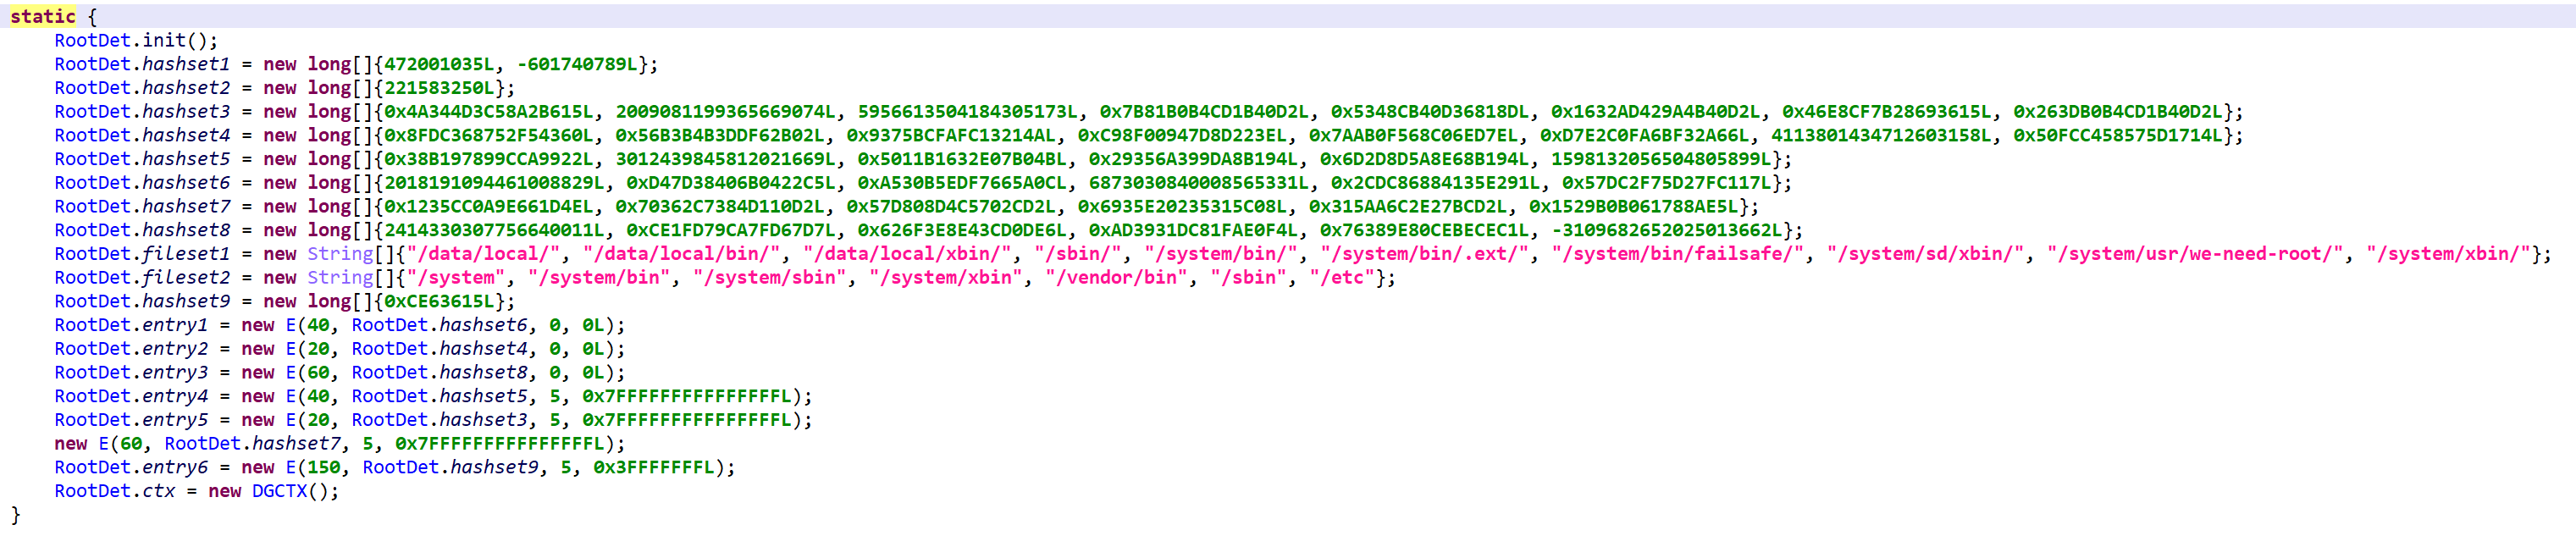
Root Detection
While root detection overlaps with most of the above, it is still another layer of security a determined attacker would have to jump over (or walk around) in order to get protected apps to run on unusual systems. Checks are plenty, and as is the case for all the code described here, heavily obfuscated. If you are analyzing such files, keeping the Deobfuscators enabled and providing guard0/guard1 hints is key to a smooth analysis.
Static initializer of the principal root detection class. Most artifacts indicative of a rooted device are searched for by hash.
Build.prop checks. As was described in emulator detection.
su execution. Attempt to execute su, and verify whether su -c id == root
su presence.su is looked up in the following locations:
Magisk detection through mount. Check whether mount can be executed and contains databases/su.db (indicative of Magisk) or whether /proc/mounts contains references to databases/su.db.
Read-only system partitions. Check if any system partition is mounted as read-write (when it should be read-only). The result of mount is examined for any of the following entries marked rw:
Verify installed apps in the hope of finding one whose package name hashes to the hard-coded value:
0x9E6AE9309DBE9ECFL
Unfortunately, that value was not reversed, let us know if you find which package name generates this hash – see the algorithm below:
    public static long hashstring(String str) {
        long h = 0L;
        for(int i = 0; i < str.length(); i++) {
            int c = str.charAt(i);
            h = h << 5 ^ (0xFFFFFFFFF8000000L & h) >> 27 ^ ((long)c);
        }
        return h;
    }
NOTE: App enumeration is performed in two ways to maximize chances of evading partial hooks.
More convoluted: iterate over all known MAIN intents: PackageManager.queryIntentActivities(new Intent("android.intent.action.MAIN")), derive the package name from the intent via ResolveInfo.activityInfo.packageName
SElinux verification. If the file /sys/fs/selinux/policy cannot be read, the check immediately passes. If it is readable, the policy is examined and hints indicative of a rooted device are looked for by hash comparison:
472001035L
-601740789L
The hashing algorithm is extremely simple, see below. For each byte of the file, the crc is updated and compared to hard-coded values.
long h = 0L;
//for each byte:
    h = (h << 5 ^ ((long)(((char)b)))) & 0x3FFFFFFFL;
    // check h against known list
Running processes checks. All running processes and their command-lines are enumerated and hashed, and specific values are indirectly looked up by comparing against hard-coded lists.
APK Check
This verifier parses compressed entries in the APK (zip) file and compares them against well-known, hard-coded CRC values.
Manifest Check
Consistency checks on the application Manifest consists of enumerating the entries using two different ways and comparing results. Discrepancies are reported.
Open the archive’s MANIFEST.MF file via Context.getAssets(), parse manually
Use JarFile(Context.getPackageCodePath()).getManifest().getEntries()
Discrepancies in the Manifest could indicate system hooks attempting to conceal files added to the application.
Permissions Check
This routine checks for permission discrepancies between what’s declared by the app and what the system grant the app.
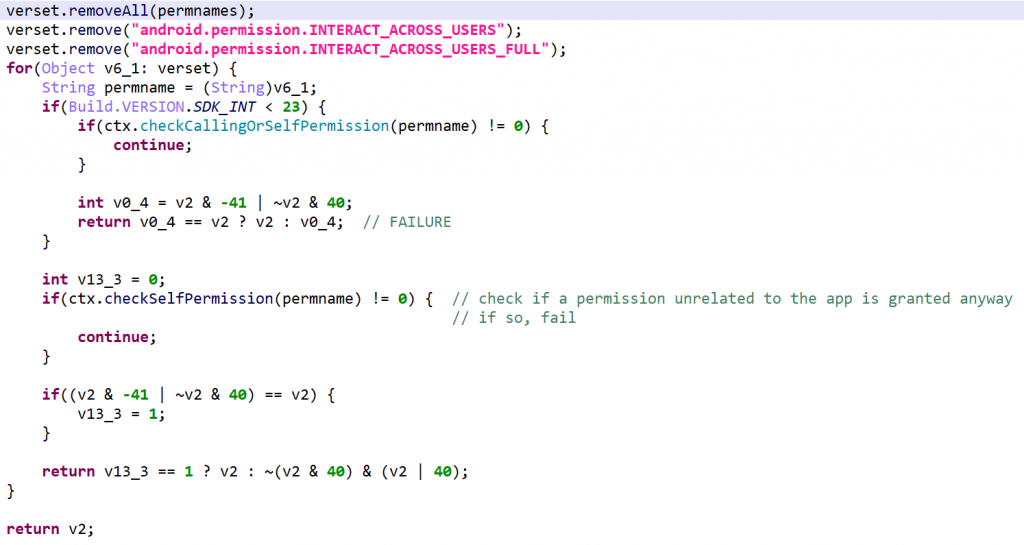
Set A: App permission gathering: all permissions requested and defined by the app, as well as all permissions offered by the system, plus the INTERACT_ACROSS_USERS and INTERACT_ACROSS_USERS_FULL permissions,
Set B: Retrieve all permissions that exist on the system
Define set C = B – A
For every permission in C, use checkCallingOrSelfPermission (API 22-) or checkSelfPermission (API 23+) to verify that the permission is not granted.
Permission discrepancies could be used to find out system hooks or unorthodox execution environments.
Note the “X & -(A+1) | ~X & A” checks. Several opaque arithmetic/binary expressions attempt to complicate the control flow. Here, that expression is never equals to v2, and therefore, the if-check will always fail. JEB 3.20 does not clean all those artifacts.
Miscellaneous
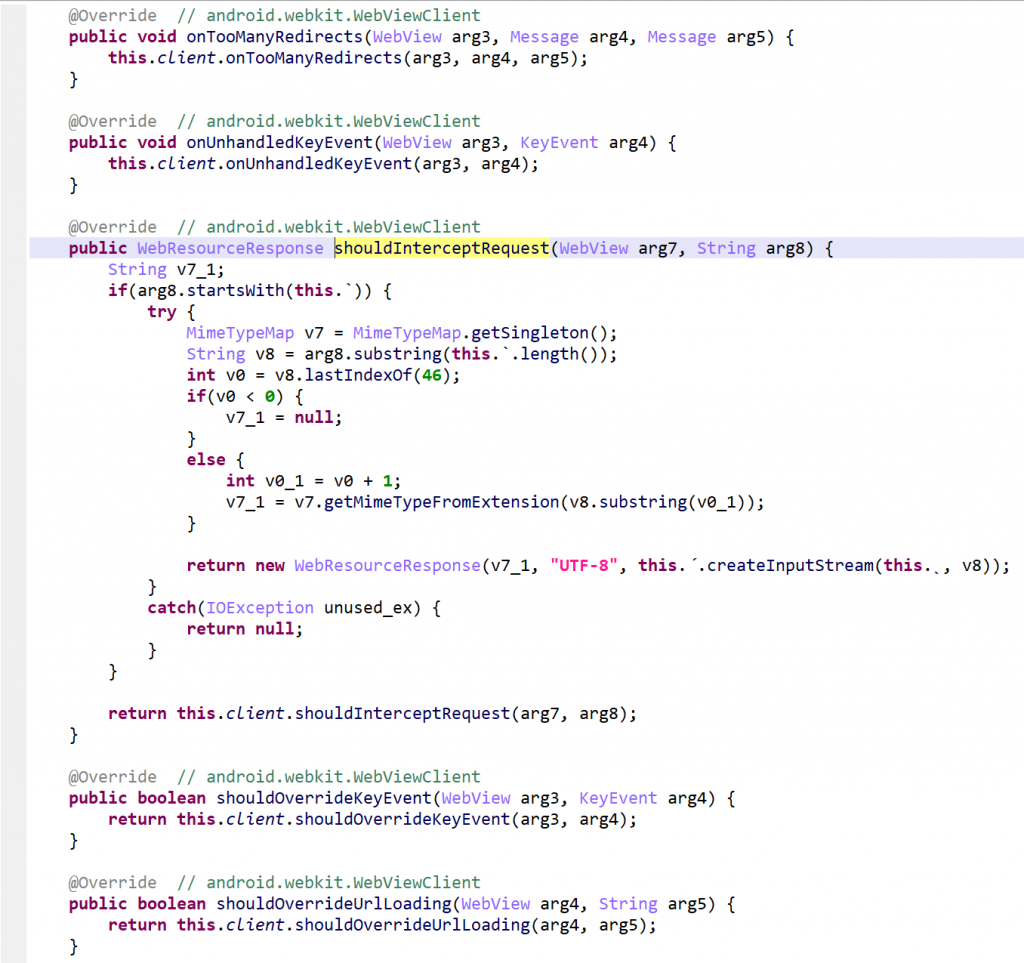
Other runtime components include library code to perform SSL certificate pinning, as well as obfuscated wrappers around web view clients. None of those are of particular interest.
Wrapper for android.webkit.WebViewClient. Make sure to enable deobfuscators and provide guardX hints. When this is done, most methods will be crystal clear. In fact, the majority of them are simple forwarders.
Conclusion
That’s it for the obfuscation and runtime protection facility. Key take-away to analyze such protected code:
Keep the obfuscators enabled
Locate the opaque integers, rename them to guard0/guard1 to give JEB a hint on where control flow deobfuscation should be performed, and redecompile the class
The second part in the series presents bytecode encryption and assets encryption.
VM in VM, repeat ad nauseam – something not new to code protection systems, it’s existed on x86 for more than a decade, but new on Android, and other players in this field, commercial and otherwise, seem to be implementing similar solutions. ↩
So-called “RASP”, a relatively new acronym for Runtime Application Self-Protection↩
Decryption and unreflection are generic processes of dexdec (the DEX Decompiler plugin); there is nothing specific to this protector here. The vast majority or encrypted data, regardless of the protection system in place, will be decrypted. ↩
It is still a work-in-progress, and more contents is added to it regularly. We are planning to kee the manual properly sync’ed with JEB’s capabilities. The next page that will receive a very large update is the Native Code Analysis section.
A note about 2020 Q1 updates (versions 3.10 to 3.16) regarding the DEX/Dalvik decompiler modules:
Generic String Decryption
Lambda Recovery
Unreflecting Code
Decompiling Java Bytecode
Auto-Rename All
Generic String Decryption
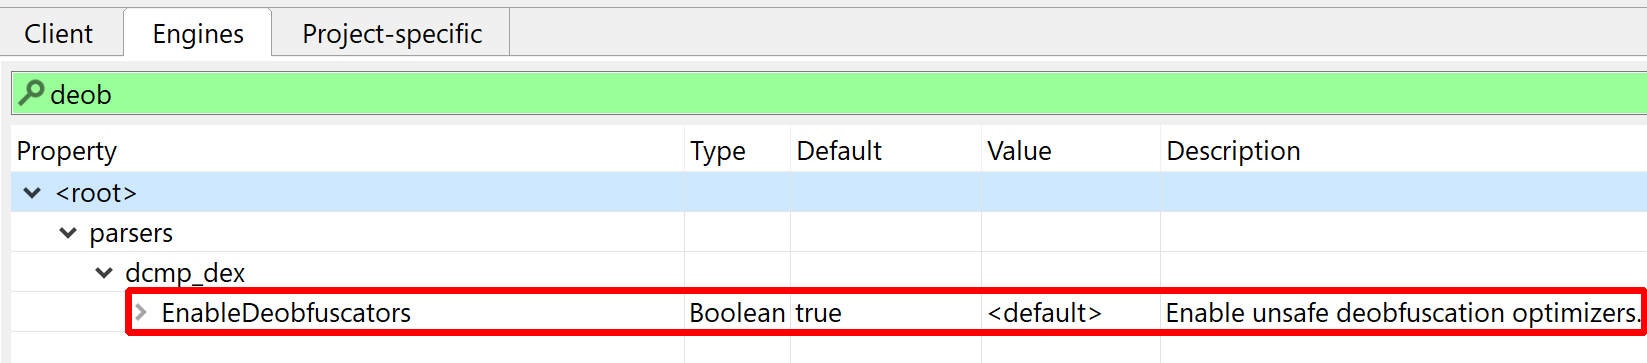
JEB ships with a generic deobfuscator that can perform on-the-fly string decryption and other complex optimizations. Although this optimizer performs safe (i.e., guaranteed) optimizations in most cases, it is unsafe in the general case case and therefore, may be disabled in the options. Refer to the Engines options .parsers.dcmp_dex.EnableDeobfuscators and .parsers.dcmp_dex.EmulationSupport.
Many code protectors offer options to replace immediate string constants by method invocations that perform on-the-fly decryption.
A variety of techniques exist, ranging from simple one-off trivial decryptor methods, to complex schemes involving object(s) creation, complicated decryptors injected in third-party packages, non-trivial logic, junk code meant to slow down analyzers, use of opaque predicates, etc. They are implemented in an infinite number of ways. JEB’s generic deobfuscator can perform quick, safe emulation of the intermediate representation to provide a replacement. It may sometimes fail or bail out due to several reasons, such as performance or pitfalls like anti-emulation and anti-sandboxing techniques.
Example 1
The string decryptor is a static method reading encrypted string data in a class byte array. Also note that code reflection is used.
The above code (blue box) ends up being deobfuscated to:
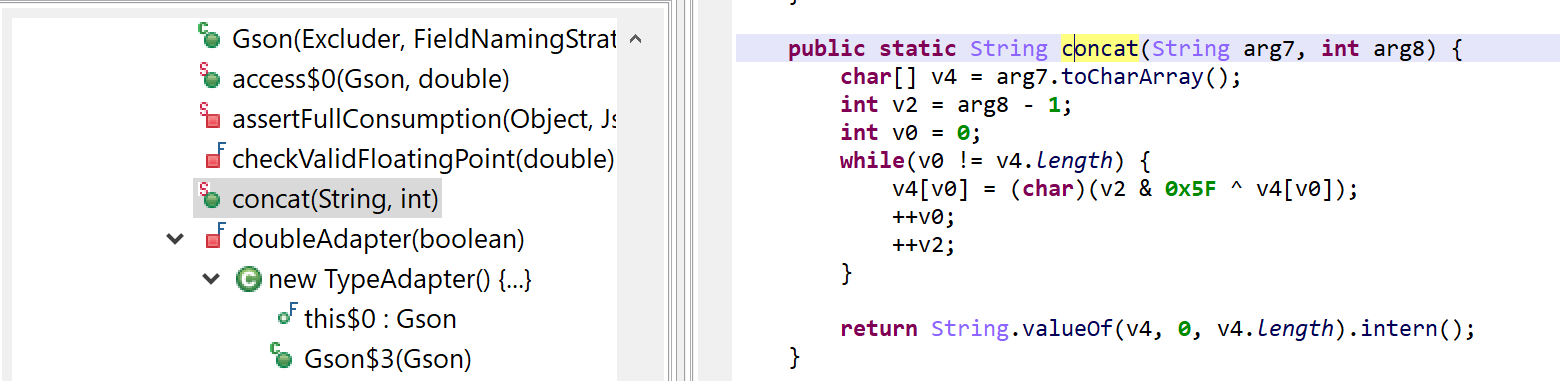
Example 2:
The decryption methods were injected into library packages, e.g. Gson’s
The above code is deobfuscated to:
With the generic string decryptor optimizer ON
Below, a decryptor that had been injected into the com.google.gson.Gson() class:
The concat(String, int) method is not part of standard Gson, of course. It was injected by the protector and is used by (some) code to perform on-the-fly string decryption.
Example 3:
One last example, which was involuntarily – yet, quite timely! – provided by a user:
Static fields initialized with decrypted strings.After decryption.
Decrypting all strings: The decryptor kicks in when decompiling methods only. At the moment, if a string happens to be successfully decrypted, the optimizer does not attempt to recover all similarly encrypted strings in the code, although it is most certainly an addition that will make it in a future software update.
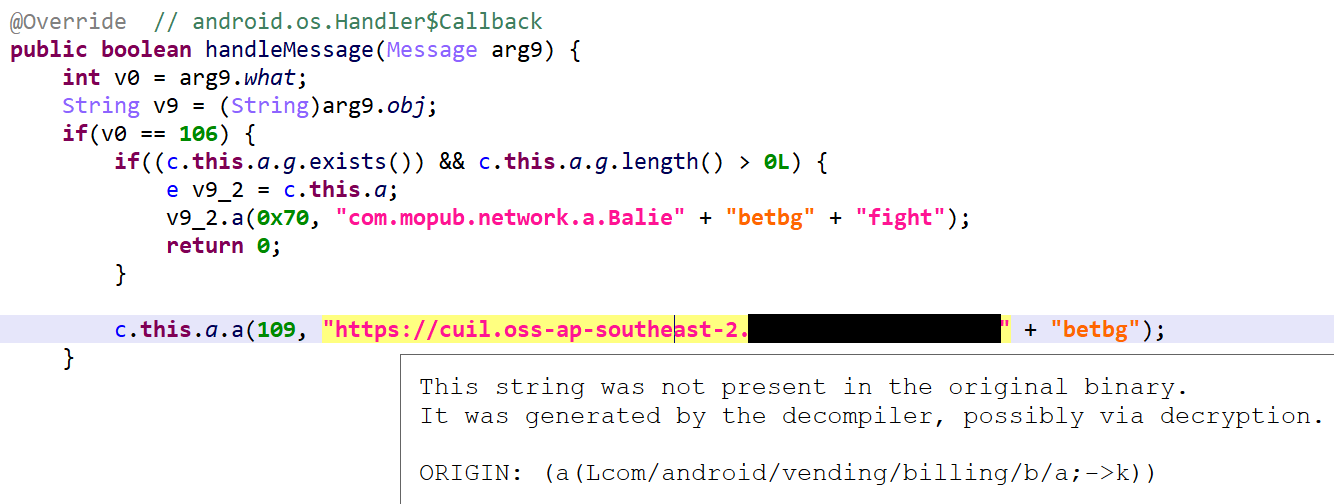
Rendering: You may quickly identify decrypted strings in the client as they are rendered using a special color associated with the itemId STRING_GENERATED, by default rendered in a flashy pink color in light and dark themes. Hovering over such items will bring up a pop-up with additional origin information, like the underlying code that would have generated that string:
Auto-decrypted strings in pink; overlays with source/origin information.
API: – From a DEX perspective: Generated strings are artificial. Therefore, IDexString.isArtificial() would return true. – From a Java/AST perspective: IJavaConstant objects that embed origin information do so using the “origin” tag. Use IJavaConstant.getTags().get("origin") to retrieve it.
Lambda Recovery
JEB attempts to perform Java 8 style lambda recovery and reconstruction.
Desugared Lambdas
Recovery and reconstruction does not rely on any type of metadata 1, such as special prefixes -$$Lambda$ for classes and methods implementing desugared lambdas in dex 37-.
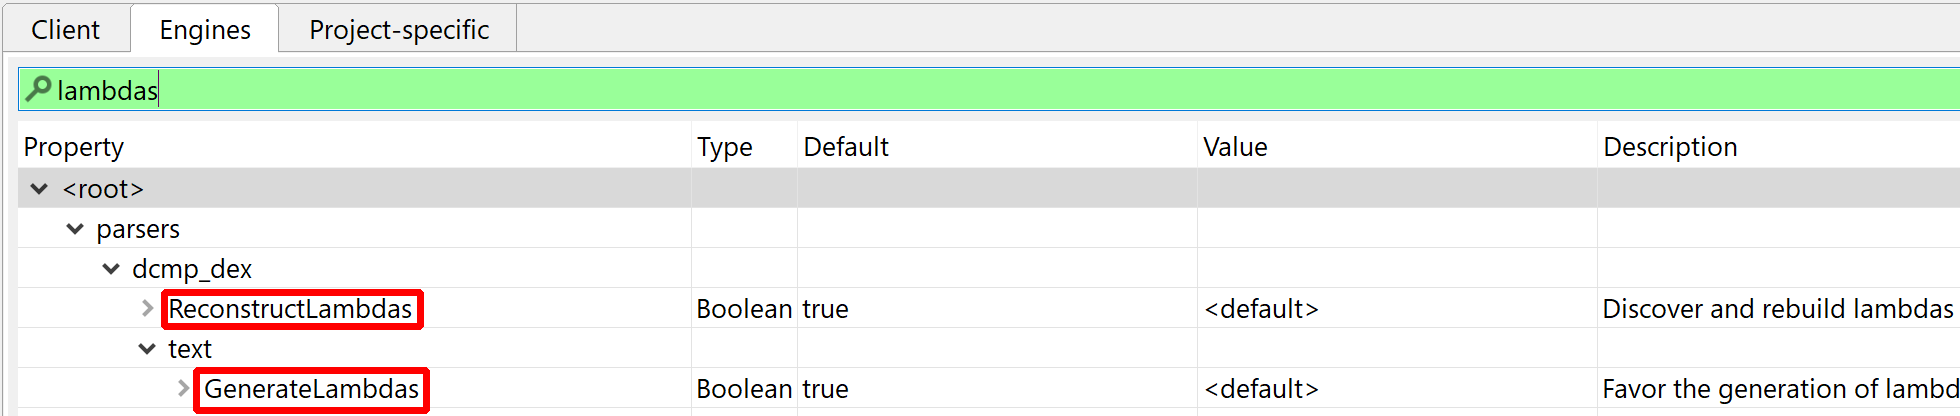
Options: Lambda reconstruction can be disabled in the options (Edit, Options, Engines, …). Lambda rendering can also be disabled in the options, as well as on-demand by right-clicking a decompiled view, Rendering Options….
Lambdas options
API Note: In the above cases, the underlying Java AST may be a IJavaNew or IJavaStaticField node. This is not the case for real (not desugared) lambdas, which map to an IJavaCall node – see below.
This DEX file contains real lambdas implemented via invoke-custom
API Note: Such lambdas map to an IJavaCall node for which isCustomCall() will return true.
Unreflecting Code
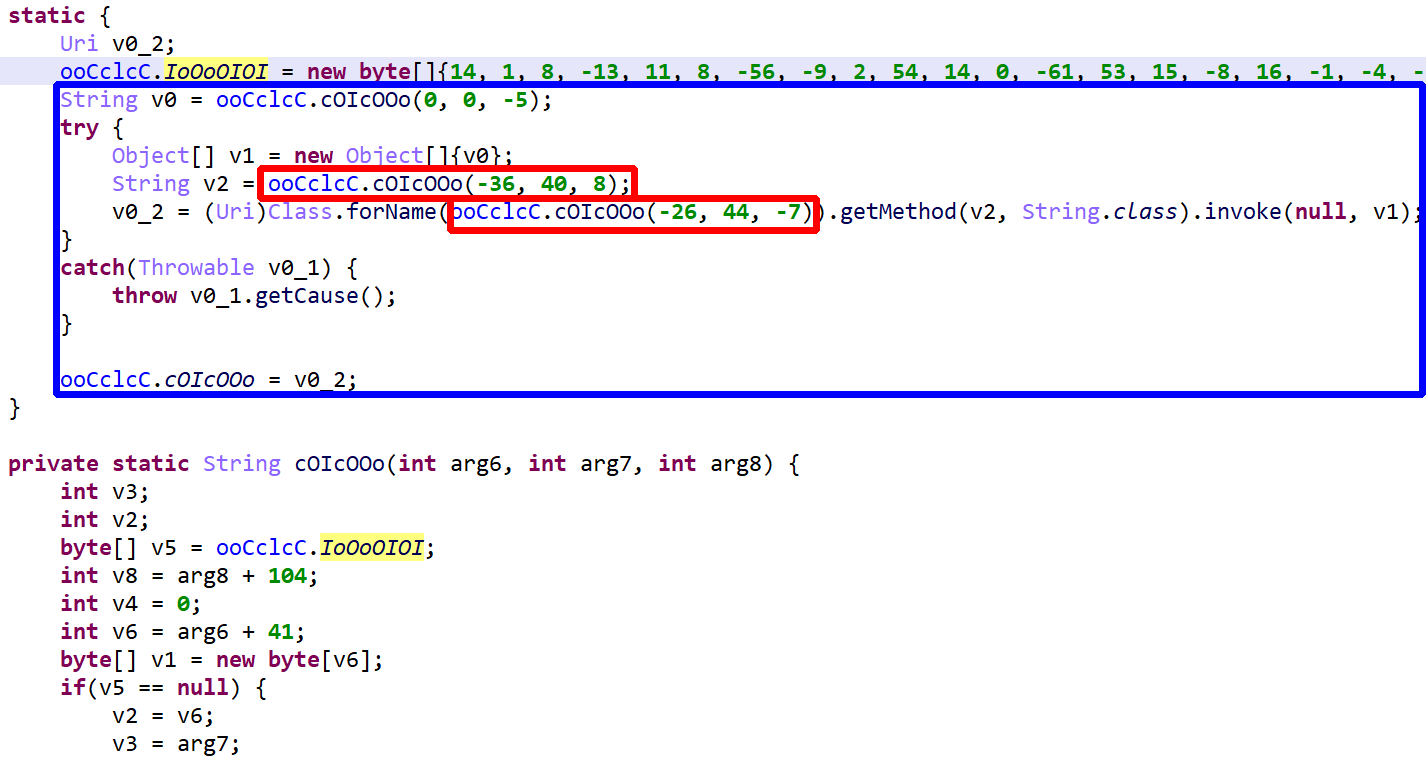
Many code protectors make heavy use of reflection – combined with string encryption, as we’ll see below – to obfuscate code. In practice, reflection is limited to method invocation (static and virtual), static and non-static field setting and getting, and new instance creation. A few examples:
v = Class.forName("java.lang.Integer").getMethod("valueOf",
        String.class).invoke(null, str);
// instead of
v = Integer.valueOf(str);
Class.forName("SomeClassName").getField("b").setInt(x, 4);
// instead of
x.b = 4;
Class.forName("java.lang.String").getConstructor(byte[].class)
        .newInstance(val);
// instead of
new String(arg6);
Such code is generally protected by a catch-all handler that forwards the cause of any exception raised by a reflection issue:
By default, JEB will attempt to unreflect code. This deobfuscator is potentially unsafe and may be disabled in the options. Note that you always have the ability to choose, for a particular decompilation, whether some options should be temporarily enabled or disabled, by pressing CTRL+TAB (or COMMAND+TAB on macOS) to decompile (same as menu Action, Decompile with options…).
Unsafe deobfuscators can be globally disabled.
So, in a nutshell, code normally decompiled to:
Reflection, not cleaned (malware was obfuscated)
will be decompiled to:
With reflection cleaned
Technical Note: This optimizer works on the Intermediate Representation manipulated by the decompiler, not to be confused with the AST rendered as its output. (The AST cleaner that was described in an older post is more limited than this IR optimizer.)
Last-step failures: Successfully unreflecting code eventually depends on being able to find the intended target method or field matching the provided description (method parameter types or field type). Failure to do so will generate a log like "A candidate field/method/constructor for unreflection was not found".
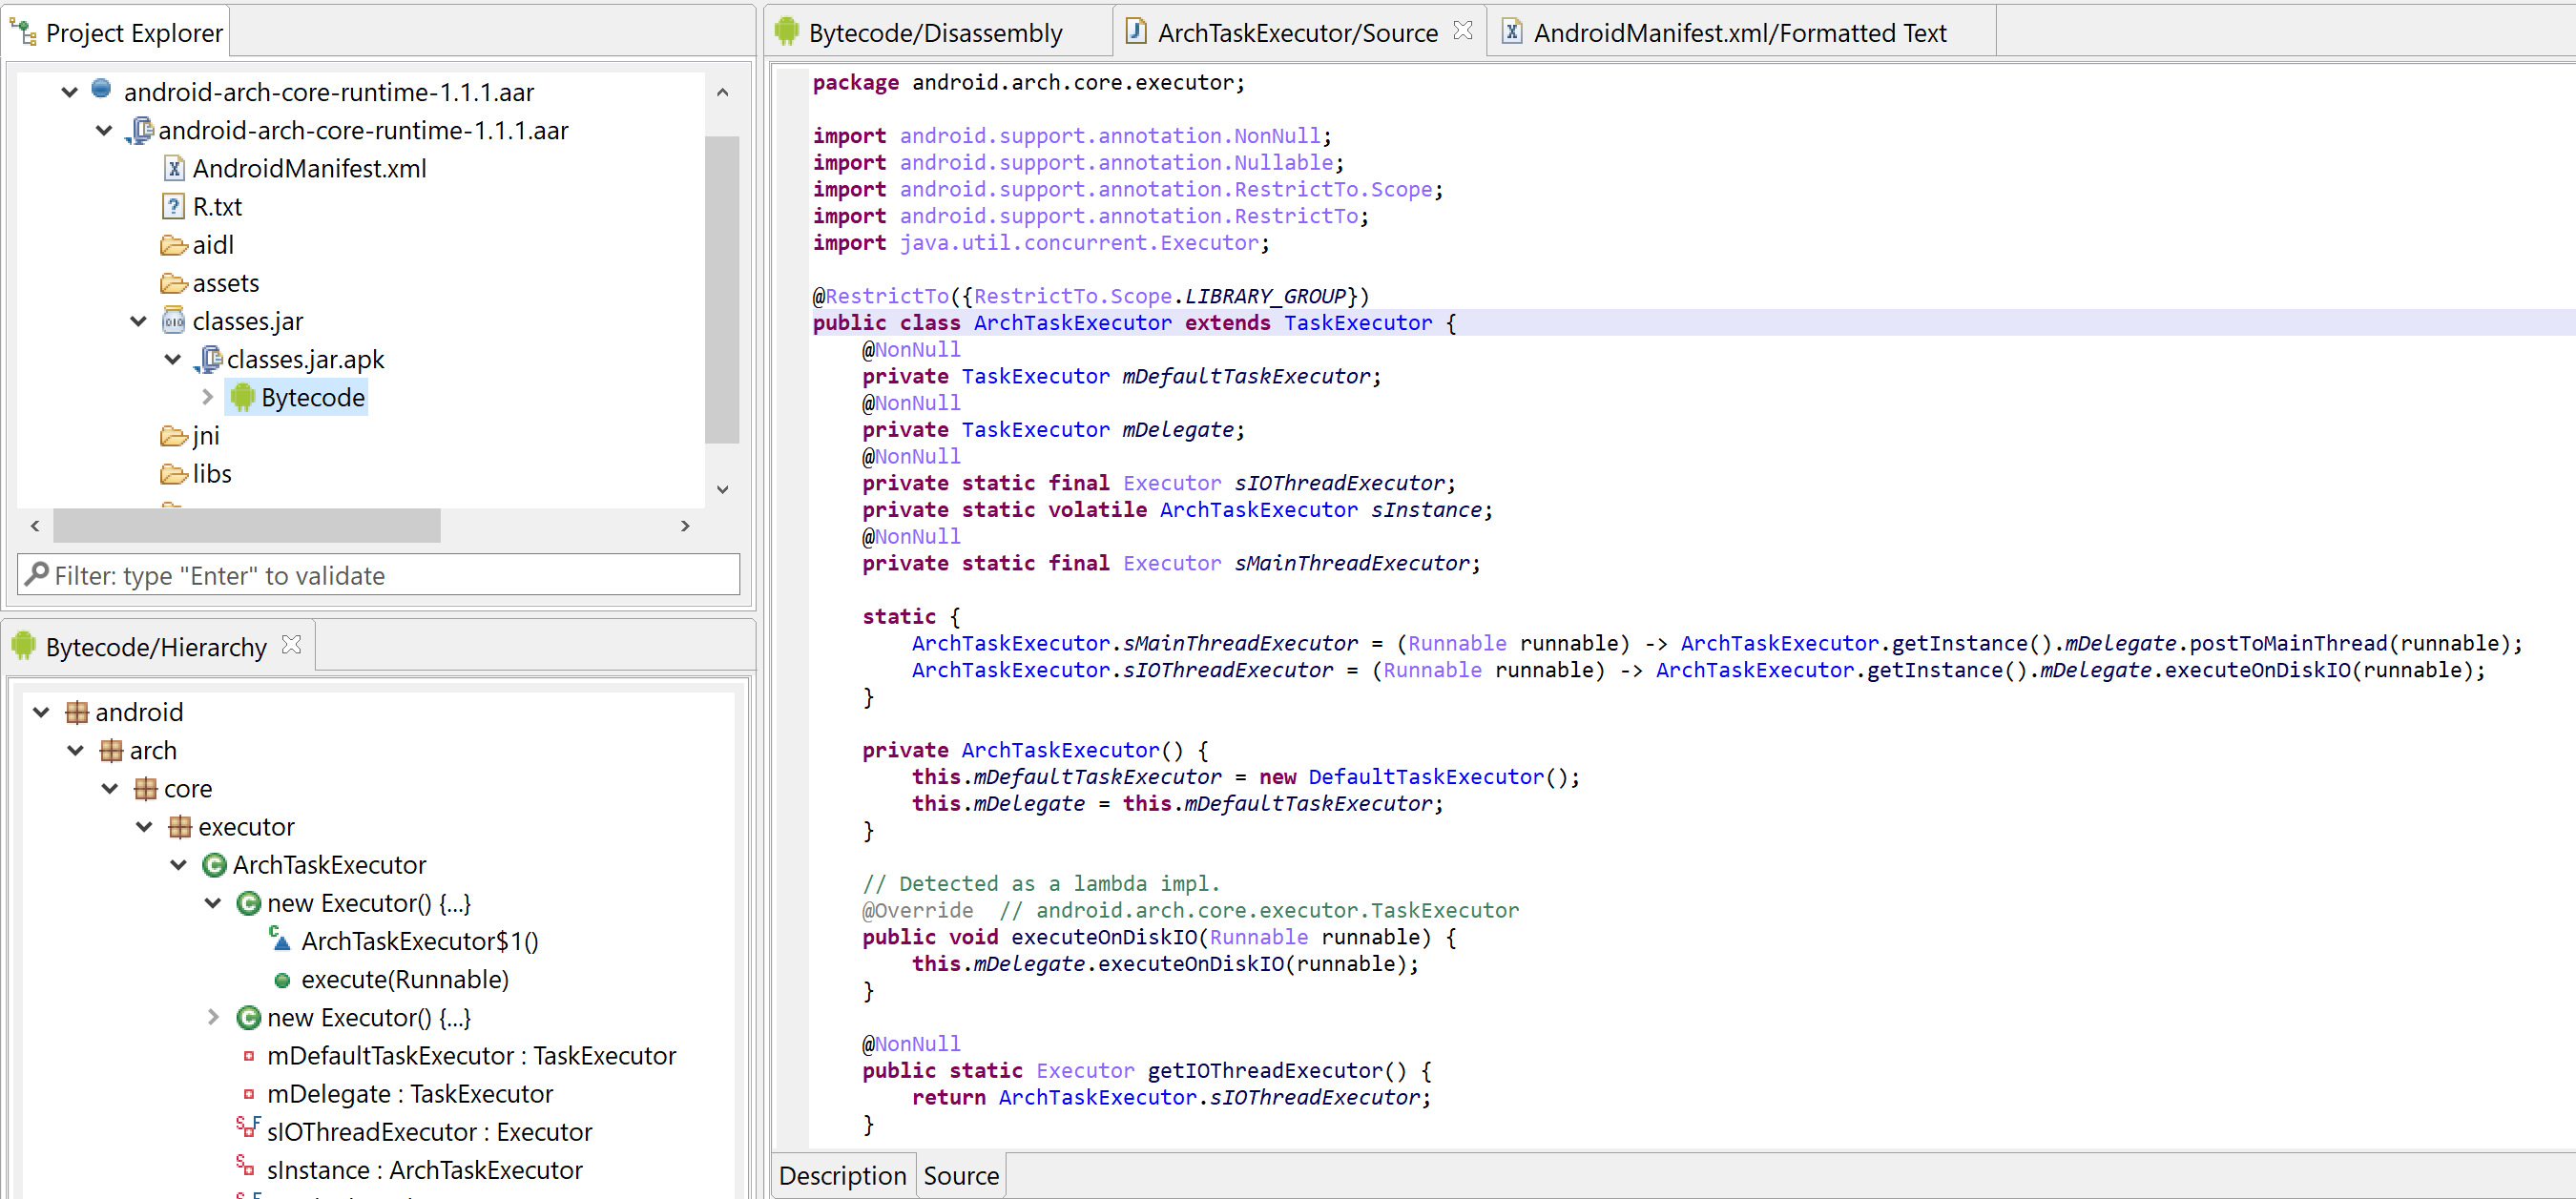
Decompiling Java Bytecode
JEB supports JLS bytecode decompilation for *.class files and jar-like archives (jar, war, ear, etc.). The Java bytecode is converted to Dalvik using Android’s dx by default. Users may choose to use d8 (not recommended for now) instead by selecting so in the Options.
The resulting DEX file(s) are processed as usual.
You may use this to decompile Android Library files (*.aar files) in JEB.
Examining the android-arch-core-runtime library
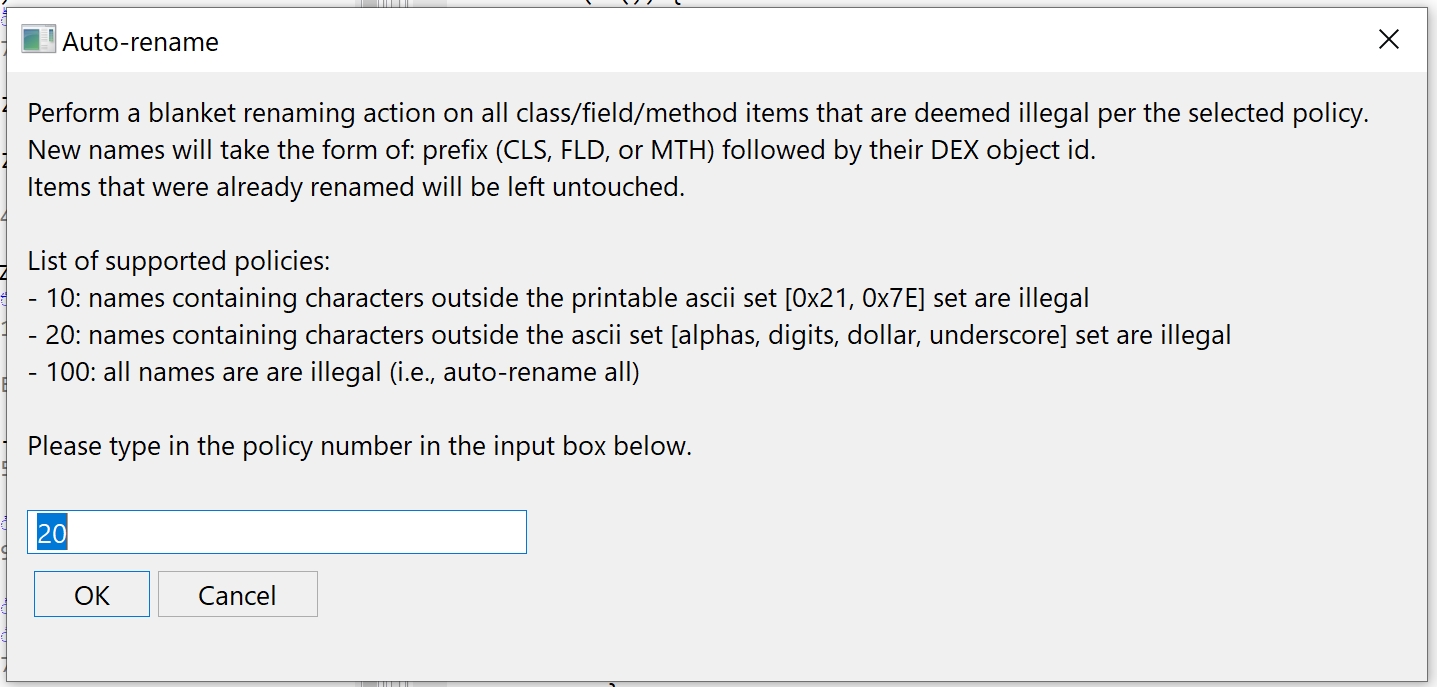
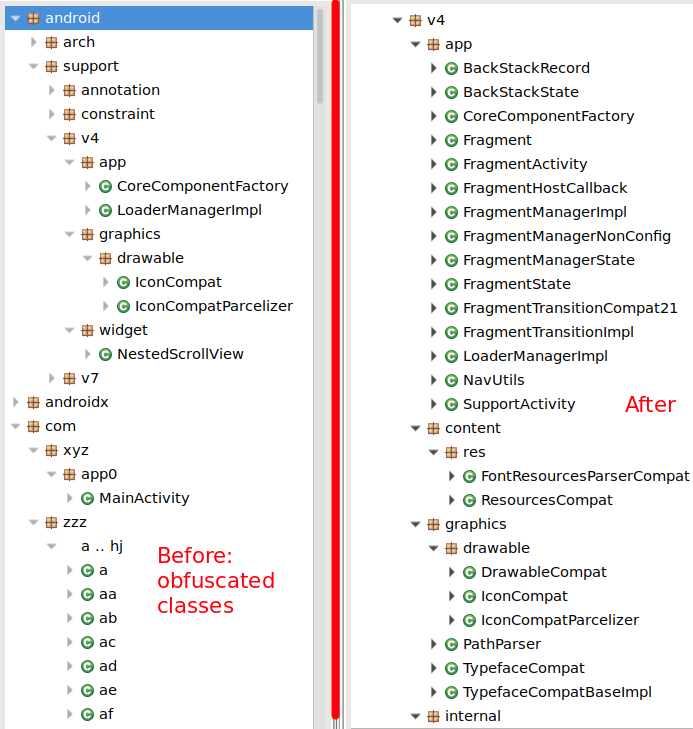
Auto-Rename All
JEB 3.13 introduced a new generic action, Auto-Rename All. Its implementation is at the discretion of code plugins. The DEX plugin implements it, therefore users may execute Action, Auto-Rename All… at any time (generally after processing an obfuscated file) in order to rename code items such as field, method, or class names, to something more easily processable for our -limited- human brains.
Look at this horrendous obfuscation scheme below. It’s using right-to-left unicode characters to seriously mess up rendering:
Obfuscated name using RTL Arabic characters
Let’s run Action, Auto-Rename All… on this file:
Auto-Renaming capabilities are provided (optionally) by plugins.After auto-renaming code items in the above file. Not clearer in terms of meaning, but at least, it’s something we can start working on.
As usual, feel free to join us on Slack, message us on Twitter, or email us privately at support@pnfsoftware.com.
Until next time!
–
Relying on metadata leads to false negatives in the best case – e.g., when the code has been minified by something like ProGuard; it leads to false positives in the worst case – e.g. forged metadata to incite the decompiler to generate inaccurate or wrong code. ↩
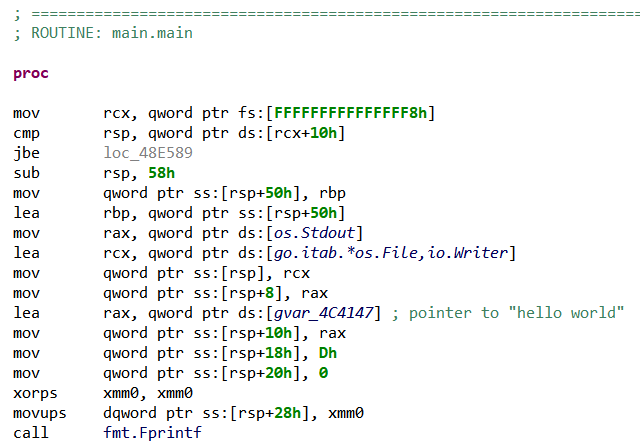
The Go programming language (also known as Golang) has gained popularity during the last few years among malware developers . This can certainly be explained by the relative simplicity of the language, and the cross-compilation ability of its compiler, allowing multi-platform malware development without too much effort.
In this blog post, we dive into Golang executables reverse engineering, and present a Python extension for JEB decompiler to ease Golang analysis; here is the table of content:
The JEB Python script presented in this blog can be found on our GitHub page. Make sure to update JEB to version 3.7+ before running it.
Disclaimer: the analysis in this blog post refers to the current Golang version (1.13) and part of it might become outdated with future releases.
Golang Basics for Reverse Engineers
Feel free to skip this part if you’re already familiar with Golang reverse engineering.
Let’s start with some facts that reverse engineers might find interesting to know before analyzing their first Golang executable.
1. Golang is an open-sourcelanguage with a pretty active development community. The language was originally created at Google around 2007, and version 1.0 was released in March 2012. Since then, two major versions are released each year.
2. Golang has a long lineage: in particular many low-level implementation choices — some would say oddities — in Golang can be traced back to Plan9, a distributed operating system on which some Golang creators were previously working.
3. Golang has been designed for concurrency, in particular by providing so-called “goroutines“, which are lightweight threads executing concurrently (but not necessarily in parallel).
Developers can start a new goroutine simply by prefixing a function call by go. A new goroutine will then start executing the function, while the caller goroutine returns and continues its execution concurrently with the callee. Let’s illustrate that with the following Golang program:
func myDummyFunc(){
	time.Sleep(1 * time.Second)
	fmt.Println("dummyFunc executed")
}

func main(){

	myDummyFunc() // normal call
	fmt.Println("1 - back in main")

	go myDummyFunc() // !! goroutine call
	fmt.Println("2 - back in main")

	time.Sleep(3 * time.Second)
}
Here, myDummyFunc() is called once normally, and then as a goroutine. Compiling and executing this program results in the following output:
dummyFunc executed
1 - back in main
2 - back in main
dummyFunc executed
Notice how the execution was back in main() before executing the second call to dummyFunc().
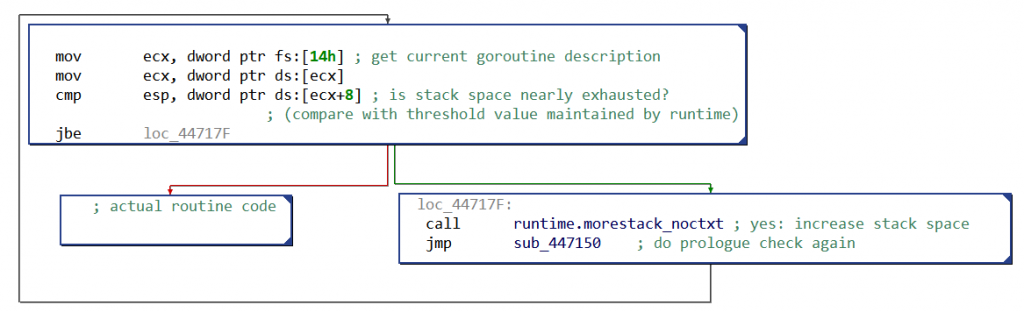
Implementation-wise, many goroutines can be executed on a single operating system thread. Golang runtime takes care of switching goroutines, e.g. whenever one executes a blocking system call. According to the official documentation “It is practical to create hundreds of thousands of goroutines in the same address space“.
What makes goroutines so “cheap” to create is that they start with a very limited stack space (2048 bytes — since Golang 1.4), which will be increased when needed.
One of the noticeable consequence for reverse engineers is that native routines (almost) all start with the same prologue. Its purpose is to check if the current goroutine’s stack is large enough, as can be seen in the following CFG:
Fig. 1: Simplified x86 CFG with Golang prologue for stack growth
When the stack space is nearly exhausted, more space will be allocated — actually, the stack will be copied somewhere with enough free space. This particular prologue is present only in routines with local variables.
How to distinguish a goroutine call from a “normal” call when analyzing a binary? Goroutine calls are implemented by calling runtime.newproc, which takes in input the address of the native routine to call, the size of its arguments, and then the actual routine’s arguments.
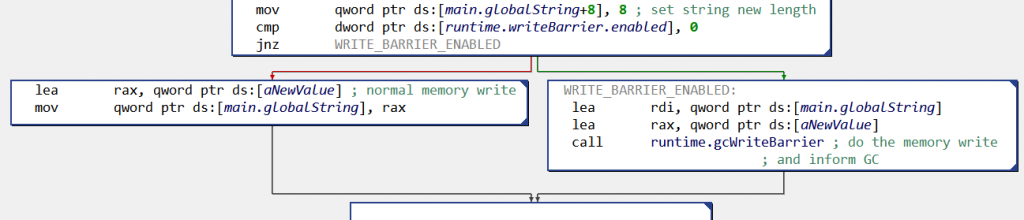
4. Golang has a concurrent garbage collector(GC): Golang’s GC can free memory while other goroutines are modifying it.
Roughly speaking, when the GC is freeing memory, goroutines report to it all their memory writes — to prevent concurrent memory modifications to be missed by the current freeing phase. Implementation-wise, when the GC is in the process of marking used memory, all memory writes pass through a “write barrier“, which performs the write and informs the GC.
For reverse engineers this can result in particularly convoluted control flow graphs (CFG). For example, here is the CFG when a global variable globalString is set to newValue:
Fig. 2: Write to global variable globalString (x86 CFG): before doing the memory write, the code checks if the write barrier is activated, and if yes calls runtime.gcWriteBarrier()
Not all memory writes are monitored in that manner; the rules for write barriers’ insertion are described in mbarrier.go.
5. Golang comes with a custom compiler tool chain (parser, compiler, assembler, linker), all implemented in Golang. 12
From a developer’s perspective, it means that once Go is installed on a machine, one can compiled for any supported platform (making Golang a language of choice for IoT malware developers). Examples of supported platforms include Windows x64, Linux ARM and Linux MIPS (see “valid combinations of $GOOS and $GOARCH“).
From a reverse engineer’s perspective, the custom Go compiler toolchain means Golang binaries sometimes come with “exotic” features (which therefore can give a hard time to reverse engineering tools).
For example, symbols in Golang Windows executables are implemented using the COFF symbol table (while officially “COFF debugging information [for executable] is deprecated“). The Golang COFF symbol implementation is pretty liberal: symbols’ type is set to a default value — i.e. there is no clear distinction between code and data.
Interestingly, Golang compiler internally uses pseudo assembly instructions (with architecture-specific registers). For example, here is a snippet of pseudo-code for ARM (operands are ordered with source first):
These pseudo-instructions could not be understood by a classic ARM assembler (e.g. there is no CALL instruction on ARM). Here are the disassembled ARM instructions from the corresponding binary:
Notice how the same pseudo-instruction MOVW got converted either as STRorMOV machine instructions. The use of pseudo-assembly comes from Plan9, and allows Golang assembler parser to easily handle all architectures: the only architecture-specific step is the selection of machine instructions (more details here).
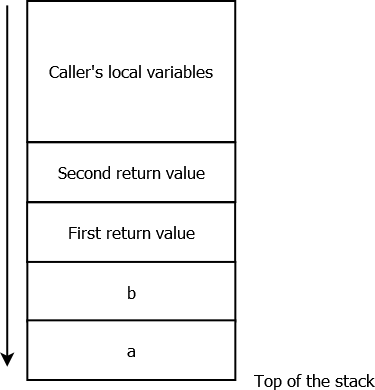
6. Golang uses by default a stack-only calling convention.
Let’s illustrate that with the following diagram, showing the stack’s state when a routine with two integer parameters a and b, and two return values — declared in Go as “func myRoutine(a int, b int) (int, int)” — is called:
Fig. 3: Simplified stack view (stack grows downward), when a routine with two parameters and two return values is called . The return values are reserved slots for the callee.
It is the caller’s responsibilities to reserve space for the callees’ parameters and returned values, and to free it later on.
Note that Golang’s calling convention situation might soon change: since version 1.12, several calling conventions can coexist — the stack-only calling convention remaining the default one for backward compatibility reasons.
7. Golang executables are usually statically-linked, i.e. do not rely on external dependencies3. In particular they embed a pretty large runtime environment. Consequently, Golang binaries tend to be large: for example, a “hello world” program compiled with Golang 1.13 is around 1.5MB with its symbols stripped.
8. Golang executables embed lots of symbolic information:
Debug symbols, implemented as DWARF symbols. These can be stripped at compilation time (command-line option -ldflags "-w") .
Classic symbols for each executable file format (PE/ELF/Mach-O). These can be stripped at compilation time (command-line option -ldflags "-s").
Go-specific metadata, including for example all functions’ entry points and names, and complete type information. These metadata cannot (easily) be stripped, because Golang runtime needs them: for example, functions’ information are needed to walk the stack for errors handling or for garbage collection, while types information serve for runtime type checks.
Of course, Go-specific metadata are very good news for reverse engineers, and parsing these will be one of the purpose of the JEB’s Python extension described in this blog post.
Making JEB Great for Golang
Current Status
What happens when opening a Golang executable in JEB? Let’s start from the usual “hello world” example:
package main

import "fmt"

func main() {
	fmt.Printf("hello, world\n")
}
If we compile it for as a Windows x64 PE file, and open it in JEB, we can notice that its code has only been partially disassembled. Unexplored memory areas can indeed be seen next to code areas in the native navigation bar (right-side of the screen by default):
Fig.4: Navigation bar for Golang PE file (blue is code, green is data, grey represents area without any code or data)
We can confirm that the grey areas surrounding the blue areas are code, by manually disassembling them (hotkey ‘C’ by default).
Why did JEB disassembler miss this code? As can be seen in the Notifications window, the disassembler used a CONSERVATIVE strategy, meaning that it only followed safe control flow relationships (i.e. branches with known targets) 4.
Because Go runtime calls most native routines indirectly, in particular when creating goroutines, JEB disassembler finds little reliable control flow relationships, explaining why some code areas remain unexplored.
Before going on, let’s take a look at the corresponding Linux executable, which we can obtain simply by setting environment variable $GOOS to linux before compiling. Opening the resulting ELF file in JEB brings us in a more positive situation:
Fig. 5: Navigation bar for Golang ELF file (blue is code, green is data, grey represents area without any code or data)
Due to the use by default of AGGRESSIVE strategy for disassembling ELF files, JEB disassembler found the whole code area (all code sections were linearly disassembled). In particular this time we can see our main routine, dubbed main.main by the compiler:
Fig. 6: Extract of main.main routine’s disassembly
Are data mixed with code in Golang executables? If yes, that would make AGGRESSIVE disassembly a risky strategy. At this moment (version 1.13 with default Go compiler), this does not seem to be the case:
– Data are explicitly stored in different sections than code, on PE and ELF.
– Switch statements are not implemented with jumptables — a common case of data mixed with code, e.g. in Visual Studio or GCC ARM. Note that Golang provides several switch-like statements, as the select statement or the type switch statement.
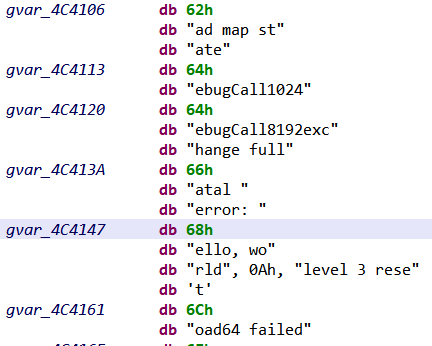
Yet, there is still something problematic in our ELF disassembly: the “hello world” string was not properly defined. Following the reference made by LEA instruction in the code, we reach a memory area where many strings have indeed been misrepresented as 1-byte data items:
Fig. 7: Dump of the memory area containing strings. Only the first byte of the strings is defined.
Now that we have a better idea of JEB’s current status, we are going to explain how we extended it with a Python script to ease Golang analysis.
Finding and Naming Routines
The first problem on our road is the incomplete control flow, specially on Windows executables. At first, it might seem that PE files disassembly could be improved simply by setting disassembler’s strategy to AGGRESSIVE, exactly as for ELF files. While it might be an acceptable quick solution, we can actually improve the control flow in a much safer way by parsing Go metadata.
Parsing “Pc Line Table”
Since version 1.2, Golang executables embed a structure called “pc line table”, also known as pclntab. Once again, this structure (and its name) is an heritage from Plan9, where its original purpose was to associate a program counter value (“pc”) to another value (e.g. a line number in the source code).
The structure has evolved, and now contains a function symbol table, which stores in particular the entry points and names of all routines defined in the binary. The Golang runtime uses it in particular for stack unwinding, call stack printing and garbage collection.
In others words, pclntab cannot be easily stripped from a binary, and provide us a reliable way to improve our disassembler’s control flow!
First, our script locates pclntab structure (refer to locatePclntab() for the details):
  # non-stripped binary: use symbol
  if findSymbolByName(golangAnalyzer.codeContainerUnit, 'runtime.pclntab') != None:
      pclntabAddress = findSymbolByName(..., 'runtime.pclntab')

  # stripped binary
  else:
    # PE: brute force search in .rdata. or in all binary if section not present
    if [...].getFormatType() == WellKnownUnitTypes.typeWinPe
    [...]

    # ELF: .gopclntab section if present, otherwise brute force search
    elif [...].getFormatType() == WellKnownUnitTypes.typeLinuxElf:
    [...]
On stripped binaries (i.e. without classic symbols), we search memory for the magic constant 0xFFFFFFFB starting pclntab, and then runs some checks on the possible fields. Note that it is usually easier to parse Golang ELF files, as important runtime structures are stored in distinct sections.
Second, we parse pclntab and use its function symbol table to disassemble all functions and rename them:
[...]
# enqueue function entry points from pclntab and register their names as labels
for myFunc in pclntab.functionSymbolTable.values():
 nativeCodeAnalyzer.enqueuePointerForAnalysis(EntryPointDescription(myFunc.startPC), INativeCodeAnalyzer.PERMISSION_FORCEFUL)
 if rename:
   labelManager.setLabel(myFunc.startPC, myFunc.name, True, True, False)

# re-run disassembler with the enqueued entry points
self.nativeCodeAnalyzer.analyze()
Running this on our original PE file allows to discover all routines, and gives the following navigation bar:
Fig. 8: Navigation bar for Golang PE file after running the script (blue is code, green is data, grey represents area without any code or data)
Interestingly, a few Golang’s runtime routines provide hints about the machine used to compile the binary, for example:
– runtime.schedinit(): references Go’s build version. Knowing the exact version allows to investigate possible script parsing failures (as some internal structures might change depending on Go’s version).
– runtime.GOROOT(): references Go’s installation folder used during compilation. This might be useful for malware tracking.
These routines are present only if the rest of the code relies on them. If it is the case, FunctionsFinder module highlights them in JEB’s console, and the user can then examine them.
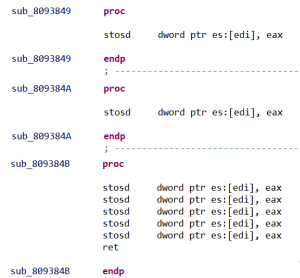
The Remaining Unnamed Routines
Plot twist! A few routines found by the disassembler remain nameless even after FunctionsFinder module parsed pclntab structure. All these routines are adjacent in memory and composed of the same instructions, for example:
Fig. 9: Series of unnamed routines in x86
Long story short, these routines are made for zeroing or copying memory blobs, and are part of two large routines respectively named duff_zero and duff_copy.
These large routines are Duff’s devices made for zeroing/copying memory. They are generated as long unrolled loops of machine instructions. Depending on how many bytes need to be copied/zeroed the compiler will call directly on a particular instruction. For each of these calls, a nameless routine will then be created by the disassembler.
DuffDevicesFinder module identifies such routines with pattern matching on assembly instructions. By counting the number of instructions, it then renames them duff_zero_N/duff_copy_N, with N the number of bytes zeroed/copied.
Source Files
Interestingly, pclntab structure also stores original source files‘ paths. This supports various Golang’s runtime features, like printing meaningful stack traces, or providing information on callers from a callee (see runtime.Caller()). Here is an example of a stack trace obtained after a panic():
The second problem we initially encountered in JEB was the badly defined strings.
What Is a String?
Golang’s strings are stored at runtime in a particular structure called StringHeader with two fields:
type StringHeader struct {
        Data uintptr       // string value
        Len  int           // string size
}
The string’s characters (pointed by the Data field) are stored in data sections of the executables, as a series of UTF-8 encoded characters without null-terminators.
Dynamic Allocation
StringHeader structures can be built dynamically, in particular when the string is local to a routine. For example:
Fig. 10: StringHeader instantiation in x86
By default JEB disassembler defines a 1-byte data item (gvar_4AFB52 in previous picture) for the string value, rather than a proper string, because:
As the string value is referenced only by LEA instruction, without any hints on the data type (LEA is just loading an “address”), the disassembler cannot type the pointed data accordingly.
The string value does not end with a null-terminator, making JEB’s standard strings identification algorithms unable to determine the string’s length when scanning memory.
To find these strings, StringsBuilder module searches for the particular assembly instructions usually used for instantiating StringHeader structures (for x86/x64, ARM and MIPS architectures). We can then properly define a string by fetching its size from the assembly instructions. Here is an example of recovered strings:
Before strings recovery
After strings recovery
Of course, this heuristic will fail if different assembly instructions are employed to instantiate StringHeader structures in future Golang compiler release (such change happened in the past, e.g. x86 instructions changed with Golang 1.8).
Static Allocation
StringHeader can also be statically allocated, for example for global variables; in this case the complete structure is stored in the executable. The code referencing such strings employs many different instructions, making pattern matching not suitable.
The script employs twoadditional final heuristics, which scan memory for printable strings located between two already-defined strings. This allows to recover strings missed by previous heuristics.
When a small local string is used for comparison only, no StringHeader structure gets allocated. The string comparison is done directly by machine instructions; for example, CMP [EAX], 0x64636261 to compare with “abcd” on x86.
Types Recovery
Now that we extended JEB to handle the “basics” of Golang analysis, we can turn ourselves to what makes Golang-specific metadata particularly interesting: types.
Golang executables indeed embed descriptions for all typesmanipulated in the binary, including in particular those defined by developers.
To illustrate that, let’s compile the following Go program, which defines a Struct (Golang’s replacement for classes) with two fields:
package main

type DummyStruct struct{
	boolField bool
	intField int
}

func dummyFunc(s DummyStruct) int{
	return 13 * s.intField
}

func main(){
	s := DummyStruct{boolField: true, intField:37}
	t := dummyFunc(s)
	t += 1
}
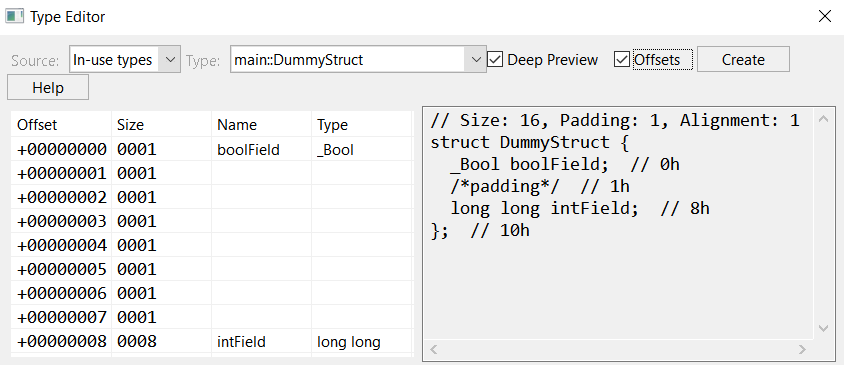
Now, if we compile this source code as a stripped x64 executable, and analyze it with TypesBuilder module, the following structure will be reconstructed:
Fig. 14: Structure reconstructed by TypesBuilder, as seen in JEB’s type editor
Not only did we get the structure and its fields’ original names, but we also retrieved the structure’s exact memory layout, including the padding inserted by the compiler to align fields. We can confirm DummyStruct‘s layout by looking at its initialization code in main():
Fig. 15: DummyStruct initialization: intField starts at offset 8, as extracted from type information
Why So Much Information?
Before explaining how TypesBuilder parses types information, let’s first understand why these information are needed at all. Here are a few Golang features that rely on types at runtime:
Dynamic memory allocation, usually through a call to runtime.newobject(), which takes in input the description of the type to be allocated
Dynamic type checking, with statements like type assertions or type switches. Roughly speaking, two types will be considered equals if they have the same type descriptions.
Reflection, through the built-in package reflect, which allows to manipulate objects of unknown types from their type descriptions
Golang type descriptions can be considered akin to C++ Run-Time Type Information, except that there is no easy way to prevent their generation by the compiler. In particular, even when not using reflection, types descriptors remain present.
For reverse engineers, this is another very good news: knowing types (and their names) will help understanding the code’s purpose.
Of course, it is certainly doable to obfuscate types, for example by giving them meaningless names at compilation. We did not find any malware using such technique.
What Is A Type?
In Golang each type has an associated Kind, which can take one the following values:
Struct: collection of fields, Golang’s replacement for classes
Interface: collection of methods, implemented by Structs
The type’s kind is the type’s “category”; what identifies the type is its complete description, which is stored in the following rtype structure:
    type rtype struct {
      size       uintptr
      ptrdata    uintptr  // number of bytes in the type that can contain pointers
      hash       uint32   // hash of type; avoids computation in hash tables
      tflag      tflag    // extra type information flags
      align      uint8    // alignment of variable with this type
      fieldAlign uint8    // alignment of struct field with this type
      kind       uint8    // enumeration for C
      alg        *typeAlg // algorithm table
      gcdata     *byte    // garbage collection data
      str        nameOff  // string form
      ptrToThis  typeOff  // type for pointer to this type, may be zero
    }
The type’s name is part of its description (str field). This means that, for example, one could define an alternate integer type with type myInt int, and myInt and int would then be distinct types (with distincttype descriptors, each of Int kind). In particular, assigning a variable of type myInt to a variable of type int would necessitate an explicit cast.
The rtype structure only contains general information, and for non-primary types (Struct, Array, Map,…) it is actually embedded into another structure (as the first field), whose remaining fields provides type-specific information.
For example, here is strucType, the type descriptor for types with Struct kind:
    type structType struct {
      rtype
      pkgPath name
      fields  []structField
    }
Here, we have in particular a slice of structField, another structure describing the structure fields’ types and layout.
Finally, types can have methods defined on them: a method is a function with a special argument, called the receiver, which describes the type on which the methods applies. For example, here is a method on MyStruct structure (notice receiver’s name after func):
func (myStruct MyStruct) method1() int{
    ...
}
Where are methods’ types stored? Into yet another structure called uncommonType, which is appended to the receiver’s type descriptor. In other words, a structure with methods will be described by the following structure:
type UncommonStructType struct {
      rtype
      structType
      uncommonType
}
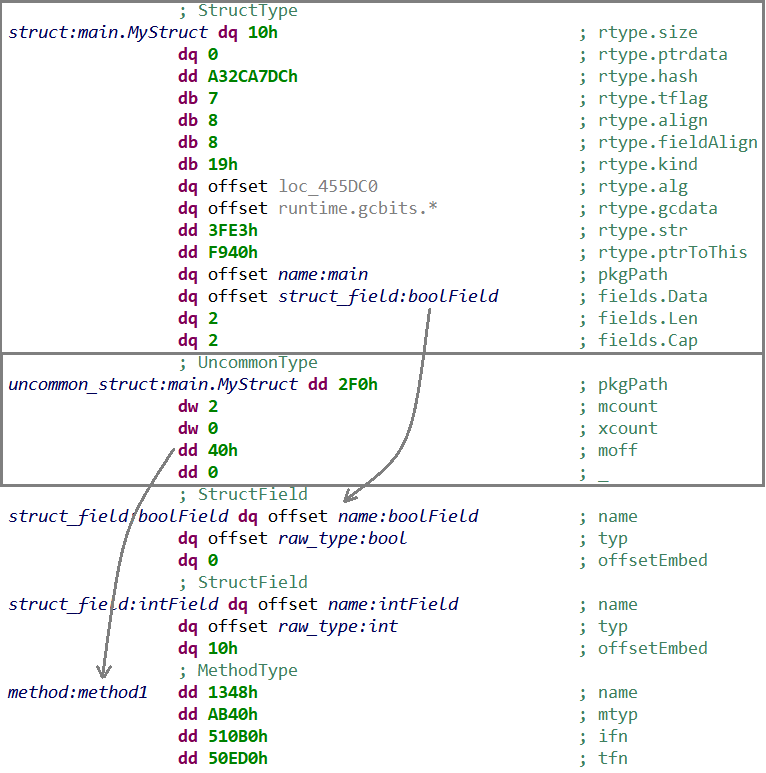
Here is an example of such structure, as seen in JEB after running TypesBuilder module:
Fig. 16: Type descriptor for a structure with methods: StrucType (with embedded rtype, and referencing StructField), followed by UncommonType (referencing MethodType)
Parsing type descriptors can therefore be done by starting from rtype (present for all types), and adding wrapper structures around it, if needed. Properly renaming type descriptors in memory greatly helps the analysis, as these descriptors are passed as arguments to many runtime routines (as we will see in StealthWorker’s malware analysis).
The final step is to transform the type descriptors into the actual types — for example, translating a structType into the memory representation of the corresponding structure –, which can then be imported in JEB types. For now, TypesBuilder do this final import step for named structures only.
Describing in details all Golang’s type descriptors is out-of-scope for this blog. Refer to TypesBuilder module for gory details.
Locating Type Descriptors
The last question we have to examine is how to actually locate type descriptors in Golang binaries. This starts with a structure called moduledata, whose purpose is to “record information about the layout of the executable“:
This structure defines in particular a range of memory dedicated to storing type information (from types to etypes). Then, typelink field stores offsets in the range where type descriptors begin.
So first we locate moduledata, either from a specific symbol for non-stripped binaries, or through a brute-force search. For that, we search for the address of pclntab previously found (first moduledata field), and then apply some checks on its fields.
There is no backward compatibility requirement on runtime’s internal structures — as Golang executables embed their own runtime. In particular, moduledata and type descriptions are not guaranteed to stay backward compatible with older Golang release (and they were already largely modified since their inception).
In others words, TypesBuilder module’s current implementation might become outdated in future Golang releases (and might not properly work on older versions).
Use-Case: StealthWorker
We are now going to dig into a malware dubbed StealthWorker. This malware infects Linux/Windows machines, and mainly attempts to brute-force web platforms, such as WordPress, phpMyAdmin or Joomla. Interestingly, StealthWorker heavily relies on concurrency, making it a target of choice for a first analysis.
The sample we will be analyzing is a x86 Linux version of StealthWorker, version 3.02, whose symbols have been stripped (SHA1: 42ec52678aeac0ddf583ca36277c0cf8ee1fc680)
Reconnaissance
Here is JEB’s console after disassembling the sample and running the script with all modules activated (FunctionsFinder, StringsBuilder, TypesBuilder, DuffDevicesFinder, PointerAnalyzer):
>>> Golang Analyzer <<<
> pclntab parsed (0x84B79C0)
> first module data parsed (0x870EB20)
> FunctionsFinder: 9528 function entry points enqueued (and renamed)
> FunctionsFinder: running disassembler... OK
 > point of interest: routine runtime.GOROOT (0x804e8b0): references Go root path of developer's machine (sys.DefaultGoroot)
 > point of interest: routine runtime.schedinit (0x8070e40): references Go version (sys.TheVersion)
> StringsBuilder: building strings... OK (4939 built strings)
> TypesBuilder: reconstructing types... OK (5128 parsed types - 812 types imported to JEB - see logs)
> DuffDevicesFinder: finding memory zero/copy routines... OK (93 routines identified)
> PointerAnalyzer: 5588 pointers renamed
> see logs (C:\[REDACTED]\log.txt)
Let’s start with some reconnaissance work:
The binary was compiled with Go version 1.11.4 (referenced in runtime.schedinit‘s code, as mentioned by the script’s output)
Go’s root path on developer’s machine is /usr/local/go (referenced by runtime.GOROOT‘s code)
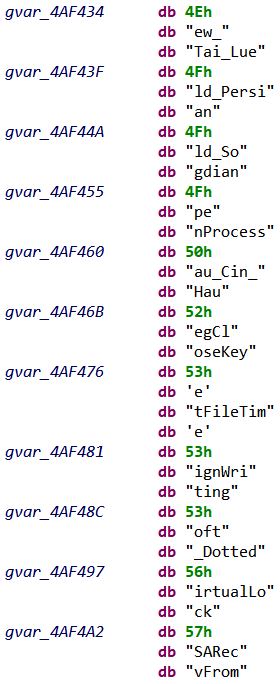
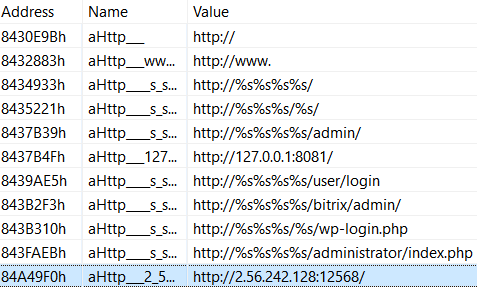
Now, let’s turn to the reconstructed strings; there are too many to draw useful conclusions at this point, but at least we got an interesting IP address (spoiler alert: that’s the C&C’s address):
Fig. 17: Extract of StealthWorker’s strings as seen in JEB after running the script
More interestingly, the list of source files extracted from pclntab (outputted in the script’s log.txt) shows a modular architecture:
Each main.go corresponds to a Go package, and its quite obvious from the paths that each of them targets a specific web platform. Moreover, there seems to be mainly two types of packages: WorkerTARGET_brut, and WorkerTARGET_check.
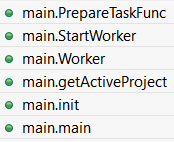
Let’s dig a bit further by looking at main package, which is where execution begins; here are its routines with pretty informative names:
Fig. 18: main’s package routines
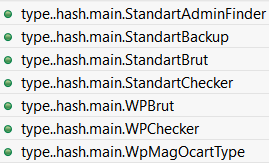
Additionally there is a series of type..hash* and type..eq* methods for main package:
Fig. 19: Hashing methods (automatically generated for complex types)
These methods are automatically generated for types equality and hashing, and therefore their presence indicates that non-trivial custom types are used in main package (as we will see below).
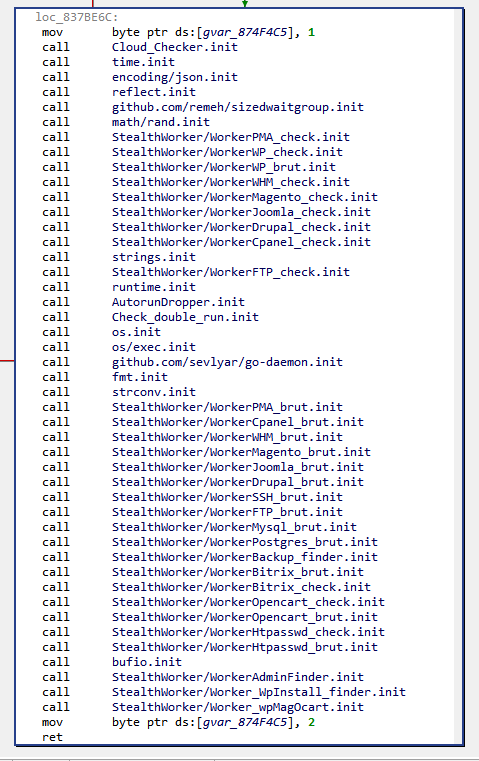
We can also examine main.init() routine. The init() routine is generated for each package by Golang’s compiler to initialize others packages that this package relies on, and the package’s global variables:
Fig. 20: Packages initialization from main.init()
Along the previously seen packages, one can notice some interesting custom packages:
github.com/remeh/sizedwaitgroup: a re-implementation of Golang’s WaitGroup — a mechanism to wait for goroutines termination –, but with a limit in the amount of goroutines started concurrently. As we will see, StealthWorker’s developer takes special care to not overload the infected machine.
Golang packages’ paths are part of a global namespace, and it is considered best practice to use GitHub’s URLs as package paths for external packages to avoid conflicts.
Concurrent Design
In this blog, we will not dig into each StealthWorker’s packages implementation, as it has been already been done severaltimes. Rather, we will focus on the concurrent design made to organize the work between these packages.
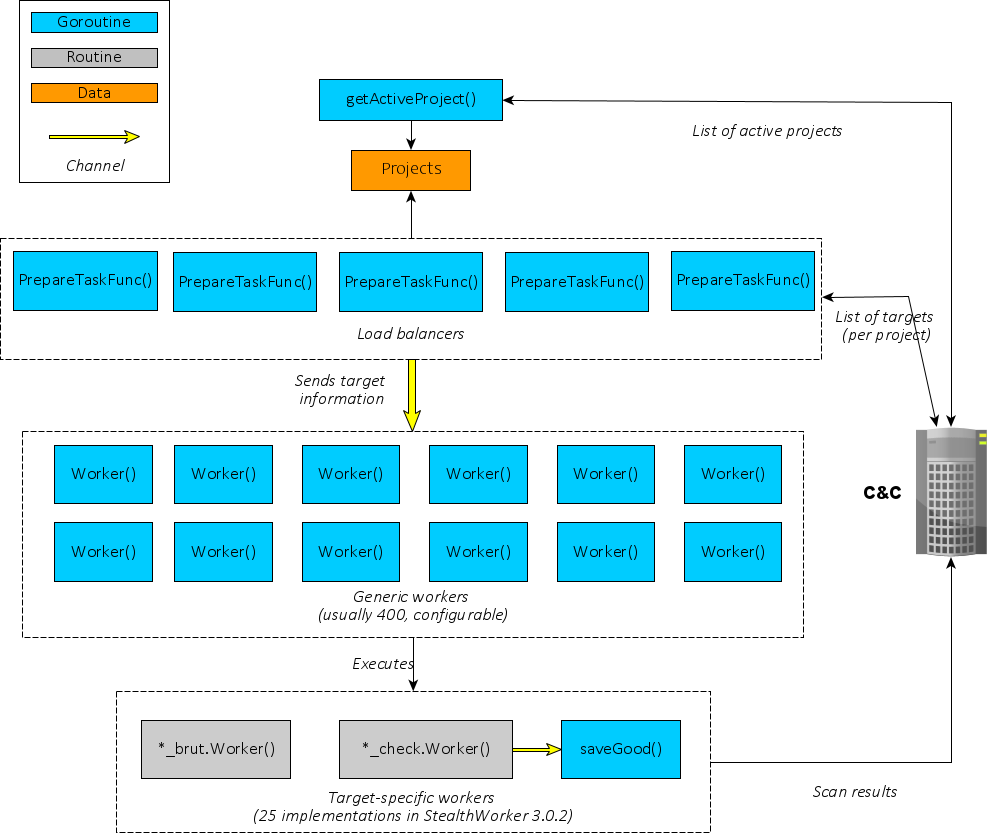
Let’s start with an overview of StealthWorker’s architecture:
Fig. 21: StealthWorker’s design overview
At first, a goroutine executing getActiveProject() regularly retrieves a list of “projects” from the C&C server. Each project is identified by a keyword (wpChk for WordPress checker, ssh_b for SSH brute-forcer, etc).
From there, the real concurrent work begins: five goroutines executing PrepareTaskFunc() retrieve a list of targets for each project, and then distribute work to “Workers”. There are several interesting quirks here:
To allow PrepareTaskFunc() goroutines to communicate with Worker() goroutines, a Channel is instantiated:
Fig. 22: Channel’s instantiation
As can be seen from the channel type descriptor — parsed and renamed by the script –, the Channel is made for objects of type interface {}, the empty interface. In others words, objects of any type can be sent and received through it (because “direction:both”).
PrepareTaskFunc() will then receive from the C&C server a list of targets for a given project — as JSON objects –, and for each target will instantiate a specific structure. We already noticed these structures when looking at main package’s routines, here are their reconstructed form in the script’s logs:
Note that all structures have Worker and Host fields. The structure (one per target) will then be sent through the channel.
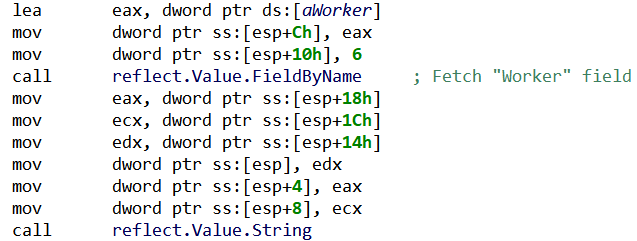
On the other side of the channel, a Worker() goroutine will fetch the structure, and use reflection to generically process it (i.e. without knowing a priori which structure was sent):
Fig. 23: StealthWorker’s use of reflection to retrieve a field from an unknown structure
Finally, depending on the value in Worker field, the corresponding worker’s code will be executed. There are two types of workers: brute-forcing workers, which try to login into the target through a known web platform, and checking workers, which test the existence of a certain web platform on the target.
From a design point-of-view, there is a difference between the two types of workers: checking workers internally relies on another Channel, in which the results are going to be written, and fetched by another goroutine named saveGood(), which reports to the C&C. On the other hand, brute-forcing workers do their task and directly report to the C&C server.
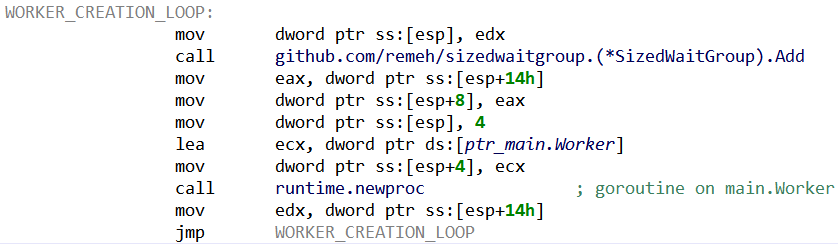
Interestingly, the maximum number of Worker() goroutines can be configured by giving a parameter to the executable (preceded by the argument dev). According to the update mechanism, it seems that the usual value for this maximum is 400. Then, the previously mentioned SizedWaitGroup package serves to ensure the number of goroutines stay below this value:
Fig. 24: Worker’s creation loop SizeWaitGroup.Add() is blocking when the maximum number of goroutines has been reached. Each main.Worker() will release its slot when terminating.
We can imagine that the maximum amount of workers is tuned by StealthWorker’s operators to lower the risk of overloading infected machines (and drawing attention).
There are two additional goroutines, respectively executing routines KnockKnock() and CheckUpdate(). Both of them simply run specific tasks concurrently (and infinitely): the former sends a “ping” message to the C&C server, while the latter asks for an updated binary to execute.
What’s Next? Decompilation!
The provided Python script should allow users to properly analyze Linux and Windows Golang executables with JEB. It should also be a good example of what can be done with JEB API to handle “exotic” native platforms.
Regarding Golang reverse engineering, for now we remained at disassembler level, but decompiling Golang native code to clean pseudo-C is clearly a reachable goal for JEB. There are a few important steps to implement first, like properly handling Golang stack-only calling convention (with multiple return values), or generating type libraries for Golang runtime.
So… stay tuned for more Golang reverse engineering!
As usual, if you have questions, comments or suggestions, feel free to:
The Golang compiler was originally inherited from Plan9 and was written in C, in order to solve the bootstrapping problem (how to compile a new language?), and also to “easily” implement segmented stacks — the original way of dealing with goroutines stack. The process of translating the original C compiler to Golang for release 1.5 has been described in details here and here. ↩
There are alternate compilers, e.g. gccgo and a gollvm↩
Golang also allows to compile ‘modules’, which can be loaded dynamically. Nevertheless, for malware writers statically-linked executables remain the usual choice. ↩
Readers interested in the internals of JEB disassembler engine should refer to our recent REcon presentation↩
Last week we presented a talk at REcon on the internals of JEB’s native disassembler.
During this talk, we focused on some of the research problems we encountered while developing our custom disassembler engine — the foundation for JEB native decompiler.
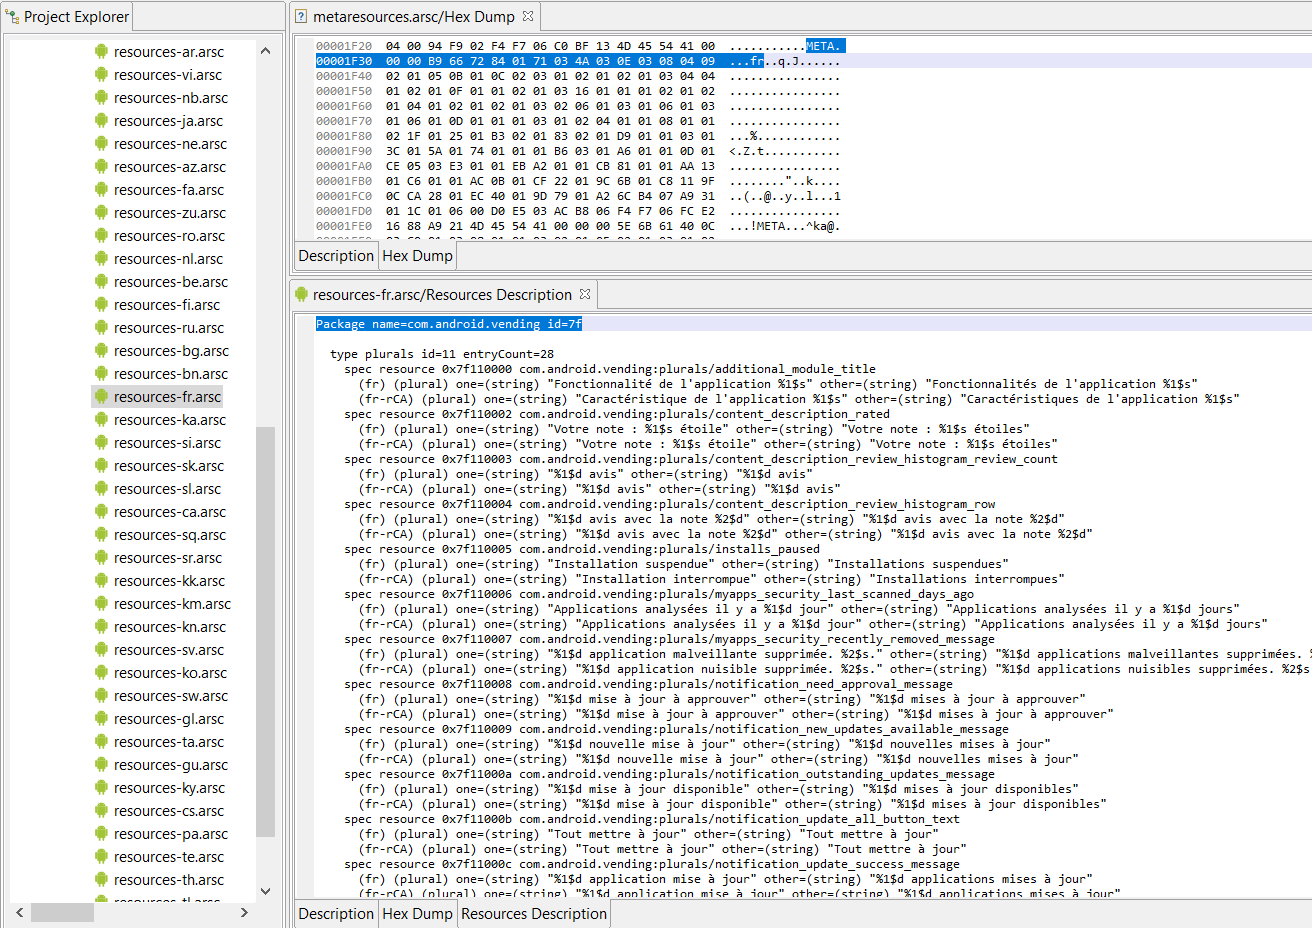
One of our users recently reported an Android resources.arsc file seemingly unprocessed by JEB. Upon closer inspection, it turned out this file was not a regular binary resources file, but instead, a compressed resources container serving as a generator for localized resources.arsc. Older versions of Google Play (eg, com.android.vending 11.6.18) and other official Google applications have been using this type of file, which is stored as a raw asset and sometimes named metaresources.arsc.
I decided to have a quick look. However, for better or worse, what was planned as a superficial exploration turned into a deep-dive into the rabbit-hole that was the “meta-arsc” parsing code.
Those files, as said above, are used to generate localized (non-English) resources.arsc files. That means that the client application can generate lightweight resources files on the fly. And presumably, APKs as well. Since this mechanism seems to be primarily used by the Play Store app, a reasonable use case could be Dynamic Delivery.
A brief description of the file format can be found below
The fully annotated JDB2 is here (as well as the source apk) if you’d like to write your own implementation of a parser and localized arsc generator. The parser and generator have been thoroughly deobfuscated and commented out where need be. Package: com.google.d.a.a.a.a. Client code: FilteredResourceHelper. Drop both files (jdb2, apk) in a folder and open the JDB2 file in JEB
What does it look like when metaresources.arsc is processed in JEB?
JEB arsc_meta plugin, here seen processing a metaresources.arsc file. All localized resources.arsc files are generated and attached as children of the original meta file.A french localized resources generated from a metaresources container. JEB processes those files as regular, stand-alone arsc files, and provides textual output similar to the one generated by the aapt2-dump tool from the Android SDK.
Binary Format
Disclaimer: Specification is a work-in-progress. Refer to the JDB2 annotation and code to fill in the gaps.
metaresources.arsc=
BE_UINT32                     cnt           count of languages
BE_UINT16[cnt]                langs         2-char language codes
MetaEntry[cnt]                metaentries   meta entries matching the language codes
CompressedResourceTableChunk  restab        a compressed resource table (code: 0x1002)
EOF                           -             not necessarily the EOF, but all metares
                                            files examined contained a single resource
                                            chunk, which is a compressed resource tab
MetaEntry=
BE_UINT32                     magic         the value 'META'
BE_UINT32                     entrysize     complete entry size (including the above
                                            magic) in bytes
BE_UINT16                     lang          language code
VAR_INT32                     cnt1          .
VAR_INT32[cnt1]               offsets1      a custom serialization of java.util.BitSet
                                            (refer to JDB2 for details) holding
                                            positions for strings and string styles
                                            stored in string pool chunks
VAR_INT32                     cnt2          .
VAR_INT32[cnt2]               offsets2      offsets to Table Package chunk entries
                                            (types, typespecs)
=> Compressed entries:
- 5 types exist, basically non-XML chunk types
- Their type code is the same as arsc's with the 0x1000 bit set
- List of chunks:
    StringPool=     refer to JDB2, class CompressedStringPoolChunk
    ResourceTable=  refer to JDB2, class CompressedResourceTableChunk
    Package=        refer to JDB2, class CompressedPackageChunk
    Type=           refer to JDB2, class CompressedTypeChunk
    TypeSpec=       refer to JDB2, class CompressedTypeSpecChunk
This post is a follow-up on a previous article: we have updated the Androsig plugin and the pre-generated set of library signatures.
Reminder: Androsig is a JEB plugin used to sign and match library code for Android applications.
The purpose of the plugin is to help deobfuscate lightly-obfuscated applications that perform name mangling and hierarchy flattening (such as Proguard and other common Java and Dalvik protectors). Using our collection of signatures for common libraries, library code can be recognized; methods and classes can be renamed; package hierarchies can be rebuilt.
Examples
Below, an example of what that looks like on a test app:
Matched libraries on a sample app bundling the Android Support package
Another example: running Androsig on a large app (Vidmate 4.0809), see the reconstructed glide/… sub-packages below:
Matched libraries on a PlayStore app
Installation
1) Download the latest version of the compiled binary plugin and drop it into the JEB coreplugins/ folder. If you are running JEB 3.4+, the plugin should come bundled with your .
JEB 3.3 ships with our internal tool SiglibGen to generate signatures for native routines. Until now, users could sign individual routines only from JEB user interface (menu Native> Create Signature for Procedure), or with the auto-signing mode.
With the release of SiglibGen, users can now create signatures for whole files in batch mode, notably executables (PE, ELF) libraries (Microsoft COFF and AR files) and JDB2 (JEB project files)1.
In this post, we will explain how SiglibGen allows power-users to generate custom signature libraries, in order to quickly identify similar code between different executables.
Signature Libraries (siglibs)
Signature libraries are stored in <JEB install folder>/siglibs folder. Each signature contains a set of features identifying a routine (detailed below), and a set of attributes representing the knowledge about the routine (name, internal labels, comments…).
JEB currently ships with signature libraries for x86/x64 Microsoft Visual Studio libraries (from Visual Studio 2008 to 2017), and for ARM/ARM64 Android NDKs (from NDKr10 to NDKr19). These signatures will be automatically loaded when a suitable file is opened (see File>Engines>Signature Libraries for the complete list of available signature libraries).
These compiler signatures are intended to be “false positive free”, i.e. they should only identify the exact same routine (though it can be mapped at a different location). Therefore, the signatures can be blindly trusted by users, and by JEB automatic analysis2.
But users might want to generate their own signature libraries, for example in the following scenarios:
User analyzed an unknown executable. The resulting JDB2 file can then be signed, such that all routines can be identified in others executables and related information (name, comments, labels) be imported.
User found out that an executable is statically linked with a public library. The library can then be compiled with symbols and signed such that the library routines will be renamed in the analyzed executable3.
Use Case: Operation ShadowHammer
To illustrate the signatures generation process, we are going to use the recent attack dubbed “Operation ShadowHammer” as an example. This operation was originally documented by Kaspersky. Roughly summarized, malicious code was inserted into a legitimate ASUS’s automatic update tool named “ASUS Live Update Utility” 4 .
In this use case, we are going to put ourselves in the shoes of an analyst willing to understand the trojanized ASUS installers. We do not intend to analyze them in-depth – it has been done several times already -, but rather show how SiglibGen can accelerate the analysis.
At first, we got our hands on three samples, originally mentioned in CounterCept’s analysis with their date of use:
An analyst would likely start looking at the oldest sample (6aedfef6…), in order to investigate possible evolution of the attack. In this sample, the installer’s main() routine was modified to load a malicious PE executable from its resources:
JEB Project View. The embedded executable can be seen in resources5.
Here is the memory map after opening the malicious executable in JEB:
Embedded PE navigation view. Blue is code, cyan is code identified by siglib, green is data.
The large chunks of cyan correspond to routines identified as being part of “Microsoft Visual C++ 2010 /MT” libraries. Then, we analyzed the remaining seven routines (the blue chunk in the navigation view), and renamed them as follow:
Malicious Routines (our names)
These routines implement the following logic: check if one of the machine’s MAC address match a hard coded list, and if it’s the case download a payload (otherwise a .idx log file is dropped).
Now in order to re-use this knowledge on more recent trojanized ASUS installers, let’s generate signatures for this first sample.
Generating Signatures
In order to sign the analyzed file, we are going to create a configuration file from the sample file provided in <JEB install folder>/siglibs/custom:
;------------------------------------------------------------------------------
; *** SAMPLE *** JEB Signature Library configuration file
;------------------------------------------------------------------------------

;template file used to configure the generation of a *.siglib file for JEB

;how to generate the siglib specified by this file?
;open a terminal and execute: (eg, on Windows)
;  $ ..\..\jeb_wincon.bat -c --siglibgen=sample-siglib.cfg

;(mandatory) name of the folder containing files to sign
; must be in the same folder as this configuration file
input_folder_name=

;(mandatory) processor type
; see com.pnfsoftware.jeb.core.units.codeobject.ProcessorType
; eg: X86, X86_64, ARM, ARM64, MIPS, MIPS64
processor=

;(mandatory) output siglib file name
; '.siglib' extension will be appended to it
; IMPORTANT! once generated, this file must be moved to the <JEB>/siglibs/ folder
; (user generated siglibs have to be manually loaded)
output_file_name=mysiglib

;(mandatory) unique identifier for your siglib
; keep it < 0 and decrement for each package you generate
uuid=-1

;(mandatory) *absolute* path to JEB typelibs folder, usually <JEB>/typelibs
typelibs_folder=

;(mandatory) name of your package
; e.g. 'Microsoft Visual C++ 2008 signatures' (without '')
package_name=

;(mandatory) package version
package_version=0

;(optional) description of your package
package_description=

;(optional) package author
package_author=

;(mandatory) list of features included in each signature
; i.e. the characteristics of the signed routines serving to identify them
; see com.pnfsoftware.jeb.core.units.code.asm.sig.NativeFeatureSignerID
; note: defaults should be suitable for most cases. ROUTINE_SIZE must always be included.
features=ROUTINE_SIZE,ROUTINE_CODE_HASH,CALLED_ROUTINE_NAME_ONLY_EXTERN

;(mandatory) list of attributes included in each signature
; i.e. additional knowledge on the signed routines conveyed by signatures
; (other than routine name)
; see com.pnfsoftware.jeb.core.units.code.asm.sig.NativeAttributeSignerID
attributes=COMMENT,LABEL
A particularly interesting part of this configuration is the features field, where users can select the characteristics of the routine they want to put in signatures. The complete feature list can be found here; here are the features we included in our case (the default ones):
Feature Name
Description
ROUTINE_SIZE
Size of the routine (number of instructions).
ROUTINE_CODE_HASH
Custom hash computed from the routine assembly code.
CALLED_ROUTINE_NAME_ONLY_EXTERN
Names of the external routines called by the signed routine.
Note that by including ROUTINE_CODE_HASH, our signatures will only match routines with the exact same code (but possibly mapped at a different location). The use of CALLED_ROUTINE_NAME_ONLY_EXTERN allows to distinguish different wrapper routines calling different API routines, but having the same code.
Here is the specific configuration file shadowhammer-oldest.cfg we made for this first sample:
input_folder_name=input
processor=X86
output_file_name=shadowhammer-6aedfef6
uuid=-1
typelibs_folder=[...REDACTED...]\typelibs
package_name=ShadowHammer -- sample 6aedfef6 (oldest)
package_version=0
package_description=Signatures generated from the analysis of the oldest sample known
package_author=Joan Calvet
features=ROUTINE_SIZE,ROUTINE_CODE_HASH,CALLED_ROUTINE_NAME_ONLY_EXTERN
attributes=COMMENT,LABEL
Then we put the JDB2 file of the analyzed sample into the input folder (see configuration’s input_folder_name field). SiglibGen can then be called by executing JEB startup script (e.g. jeb_wincon.bat) with the following flags:
$jeb -c --siglibgen=shadowhammer-oldest.cfg
The generated signature libraries will then be written in the output folder. In our case, SiglibGen signed our seven routines, as indicated in siggen_stat.log file 6:
> Package created on 2019.05.01.15.29.23
> metadata: X86/ShadowHammer -- sample 6aedfef6 (oldest)/0/Signatures generated from the analysis of the oldest sample known/Joan Calvet/1556738959
> # sigs created: 7
> # very small routines: 0
> # small routines: 0
> # medium routines: 6
> # large routines: 1
> # unnamed routines: 1
> # blacklisted routines: 0
> # duplicated routines: 0
We can now copy shadowhammer-6aedfef6.siglib to <JEB>/siglibs/ folder. It will now be available under File>Engines>Signature Libraries to be manually loaded.
Second Sample Analysis
Now, it is time to turn to the second sample (736bda6432…). The workflow is quite different from the previous one: a routine call has been inserted into Visual Studio library method __crtExitProcess, which is called whenever the program exists:
Trojanized __crtExitProcess. Call to __crtCorExitProcess was replaced by a call to malicious code.
The astute reader might wonder why the routine is still named __crtExitProcess(), as if it was the original one, if one of its call has been rewritten to point elsewhere. In this case, the routine’s name comes from the fact that several caller routines were identified as library code (and are known to call __crtExitProcess()), as indicated by the routine header comment “Routine’s name comes from a caller […]”.
Following the dubious call, we end up decrypting the malicious payload, which is then executed. We can load the malicious dump in JEB with the x86 processor and the correct base address. After manually defining the code area, we obtain the following navigation view:
Memory dump’s initial navigation view. Blue is code.
For now, no compiler signature libraries were loaded because it is a memory dump without a proper PE header. As we know the previous malicious sample was compiled with Visual Studio 2010 /MT libraries, we can manually load the corresponding signatures (File>Engines>Signature Libraries). Here is the navigation bar at this time:
Memory dump’s navigation view with Visual Studio 2010 /MT signature libraries loaded. Blue is code, cyan is library code.
Most of the code has been identified. Now, we can load the custom signatures we generated from the previous sample, and we end up with two more routines being identified (i.e. miscreants directly re-used them from the first sample):
We can now look at the non-identified routines, without having to reanalyze the duplicates.
Finally, after having analyzed the remaining routines, we can generate a new signature library, following the same steps previously described. This time we put two samples in the input folder (the trojanized installer’s JDB2, and the memory dump’s JDB2). Eight routines are then signed.
Third Sample Analysis
The most recent sample (9a72f971944f…) follows the same logic as the previous one, namely it dynamically decrypts the malicious code, which is then executed. As previously, we load the memory dump in JEB with Visual Studio 2010 /MT signatures:
Memory dump’s navigation view with Visual Studio 2010 /MT signature libraries loaded.
Finally, we load the ShadowHammer signature libraries generated from the previous two samples:
Memory dump’s navigation view with Visual Studio 2010 /MT and ShadowHammer signature libraries loaded.
At this point, only one malicious routine has not been identified (the large blue area in the navigation view). We can now focus on it, knowing that the rest of the code is the same.
If we open the two binaries side-by-side, we can rapidly pinpoint that the unidentified routine has indeed been modified between the two samples. For example:
Sample 736bda643291c
Sample 9a72f971944fc
It appears the hardcoded list of searched MAC addresses (represented by their MD5 hashes) has been modified between the two samples.
Conclusion
We hope this blog post demonstrated how SiglibGen allows users to speed up their analysis by easily re-using their work. Remember that signatures can be generated in a lighter manner directly from JEB UI (as shown in the auto-signing mode video). As usual, do not hesitate to contact us if you have any questions (email, Twitter, Slack).
Note: SiglibGen might set .parsers.*.AnalysisStyle and .parsers.*.AllowAdvancedAnalysis engines option to specific values suitable for signatures generation, without restoring the original values after the generation. For now, JEB power-users have to manually restore these two engines options to the intended values after having generated signatures (menu Edit>Options>Engines). This will be fixed in next release JEB 3.4.
Annex: SiglibGen Log Files
A typical SiglibGen run will produce several log files (in the same folder):
File Name
Purpose
siggen_stat.log
Summary log (number of signatures created, etc). A new entry is appended to the log file at each signature generation.
siggen_report.html
Complete HTML log file; each signed routine is shown with the corresponding features and attributes.
conflicts.txt
Conflict resolution file; users can tweak here the decisions taken when several routines have the same features (and then regenerate the signatures).
removals.txt
Removals resolution file; users can tweak here the automatic decisions regarding removing certain signatures (and then regenerate the signatures) .
More formats could be handled, do not hesitate to contact us if you have such needs. ↩
While the signatures shown in this blog post will also be generated in a false positive free manner, SiglibGen allows to build more flexible signatures; this will the topic of another blog post. ↩
If signatures were built to be strict (i.e. not allowing any modifications to the original routine), this can be far from trivial, as the library needs to be compiled with the exact same options as the analyzed executable. ↩
There are numerous excellent analysis available for Operation ShadowHammer, like the one from CounterCept. ↩
Note that thanks to JEB recursive processing, the embedded executable does not need to be extracted, and can be directly analyzed within the original JEB’s project ↩
See Annex for a description of all log files produced by SiglibGen. ↩