Automatic Identification of Mirai Original Code

Context

One of the major threat on embedded devices — the so-called “Internet of things” –, is the infamous Mirai malicious software, whose source code was made public in September 2016. This malware has the ability to infect devices by brute-forcing Telnet credentials, and is primarily used to launch distributed denial-of-service attacks.

Since the source code release, numerous Mirai variants have been deployed in the wild by miscreants, like the one we documented in a recent post.

In this blog we will first take a quick look at another Mirai-based malware, quite original in its own way, to then introduce our novel signature system that can identify Mirai original code in executables.

Yet Another Mirai Variant

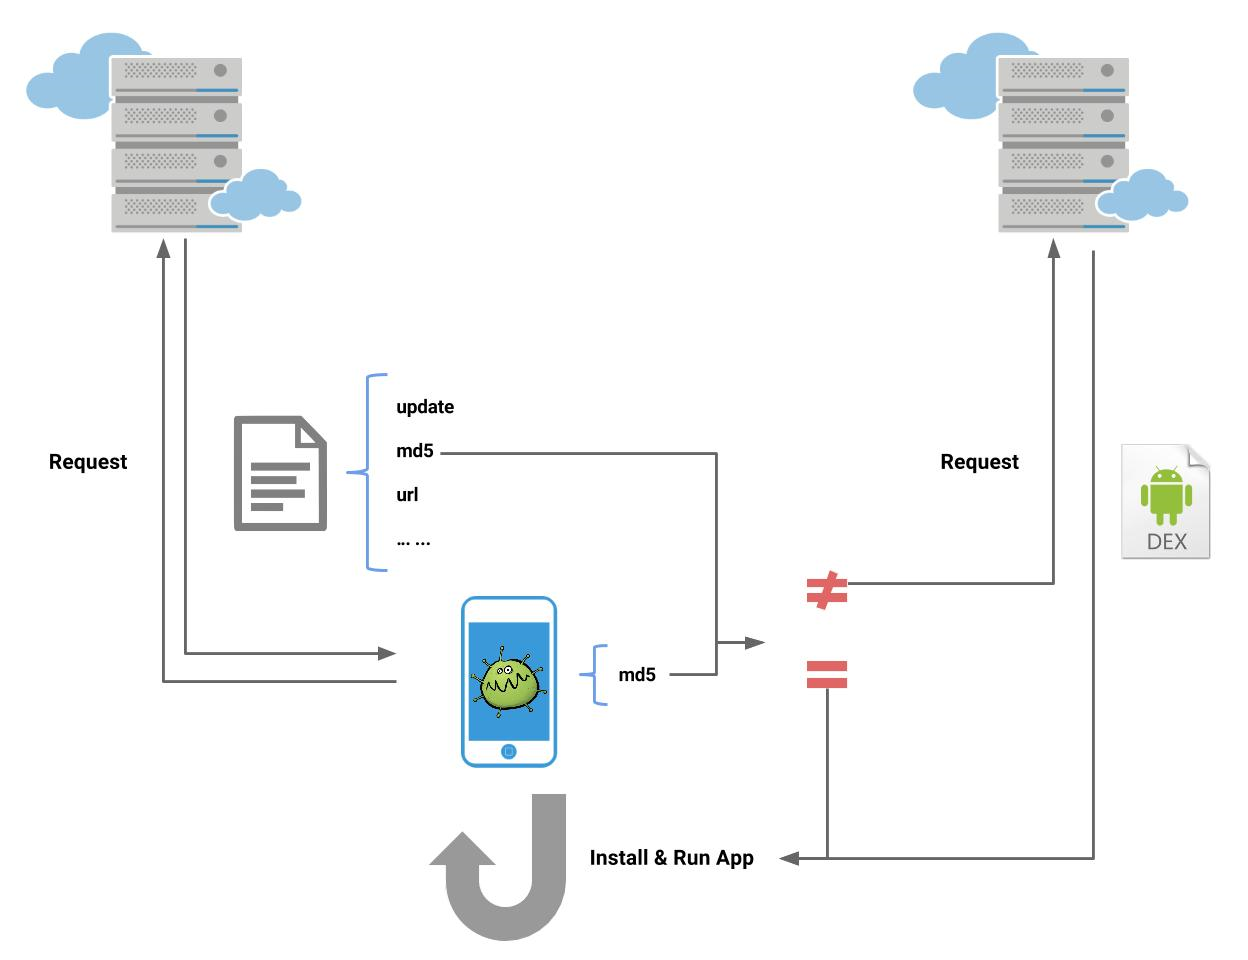
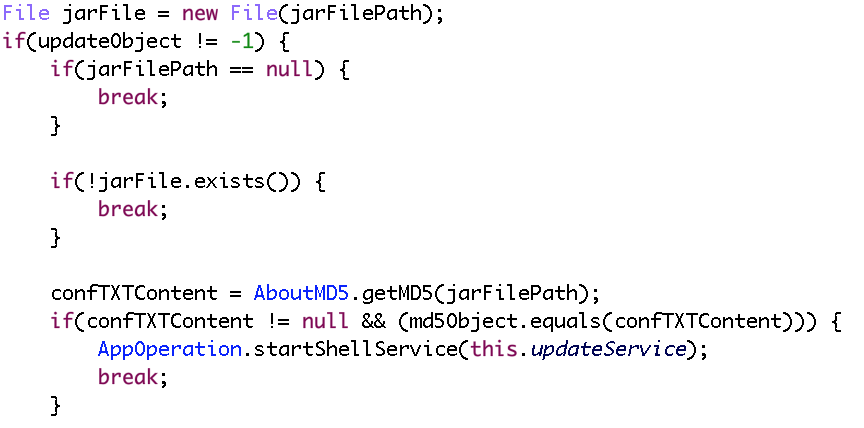
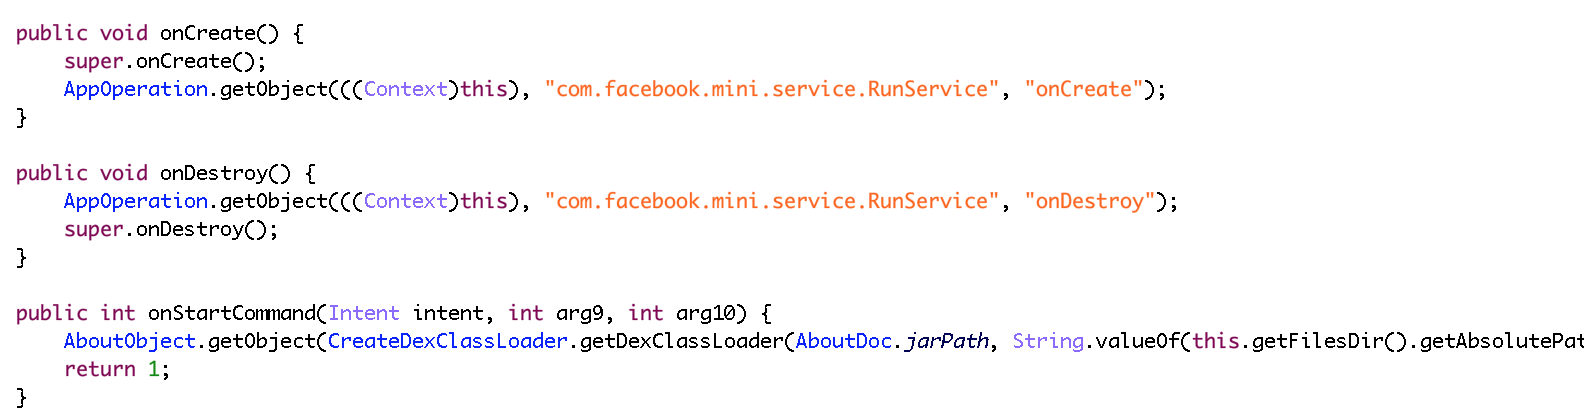
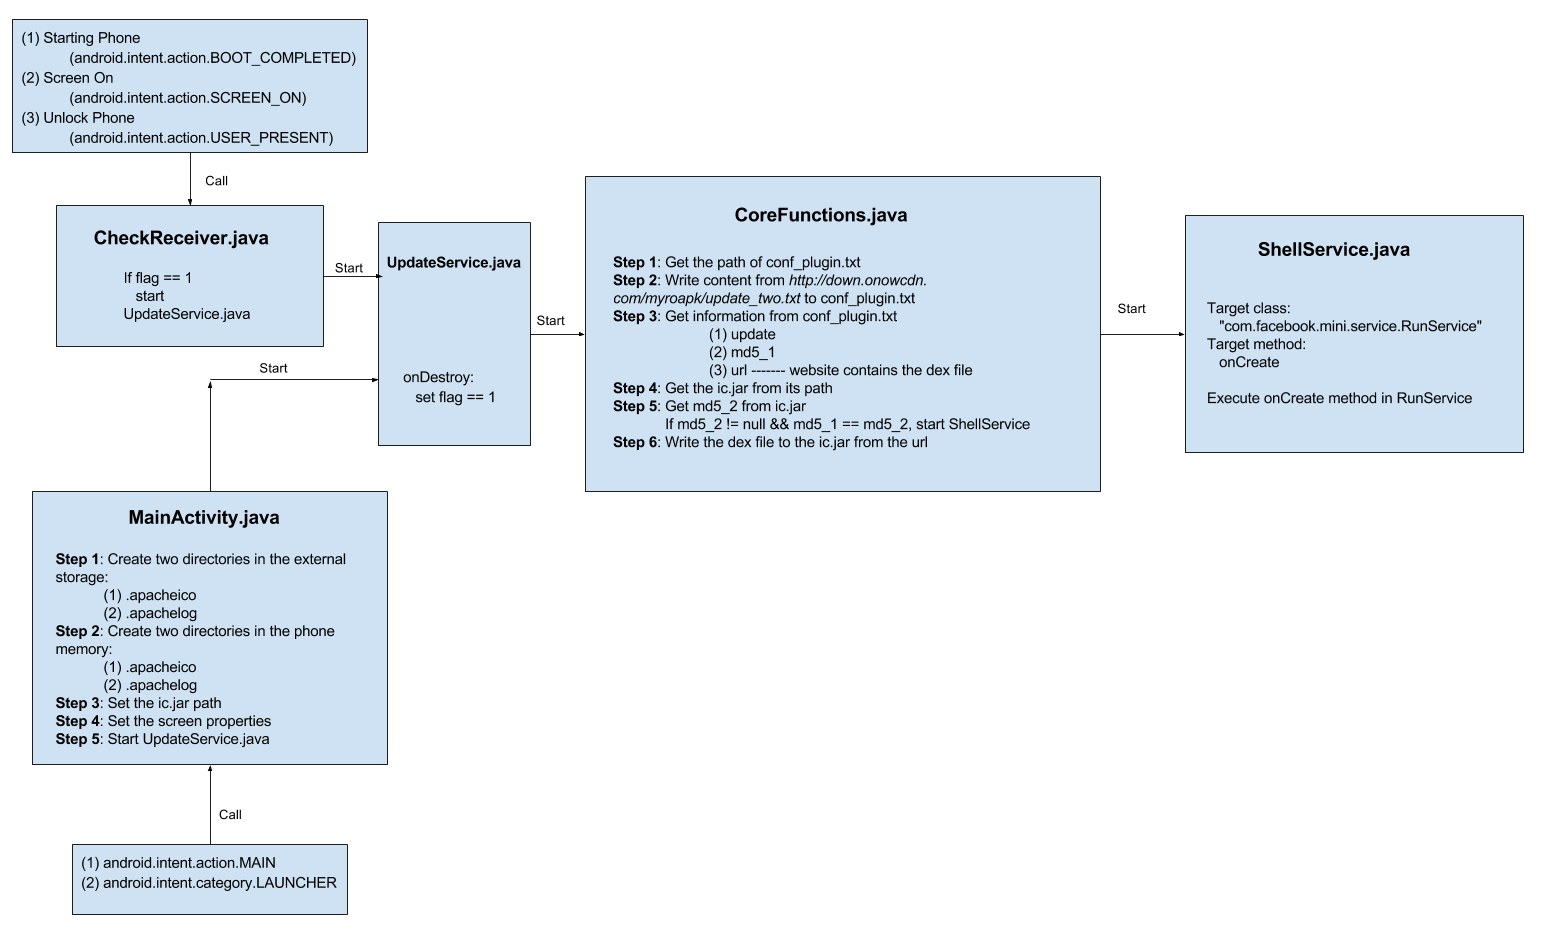
On May 18th, ESET’s Michal Malík mentioned on Twitter a Mirai-based sample for MIPS that grabbed our attention. Michal pointed out new functionalities like a custom update mechanism, and some strange debug routines, so we decided to take a look with our brand new MIPS decompiler. It should be noted that this sample comes with the debug symbols, which explains the names present in the decompiler output.

The malware logic starts in its main() routine, which is shown below as decompiled by JEB.

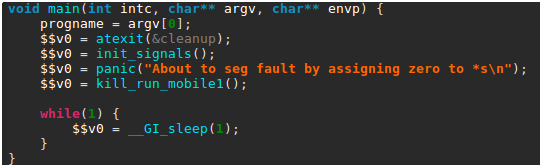
Briefly summarized, this routine first sets up a few signal handlers, in particular to create a core file in case of segmentation fault. It then calls a homemade panic() function — not to be confused with the standard Linux panic() routine. The panic() function code is shown below, as seen in JEB.

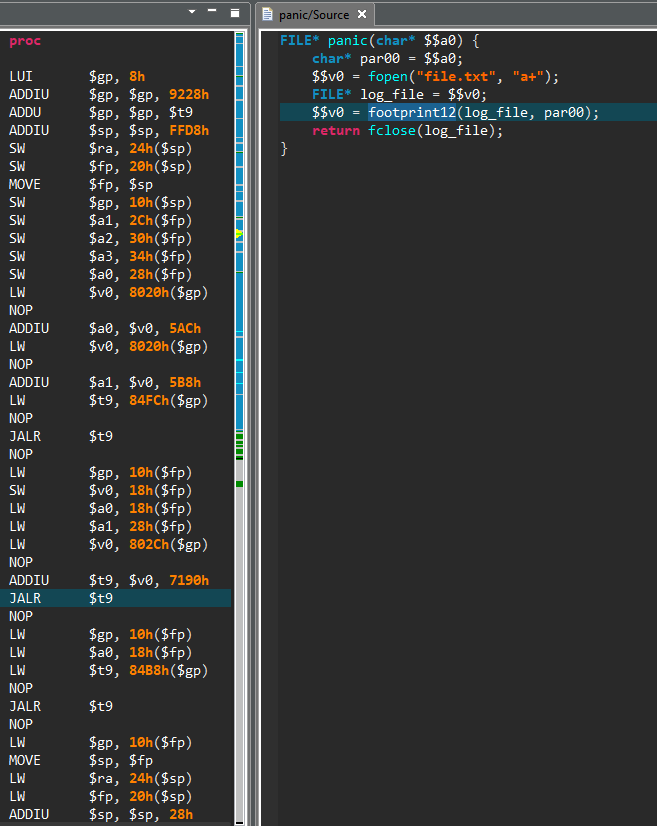
While the routine native code — seen on the left side — can be pretty dry to read, the decompiled code on the right side is fairly straightforward: a file named file.txt is opened and a given error message is written to it, accompanied by a custom system footprint built by the footprint12() routine.

Finally, main() calls the kill_run_mobile1() function, which first kills any application listening on TCP port 18899 (likely others instances of the same malware),  and then creates a thread on the mobile_loop1() function, which is shown below.

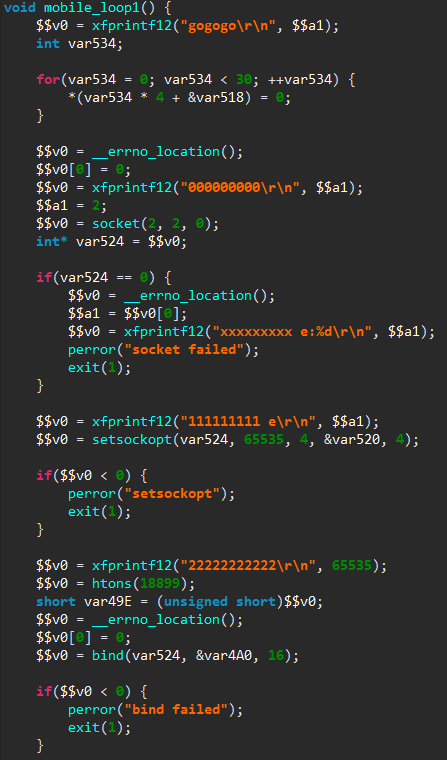
The new thread will listen for incoming connections and process them through a custom command handler. As can be seen from the numerous debug messages in the decompiled code, the code is still in a development stage.

To summarize, this sample appears to be an attempt to repackage Mirai source code with a different update mechanism, and is still in development, as can be seen from the presence of debug routines, and the fact that plenty of code remains unused.

While the technical quality of this sample is dubious, it illustrates one of the major consequence of Mirai source code public release: it has lowered the bar of entry for malicious software developers. In particular, we can expect the strain of Mirai-based malicious software to continue to grow in the following months.

Native Code Signatures

In a context where numerous Mirai-based malware are deployed in the wild, having the ability to identify original Mirai code becomes particularly useful, as it allows the analyst to focus only on the new functionalities in each sample.

Of course, most of Mirai-based samples do not come with symbols, and hence we need a proper mechanism to identify Mirai original code. That is the purpose of the native signature system released with JEB 2.3, which can actually identify code for all native architectures supported by JEB (x86, ARM, MIPS and the associated variants).

The objective of this signature system is to identify native routines with a minimal number of false positives. In others words, we want to fully trust a successful identification, while we may miss some known routines.

To realize this low false positives goal, our signatures are primarily based on two features:

  • A custom hash computed on the binary code of the unknown routine. During this computation, we remove from the native instructions the addresses and offsets that may vary depending on where the routine is located in a binary. Hence the same routine located at a different place will have the same hash. Interestingly, as our algorithm uses the generic JEB interface on native instructions (IInstruction), the hash computation is done on all architectures in the same way.
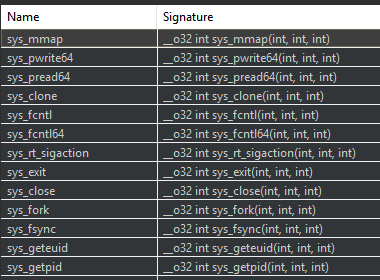
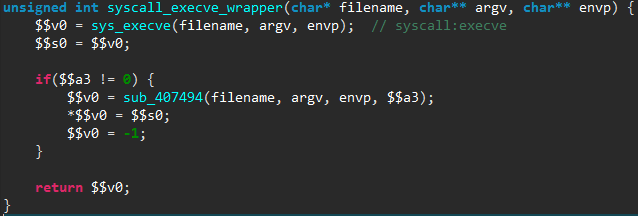
  • The names of the routines called by the unknown routine, e.g. API routines, system calls, or already identified routines. This feature allows to distinguish wrappers that have exactly the same binary code but call a different routine.  

The whole signature process can be summarized in two steps — which will be described in details in a separate documentation:

  1. Signatures are generated from a reference file. This file can be a native file with symbols, or a JEB database with some routines renamed by the user. For each named routine, a signature containing the routine features and information is created. Signatures are then grouped into packages for each platform.
  2. When JEB analyzes an unknown routine, it tries to match it with the signatures. If there is a match, the information of the original routine are imported, e.g. the matched unknown routine is renamed as the original routine.

Due to its strict reliance on the binary code, this identification process does not offer a resistance to minor changes, like the ones introduced by compilation with a different compiler version or with different optimizations. We intend to develop others signature systems in JEB, which will be more resistant to such variations, in particular by using JEB intermediate representation.

Still, it is particularly suitable in the case of Mirai, where the public source code comes with compilation instructions, such that many samples are compiled in the same way and share the exact same binary code. Therefore, JEB 2.3 comes with a set of signatures created from a non-stripped executable created from Mirai public source code.

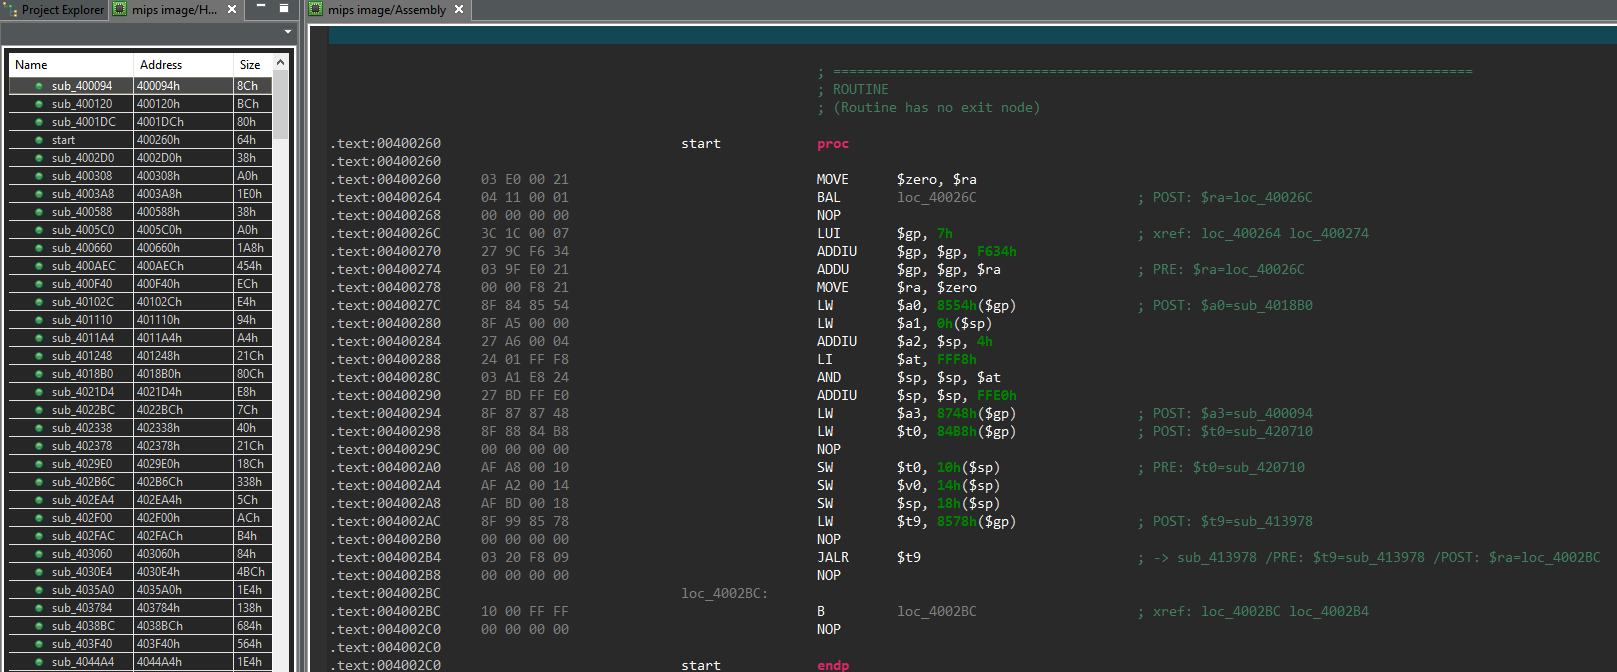
These signatures are automatically applied when a MIPS binary is loaded in JEB. For example, here is an extract of the initial routines list after loading in JEB a stripped Mirai sample deployed last year (SHA1: 03ecd3b49aa19589599c64e4e7a51206a592b4ef).

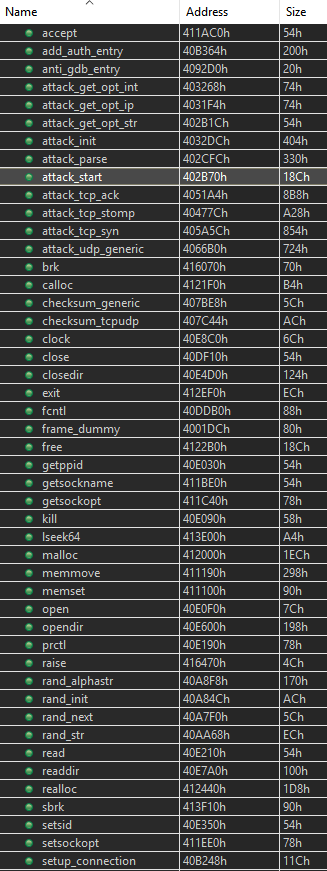
On the 204 routines contained in the sample, 120 are automatically identified and renamed by JEB, allowing the user to focus on the unknown routines. It should be noticed that not all recognized routines belong to Mirai specific code, some of them belong to the C library used by Mirai (uClibc).

Conclusion

The JEB native signature system is still in development, but its results are encouraging and we provide a set of signatures for Mirai on MIPS platform, and for the standard C library shipped with Microsoft Visual Studio 2013 on the x86 platform. We encourage users to try it through our demo version, and report any comments to support@pnfsoftware.com.

In the following weeks, not only will the number of signatures rapidly grow — through a specific update mechanism –, but we also intend to let users generate their own signatures with JEB public API.

Acknowledgement

The malicious software analysis presented in this post was done by our intern Hugo Genesse.

Analyzing a New MIPS IoT Malware With JEB

Over the last few months, several major vulnerabilities in a certain brand of IP cameras have been publicly released. One vulnerability allows remote code execution, while another permits the retrieval of the administrator’s credentials. The situation is made worse by the fact that many of these cameras are reachable on the Internet (around 185,000 according to one of the researcher).

It did not take long for miscreants to abuse this discovery, and a novel malicious software 1 was recently propagated through the vulnerable cameras, as described in a 360.cn blog post.

This malicious software comes with MIPS and ARM versions, so we decided to quickly analyze it using our brand new MIPS decompiler. This blog post describes our findings.

Note: JEB MIPS decompiler being in beta mode, the decompiled output presented in this blog post should be considered with caution; we provide it mainly to allow the reader to get an idea of JEB capabilities. As we are constantly refining the decompiler, the produced code will strongly evolve in the next few months.

Recon

The sample we will be analyzing is the following:

7A0485E52AA09F63D41E471FD736584C06C3DAB6: ELF 32-bit MSB executable, MIPS, MIPS-I version 1 (SYSV), statically linked, stripped

After opening it in JEB, our disassembler found 526 routines. To give the reader an idea, here is what it looks like at the program entry point:

We can see here the disassembled MIPS code, which can be a hard language to read to say the least. Hopefully JEB is able to decompile it, as shown below (names are our own):

The main() routine is where the malware logic lies, and will be described below.

The interested reader might have noticed the comments in the assembly code. Those comments are the result of what we call the “advanced analysis” step, which can be roughly described as an emulation of the native code (based on JEB custom intermediate representation). This allows to find the actual values manipulated by the code, when those values are the result of previous computations. The advanced analysis will be properly described in a separate blog post.

But before going on with the analysis, one might want to take a look at the strings used by the malware, to get a sense of its abilities:

We can observe some likely C&C server information, and various strings related to the malware network abilities. Interestingly, an Arabic string clearly stands out from the others; it can be translated to “Loading Version 1”.

A final preparation step is to look at the system calls made by the malicious software, as it allows to easily understand some routines behavior. JEB automatically renames such syscalls — rather than just showing the system call number resulting from the advanced analysis phase, and displays them in a separate panel:

The user can then jump to these syscall references, and rename them appropriately, as done in the following example:

Through this process we renamed around 60 routines that are simply wrappers for syscalls.

Our reconnaissance step being done, we can now dig into the malware core logic!

Workflow

We start at the main() routine previously mentioned, and describe here the main steps of this malicious software. As we will see, part of this malware code is borrowed from the infamous Mirai malware, whose source code was made public in September 2016.

Initialization

At startup the malware does a few initialization steps, most of them being directly copy-pasted from Mirai. There is one original action though, which can be seen in the following image:

The files /tmp/ftpupdate.sh and /tmp/ftpupload.sh are first removed, then linked to /dev/null. These two files are used by various exploits against these IP cameras, and hence the malware makes sure a newly infected device can not be infected again.

C&C Commands

The malware then enters in a loop to fetch 1-byte commands from the C&C server (whose domain name is hardcoded). We counted 8 different commands, some of them having subcommands. We will now describe the most interesting ones.

Infection

As previously explained, this malware propagates by infecting vulnerable IP cameras connected to the Internet. To do so, it first scans the Internet for these devices, by re-using the TCP SYN scanner of the Mirai malware. To illustrate that, here is the scanner initialization loop, as seen in the released Mirai source code and in the decompiled code of our malware:

Scanner code, as seen in Mirai source code…

… versus the new malware code decompiled by JEB

The only major difference is that the TCP destination port is fixed to 81 in our malicious software, rather than alternate between port 23 and 2323 in Mirai. It is worth noting than even the loop counter has the same value (SCANNER_RAW_PPS is set to 160 in Mirai source code).

If the malware finds a device with an opened port 81, it then launches the actual exploit, which is built from a combination of publicly known vulnerabilities in the IP camera web server:

  1. Extract the device administrator’s credentials by sending an HTTP request for the file login.cgi and then parsing the answer for the administrator login and password (documented here).
  2. Send two specially crafted HTTP requests to first plant a connect-back payload on the device, and then execute it (documented here). The sending of this first request is shown below, as seen in JEB:

Once the connection has been established with the miscreants’ server thanks to the connect-back payload, the newly infected device is asked to download and run the malicious software, as described in the 360.cn blog post.

Attack Routers

Another action possibly ordered by the C&C server is to scan for UPnP enabled devices, in order to add a port forwarding entry to them. Such UPnP devices typically include home routers.

To do so, the malicious software starts to repeatedly send UPnP discovery messages to random IP addresses:

Once a UPnP enabled device has been found, a SOAP request is forged to add a new port forwarding entry in its configuration:

As mentioned in another 360.cn blog post, this code may be used to exploit the CVE-2014-8361 vulnerability, which allows to execute system commands with root privileges through the <NewInternalClient> SOAP tag. Also, notice the <NewPortMappingDescription> tag set to Skype to attempt hiding the request.

UDP DDoS

As documented in the 360.cn blog, the malicious software can launch a denial of service attack over UDP. The packets are built from the SSDP discovery message, which may also serve as a preparation step for a SSDP reflection attack, though it appears the code for that is not present in the binary.

Interestingly, there is another denial of service attack implemented, using a 25-byte payload shown below:

This payload is used in amplification attacks through Valve Source Engine servers.

Conclusion

We hope the readers enjoyed this quick analysis; feel free to ask questions in the comments section below.

JEB MIPS decompiler is currently in beta mode, and a demo version can be downloaded on our website.

  1. This malware was named http81 by 360, Persirai by ESET, or is simply recognized as a variant of Mirai by other vendors.

Analysis of Android.Golem downloader component

Recently, we came across a new malware which seems to be a module of a recent Android trojan named dubbed Golem.

Golem has been found in several countries and hundreds of thousands of phones have already been infected, according to reports.

We performed detailed analysis of the malware using JEB, the operations achieved by the malware can be divided into several steps:

Step 1

When user start the phone or unlock the screen or light the screen, the malware will automatically download a file named “conf_plugin.txt” which contains configuration information like “update”, “md5”, “url”, etc.

Step 2

Then the malware will check if there is a jar file named “ic.jar” in phone memory, if not or if its md5 is different from the md5 in “conf_plugin.txt” (which means the local dex is different from the dex in remote server), malware will download the dex.

Step 3

After that, the malware will install and run the dex and execute the “onCreate” function in the “com.facebook.mini.service.RunService” class.

The complete process can be represented by the graph below:

Based on the analysis, the malware can automatically download, launch and run application without user’s authorization. The downloaded apps will run with the set of permissions already requested by the downloader:

Through this malware, the attacker can easily get your personal information, contacts or even bank accounts and passwords. Also, the attacker can remotely control your phone to open specified application and perform some bad operations to make illicit profits.

Sample SHA256:
3cb7a4792725d381653fcca18d584f9fbe47d67f455db03e3c53e8e8e7736385

Analysis by Ruoxiao Wang

Deobfuscating Android Triada malware

The Triada malware has received a lot of news coverage recently. Kaspersky was one of the first firm to publish an analysis of this Trojan earlier last week.

The code is obfuscated, and most strings are encrypted. The string encryption algorithm is trivial, but ever-changing across classes: bytes are incremented or decremented by constant values, either stored in a default decryptor method, or retrieved via calls to other methods. The result is something quite annoying to handle if you decide to perform a serious static analysis of the file.

Encrypted string buffers in Triada. Decryption routines can be seen in the decompiled class on the right-hand side.

Our intern Ruoxiao Wang wrote a very handy decryption script for Triada. It needs customizing (the decryption keys are not automatically retrieved) on a per-class basis, but the overall effort is a couple of seconds versus hours spending doing tedious and repetitive semi-manual work.

The script will decrypt the encrypted byte arrays and replace the decompiled Java fields supposedly holding the final strings by their actual value, as seen in the picture below.

Decrypted strings. Comments (in the left-side red box) indicate the string use was not found via xrefs. The right-side red box shows updated String fields after decryption.

The script can also be used as a tutorial on how to use the JEB Java AST API to look for and modify the AST of decompiled code.  (More examples be seen on our GitHub sample script repo.)

Download the Triada decryptor script here:
TriadaStringDecryptor.py

(Specific instructions are located in the script header.)

Version 0.2.9 of the PDF analyzer plugin is available

Update (9/13/2017): we open-sourced the PDF plugin. A compiled JAR binary is also available.

We have released version 0.2.9 of our PDF analyzer plugin for JEB2. This release adds support for XFA (XML Forms Architecture) fragment streams reconstruction and parsing.

In the following example, a malicious PDF file contains two XFA streams encoded with the unusual CCITTFFax encoder. Once decoded, JEB2 reassembles the decoded contents into a unit “32 0”. The XFA contains a malicious JavaScript snippet, also visible as a separate unit:

Reconstructed XFA data showing a malicious JavaScript snippet.
Notifications reported also show a dangerous Open action.

The malicious PDF file examined in this entry is available on VirusTotal.
SHA256: e108432dd9dad6ff57c8de6e907fd6dd25b62673bd4799fa1a47b200db5acf7c

Scanning PDF Files using JEB2

Update (9/13/2017): we open-sourced the PDF plugin. A compiled JAR binary is also available.

Update: Feb. 27: Slides – Automation How-To
Update: Dec. 3: List of notifications

In this blog post, we show how JEB2 can be used as a building block of a file analysis system. We will show how to use the Core API to create a headless client. That client will scan PDF files using the JEB2 PDF Analysis Module. Basics of the IUnit and co. interfaces is also demonstrated.

Source code on GitHub.

Sample execution output produced by the PDF Scanner

As this slide deck shows, the back-end and front-end components of JEB2 are separated. The official RCP desktop client uses the JEB2 Core API; other front-ends, like the PDF scanner, can be built using that same API.

JEB2 HL Architecture Diagram

Creating an Eclipse project

Let’s get started by creating a new code project. We will show how to do this in Eclipse.

0- Check your license of JEB2. Make sure to use a license that supports third-party client creation and the loading of third-party plugin. If you haven’t done so, download and drop the PDF module in your coreplugins/ sub-directory.

1- Clone our sample code repository: git clone https://github.com/pnfsoftware/jeb2-samplecode.git

2- Create a new Java project. The Java source folder should be rooted in the src/ directory.

3- Add the JEB2 back-end as a JAR dependency. The back-end software is contained in the file bin/cl/jeb.jar located within your installation folder. You may also want to link that JAR to the API documentation, contained in the doc/apidoc.jar file, or online at https://www.pnfsoftware.com/jeb/apidoc

Your Package Explorer view should now look like:

Package explorer view after setting up dependencies

5- Set up the execution options. The required Java properties for execution (jeb.engcfg and jeb.lickey) can be set in the Run Configurations panel (accessible via the Run menu). Example:

Example of a Run configuration

6- Open the com.pnf.pdfscan.PDFScanner source file. You are ready to execute main().

How the scanner works

Now, let’s focus on the scanner source code.

  • The JEB2 back-end is initialized when scanFiles() is called:
    • Use JebCoreService to retrieve an instance to ICoreContext
    • Create an IEnginesContext
    • Load a project within that context (IRuntimeProject)
    • Add artifact(s) and process them (ILiveArtifact)
      • We add a single file artifact per project in this example
    • Retrieve the products (IUnit)
      • We are retrieving the top-most unit only in this example
    • Analyze the unit (see assessPdf())
    • Close the project

[Note: A detailed explanation of the above concepts (core, engines, project, artifacts, units, etc.) is outside the scope of this tutorial. Refer to our Developer Portal for more information.]

Snippet of scanFiles()

The assessPdf() method evaluates PDF units. The evaluation performed by this sample scanner is trivial: we collect the notifications created by the PDF plugin during the analysis of the file, and see if they meet basic criteria.

About the Unit Notifications:

  • Any JEB2 plugin can attach notifications to its units. The PDF plugin does so. Notifications are meant to pin-point noteworthy areas of a unit or artifiact.
  • A notification has a “dangerosity level” ranging from 0 to 100. It also has a description, an optional address to point to which area of the unit the notification is associated with, etc.
  • The API offers standard notification types, ranging from “Interesting area” to “Definitely Malicious”.
Standard notification levels offered in the NotificationType enum

A PDF unit can contain several types of notifications. Example include: corrupt areas in stream; multiple encoding of stream; JavaScript; password-protected stream; invalid/illegal entries in stream; etc.

Link: Complete list of notifications issued by the PDF plugin.

Our simple scanner reports a file as suspicious if it contains at least 2 notifications that have a level >= 70 (POTENTIALLY_HARMFUL). These thresholds can be tweaked in the source code.

The assessPdf() routine

The screenshot below is a sample output produced by the PDF scanner:

Conclusion

The intent of this entry is to shed some light on the process of writing third-party clients for JEB2, as well as what and how to use notifications reported by Units. We encourage you to visit our Developer Portal to find additional documentations as well as the reference Javadoc of the API.

Red October Malware for Android

Blue Coat Systems recently released a paper about the Inception APT (also dubbed Cloud Atlas, it may be connected to the Red October APT). One component of this APT is an Android trojan, masquerading as a Whatsapp update package. It is able to record audio calls, as well as gather, encrypt and exfiltrate user information.

The 4 strings partially written in Hindi that have been speculated on are those:

redoctober-android-img1

redoctober-android-img2

redoctober-android-img3

For researchers wanting to have a peak inside the APK, we are providing JEB decompiled Java code for one such sample.

Download is here: cloudatlas-android-malware-decompiled.zip

FinFisher FinSpy Mobile app for Android decompiled

The fully decompiled code and assets of 421and.apk can be found here: FinSpyMobileAndroid-decompiled.zip (no password).

This particular APK, although not the latest, is not obfuscated and easily reveals most capabilities of the malware:

  • Location tracker
  • Information stealer (calendar, contact list, text messages, Whatsapp databases, etc.)
  • Remotely controlled through encrypted communication over SMS and data

A great recap of the full story can be read on Netzpolitik. Real time updates are on Twitter.

Decompiled Java code for Android MisoSMS

Yesterday was eventful on the Android malware front. After Mouabad reported by Lookout, FireEye reported MisoSMS. It might also have been reported by Sophos at roughly the same time.

The malicious application is used in several campaigns to steal SMS and send them to China, according to FireEye’s blog post.

Many of you would like to examine and study its code, that’s why I uploaded an archive with the source code decompiled by JEB 1.4, as well as a cleaned-up manifest. Link: MisoSMS_JEB_decomp_20131217

misosms_mainact

Decompiling Android Mouabad

Lookout has an interesting article about Android Mouabad. Yet another Korean SMS malware!

The APK fully decompiled by JEB 1.4 can be found here: mouabad_JEB_decomp_20131217.zip. I haven’t refactored or commented the code, these are raw decompiled classes.

mouabad_sms_receiver

Sample MD5 68DF97CD5FB2A54B135B5A5071AE11CF is available on Contagio.